Create an RMA from a Work Order
To create an RMA from a work order:
1. Locate the Case by searching in the sidebar or from a list view in the Work Order tab. Click the Work Order number from which you want to initiate an RMA.
2. Click Create RMA. The Create RMA screen is displayed as shown in the following screenshot.
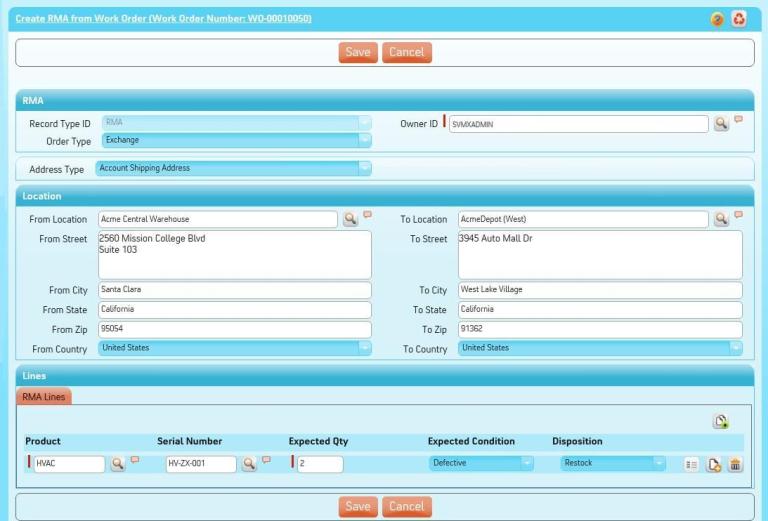
3. Select the owner of the RMA in the Owner ID field by using Lookup. Owner ID is usually the ServiceMax user who will be processing this RMA upon receipt. By default, it will be set to your user name.
4. Select Order Type as applicable.
5. In the From Location section:
a. Select an address type from Address Type. This automatically populates the selected address and disables the address field.
b. If you select a location using Lookup, the address fields are populated automatically. Alternatively, you can enter the address information manually by entering appropriate values in their respective fields.
6. Select an existing location using Lookup or enter the address in the To Location section.
7. In the RMA Lines section:
a. The product and serial number entered on the Work Order are automatically displayed in the first RMA line.
b. Enter a product and/or serial number using Lookup. When the installed product is selected, the product is not automatically calculated.
c. Enter Expected Qty, Expected Condition, and Disposition.
d. Click Add to add more product returns.
To delete one or more products entered, click Delete beside each record. |
8. Click Save to save the created RMA for a Work Order.
The following are the configurable options available for this screen. These settings can be adjusted by your ServiceMax admin.
• Default address type
• Mapping of fields between Work Order and RMA This includes your organization’s custom fields too.
This screen is presented by the Service Flow delivery engine of ServiceMax based on the service flow configuration. To learn more about how to use this screen’s features, see SFM Delivery. In addition, you can click the screen title or the help button to view additional help for this screen, if configured by your admin. |