Swimlane (dictionary item)

• In Studio 7.0 and earlier versions, General Flow Diagrams were named Activity Diagrams: If you created Activity Diagrams in Studio version 7.0 or earlier and have upgraded Modeler, your Activity Diagrams are now called General Flow Diagrams in Modeler. • Studio 7.1 included new Activity Diagrams, which you should use in preference to General Flow Diagrams. General Flow Diagrams are being deprecated and are included in Modeler only for backward compatibility. • Should you need to create General Flow Diagrams, they can now be created only from the Model or a Package. After creating a General Flow Diagram you can drag it to an Activity, Actor, Class, Interface, Event, Operation, Signal, Subsystem or Use Case. |
A Swimlane is used to organize the responsibility for actions on a General Flow Diagram.
You can create a Swimlane only through the General Flow Diagram. A Swimlane can appear on only one General Flow Diagram, and a Swimlane cannot exist unless it appears on a General Flow Diagram. Swimlanes do not appear in the Packages pane.
A Swimlane owns the nested Swimlanes and General Flow Diagram Nodes that are placed on it. If an Activity Node crosses the border of a Swimlane, the Activity Node is owned by the Swimlane in which the top left corner of an Activity Node resides. If you delete a Swimlane, the nested Swimlanes and General Flow Diagram Nodes it owns are also deleted.
If you add a symbol to the right of the right most Swimlane, the right most Swimlane extends so that the symbol can be added in the required position.
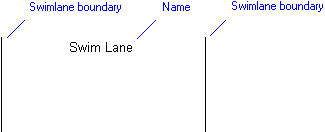
When used on a General Flow Diagram, a Swimlane's notation is as follows.

You can change the order and nesting of Swimlanes by dragging a Swimlane (drag its Name) to the required position. The Swimlane's nested Swimlanes and symbols are moved with the Swimlane.
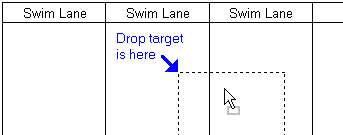
When you drag a Swimlane to a different position, the top left corner of the Swimlane outline determines the drop target, as shown here.  |
For information about adding and moving Swimlanes, see
Overview of adding and moving swimlanes (general flow diagram).
You can change the width of a Swimlane by selecting the right boundary, and then dragging a handle to the required position.
You can link a Swimlane to most dictionary item and diagram types in the Model by dragging the required item to the Swimlane's Name.
If you link a Swimlane to an item and you select the Swimlane on the General Flow Diagram, the Property Pages display properties of the linked item. If you want to view properties of the Swimlane, right-click the Name of the Swimlane, and then click Instance Properties.
The following view options can be applied to a Swimlane:
• Show Name - Displays the Name of the Swimlane or linked item on the diagram.
• Show Description - Displays the Description of the Swimlane on the diagram.
• Show Associated Item Name - Displays the Name of the linked item, rather than the name of the Swimlane.
• Show Full Name - Displays the scoped name of the Swimlane or linked item.
If both the Name and Description are displayed, the Name is displayed above the Description. |
The following sections provide information about how a Swimlane is used in the model. For more information about a property, item, model part or diagram, click it.
Properties
A Swimlane has these properties:
Owned by
Owns
Defined in these parts of the model
None. General Flow Diagrams are shown in the Miscellaneous folder of the Relationships pane.
Shown on these diagrams
For information about how the View Options affect the presentation of Swimlanes, see
Swimlane view options - general flow diagram.
Can be linked to these dictionary items
A Swimlane can be linked to most dictionary item and diagram types in the Model.
 General Flow Diagram
 Variant Diagram