Working with the Publisher HTML output format (Publisher)
When you select the Publisher HTML output, Publisher generates HTML files that allow you to use an internet browser to navigate through the structure of the extracted items, view diagram images and view the properties of items.
For information about which versions of internet browsers can be used to view the Publisher HTML output, see the Modeler Release Notes. Note that you cannot view Publisher HTML output using Microsoft Edge, because Microsoft Edge does not support local file access.
To view Publisher HTML output, start the default.htm file (or if you are using Google Chrome, start the Run Google Chrome.vbs file) that resides in the following folder:
<output path specified on Publisher Generate pane>\<title of document definition>
If you are using Microsoft Internet Explorer and it displays the following message, click the Allow Blocked Content button:
Note that if Internet Explorer removes the preceding message before you click the Allow Blocked Content button, refresh the view to see the message again.
Internet Explorer displays the preceding message when the Publisher HTML output is not in a trusted zone. To stop the message being shown, move the Publisher HTML output to a trusted zone.
If you want to transfer the HTML output to another computer, copy the output folder to the other computer.
When viewing the Publisher HTML output in an internet browser, three panes are available:
• The left pane shows the Search box and the structure of the extracted data in a browser so that you can quickly explore that data. The active item is high-lighted in the browser.
• The center pane shows items and diagrams that are associated with the active item. In addition, the center pane allows you to view the initial home page and diagram images.
• The right pane shows properties of the active item. This pane is not shown by default.
You can change the width of the panes:
• If you are not using Google Chrome, drag the pane dividers.
• If you are using Google Chrome, click on the appropriate pane resizing button.
There are three viewing options that can be set through the Display Settings/Hide Settings button:
• To show three or more items in the Center pane using a carousel, set the Display Item Carousel option to On. When the Display Item Carousel option is set to Off, the items are shown tiled.
• To show animation when opening and closing panes, set the Display Animation option to On.
• To use larger icons in the left pane, set the Display Large Navigation option to On. Larger icons are useful when using touch screens.
Display Settings/Hide Settings button
The Left Pane
The left pane shows the Search box and structure of the extracted data in a browser so that you can quickly explore that data. The active item is high-lighted in the browser.
To show or hide the left pane, click the Display Navigation/Hide Navigation button:
Display Navigation/Hide Navigation button
The Search box allows you to search for items. Type the text you want to search for and then click the Search button. The Publisher HTML output searches for the text string you enter in the name of each extracted item. The results of the search are displayed in the Center pane.
Search box and button
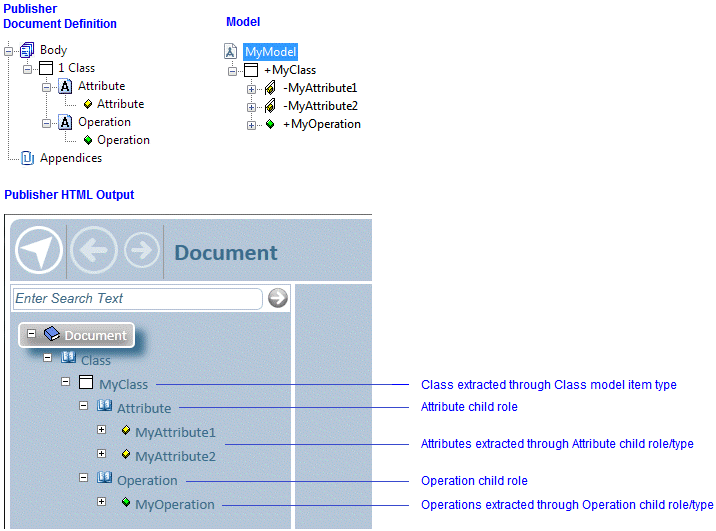
The left pane shows the items and diagrams that have been extracted through the structure defined in the Publisher Document Definition. The child roles defined in the Document Definition are also shown accordingly. For example:
To make a different item active, click the item:
• The center pane shows that active item's associated items (as extracted through the Document Definition) unless the active item is a diagram, in which case the center pane shows the diagram image.
• The right pane shows properties of that active item.
You can navigate back to previous active items through the Navigate Back button. After navigating back through previous active items you can then navigate forward through those items.
Navigate Back button
Navigate Forward button
If you want the content of the left pane to be structured in a similar way to that of the Packages pane in Modeler, use the 'Model Package Browser - HTML' document template to generate the Publisher HTML output.
The Center Pane
The center pane can show the following information:
• The initial home page.
• Items and diagrams associated with the active item.
• Diagram images.
On first starting the default.htm file, the center pane shows the initial home page that includes document information such as the document name and author.
You can return to the initial home page by clicking the Return To Home Page button.
Return To Home Page button
Items and diagrams associated with the active item
When the active item is not a diagram or an item with no associated items, the center pane shows items and diagrams that are associated with that active item (as extracted through the Document Definition).
When the active item has one or two associated items:
• The one or two items are shown and you can click an item to make it the active item.
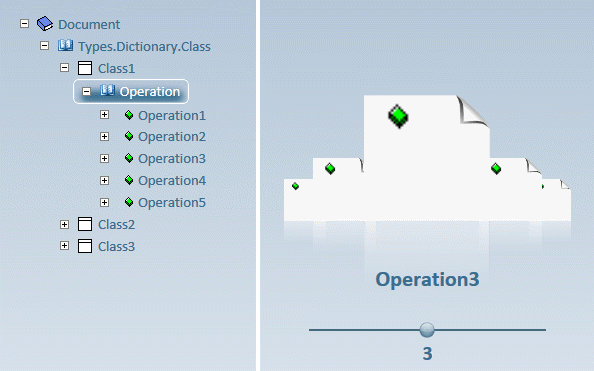
When the active item has three or more associated items:
• If the Display Item Carousel option is set to Off, the items are shown tiled.
• If the Display Item Carousel option is set to On, The items are shown using a carousel presentation.
In the preceding example you can see that Operation3 has the focus in the carousel. You can make a different item have the focus by clicking it, dragging the slider control or moving the mouse wheel forward or backward. Clicking the item that has the focus in the carousel makes that item the active item in the left pane.
If the carousel contains many items, you can reduce the number of items shown by performing a search of those items. Type the text you want to search for and then click the Search button. The carousel then displays only those items in which the searched text appears.
Search button
After performing a search, you can show all items again by clicking the Close Search Results button.
Close Search Results button
Diagram image
When the active item is a diagram:
• The center pane shows the diagram image.
• To zoom in or out of the diagram, move the mouse wheel forward or backward, or click the Zoom In or Zoom Out button.
Zoom Out button
Zoom In button
• To show all the diagram in the available space, click the Resize Diagram to Fit Windows button.
Resize Diagram to Fit Window button
• To view the extracted properties of a diagram item, click that diagram item. The properties are shown in the right-pane.
• When the active item is a diagram, the center pane shows the diagram image rather than the items and diagrams that are associated with that diagram. To show the items and diagrams that are associated with a diagram that is active item, click the Display Items Below This Diagram button.
Display Items Below This Diagram button
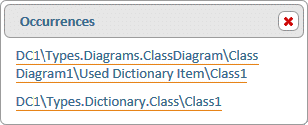
• To make an item on the diagram the active item, double-click that item. If two or more occurrences of the item have been extracted, the Occurrences dialog is opened for you to select which occurrence of the item you want to make active.
The Right Pane
The right pane shows properties of the active item.
To show or hide the right pane, click the Show Properties/Hide Properties button:
Display Properties/Hide Properties button
When shown, the right pane shows the extracted properties of the active item. When you click a hidden property, that property is shown. When you click a shown property, that property is hidden.
Note that if no properties have been extracted for the active item, the right pane displays a warning stating 'No properties defined for item'.
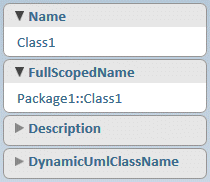
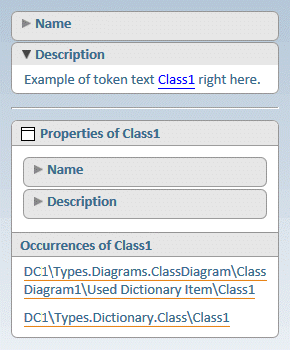
When a rich text property contains model object references (shown in blue underlined text), you can click the model object reference to see the properties of the referenced item. The properties of the referenced item are shown below the properties of the active item. The occurrences of the referenced item are shown so that you can make the referenced item active.
In the following example, the Class1 model object reference has been clicked. The properties of the referenced item are shown until another item is made active.
If the active item does not have any child or associated items, the center pane is hidden and the right pane expands to fill the space. When this is the case, a lock is shown on the Show Properties/Hide Properties button.