Business logic extension lab
|
Time Estimates for Completion
|
||
|---|---|---|
|
Customize Creo Elements/Direct Model Manager's business logic for your organization.
In this lesson you will extend a Creo Elements/Direct Model Manager class to include custom business logic and then configure the associated XML class to use your business logic.
|
Description:
|
1 minute
|
|
Lab exercise:
|
20 minutes
|
|
Description
By now, you should have completed the Basic customization and deployment lab and XML customization lab labs. This lab is based on Netbeans 11.0. If you are using a different Java development environment, you will need to translate the instructions for your IDE.
The basic pattern for customizing business logic is to extend the business class for the object and then register the extension in the XML file.
Try the lab exercise below to learn how to extend Creo Elements/Direct Model Manager's business logic.
Lab Exercise
In this lab you will add a custom business class that disallows letters that are easily confused in part names - specifically 'i', 'l', and 'o'.
This lab assumes that you have completed the Basic customization and deployment lab and the XML customization lab.
You also need to know whether your database uses the Data Management schema or Desktop schema.
Determine your database schema
1. Click the Search tab. In the What do you want to search for? pane, click Advanced.
2. Click the pulldown arrow under Search through and scroll through the list.
◦ If one of the choices is MODEL_3D, the database uses the Data Management schema.
◦ If one of the choices is me_model, the database uses the Desktop schema.
The major steps for extending Creo Elements/Direct Model Manager's business logic are:
Extend the Java code
Begin by creating a class that extends the base class, then adding the code for your business logic.
Data Management schema
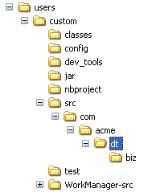
1. Using Windows Explorer, create a biz directory for the Java file (com\acme\dm\biz).
|
Java doesn't care how you name your directories, but Creo Elements/Direct engineers have found that maintaining a consistent directory structure makes it easier to find code later. The convention is to create the directory structure starting with "com" followed by the company name followed by the directory for the type of class. The class you will extend for this lab comes from the dm\biz directory, which holds business logic.
|
 |
2. In NetBeans, create the AcmeModel3D class.
3. Edit AcmeModel3D to look like the following (click here for a file you can copy and paste):
package com.acme.dm.biz;
import com.osm.biz.*;
import com.osm.exception.*;
import com.osm.dm.biz.DMModel3D;
public class AcmeModel3D extends DMModel3D {
public AcmeModel3D(WMSession theSession, int theHandle) throws WMException {
super(theSession, theHandle);
}
@Override
public void setName(String name) throws WMException {
if (name.indexOf('l') > -1) {
throw new WMException ("l not allowed in model name");
}
if (name.indexOf('o') > -1) {
throw new WMException ("o not allowed in model name");
}
if (name.indexOf('i') > -1) {
throw new WMException ("i not allowed in model name");
}
super.setName(name);
}
}
4. Compile the new class code with F9.
Desktop schema
1. Using Windows Explorer, create a biz directory for the Java file (com\acme\dt\biz).
|
Java doesn't care how you name your directories, but Creo Elements/Direct engineers have found that maintaining a consistent directory structure makes it easier to find code later. The convention is to create the directory structure starting with "com" followed by the company name followed by the directory for the type of class. The class you will extend for this lab comes from the dt\biz directory, which holds business logic.
|
 |
2. In NetBeans, create the AcmeDTModel class.
3. Edit AcmeDTModel to look like the following (click here for a file you can copy and paste):
package com.acme.dt.biz;
import com.osm.biz.*;
import com.osm.exception.*;
import com.osm.dt.biz.DTModel;
public class AcmeDTModel extends DTModel {
public AcmeDTModel(WMSession theSession, int theHandle) throws WMException {
super(theSession, theHandle);
}
@Override
public void setModelNo(final String modelNo) throws WMException {
if (modelNo.indexOf('l') > -1) {
throw new WMException ("l not allowed in model name");
}
if (modelNo.indexOf('o') > -1) {
throw new WMException ("o not allowed in model name");
}
if (modelNo.indexOf('i') > -1) {
throw new WMException ("i not allowed in model name");
}
super.setModelNo(modelNo);
}
}
4. Compile the new class code with F9.
Add the extension to the XML file
Creo Elements/Direct Model Manager uses XML files to control how database data is treated. The <BusinessObjectClass> tag is used to define the name of the Java class that will control a database class. Creating these classes is much easier than in the past because of the addition of the extends clause.
2. Add a class to the <ClassDefs> section with the following code, being very careful of capitalization:
Data Management schema:
<Class extends="DMModel, DMReleaseProcess">
<Name catalog="awm_stda" msg_num="258">MODEL_3D</Name>
<BusinessObjectClass>com.acme.dm.biz.AcmeModel3D</BusinessObjectClass>
</Class>
<Name catalog="awm_stda" msg_num="258">MODEL_3D</Name>
<BusinessObjectClass>com.acme.dm.biz.AcmeModel3D</BusinessObjectClass>
</Class>
Desktop schema:
<Class extends="DTModel, DTReleaseProcess">
<Name catalog="awm_stda" msg_num="10">me_model</Name>
<BusinessObjectClass>com.acme.dt.biz.AcmeDTModel</BusinessObjectClass>
</Class>
<Name catalog="awm_stda" msg_num="10">me_model</Name>
<BusinessObjectClass>com.acme.dt.biz.AcmeDTModel</BusinessObjectClass>
</Class>
Test the extension
You can run the code from NetBeans, without having to install it. If you want to debug your Java code, see How to start the NetBeans debugger for instructions on attaching the NetBeans debugger to Creo Elements/Direct Model Manager.
1. In NetBeans, display the dev.properties file, and modify run.mode to OSDM.
2. Execute the Run Main Project script. Creo Elements/Direct Modeling will start.
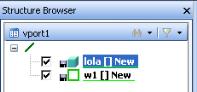
3. In Creo Elements/Direct Modeling, change the name of the part p1 to "lola".
4. Start Creo Elements/Direct Model Manager from Creo Elements/Direct Modeling's > menu.
5. In the Creo Elements/Direct Modeling Structure Browser, right-click lola, then choose > .
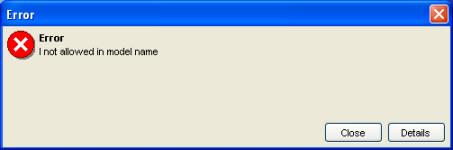
6. You will get the error message you put in your exception.
Deploy the extension
Package and test on your local Software Distribution Server. Prepare a package for deployment on the final Software Distribution Server.
1. In NetBeans, edit dev.properties, ensuring that mm.force.update is true, and that sds.host is the fully qualified name of your local machine.
2. Execute the Build and Package Project script. This will build and install the package on the local machine.
3. Test the extension by:
◦ Starting Creo Elements/Direct Modeling from the Windows Start menu,
◦ Enabling Creo Elements/Direct Model Manager (select acme if asked for a configuration),
◦ Changing the name of p1 to lola,
◦ Trying to save lola. The extension is working if you see your error message in an Error dialog.
4. Edit dev.properties and set sds.host to the fully qualified name of the final Software Distribution Server. This produces a zip file in your working directory.
5. Move the zip file to the SD Server and unzip it at the top of the install directory. When users start Creo Elements/Direct Model Manager, they will be forced to install the new version of Creo Elements/Direct Model Manager with your extension.