How to start the NetBeans debugger
The instructions in this article will show you how to attach the Netbeans 11.0 debugger to Creo Elements/Direct Model Manager. See How to set up NetBeans for instructions on setting up Netbeans 11.0 for Creo Elements/Direct Model Manager customization.
These instructions are provided as-is, and are not supported by Creo Elements/Direct R&D or Technical Support. They are provided to offer guidance, but your computer or needs may require additional steps that are not addressed by this documentation. Please refer to the Sun Developer Network Web site for technical guidance if you have any problems.
Overview
The steps required to attach the NetBeans debugger to Creo Elements/Direct Model Manager are:
2. Start the application – execute the run script.
Configure dev.properties
Begin by setting the application you want to invoke Creo Elements/Direct Model Manager or Creo Elements/Direct Drawing Manager.
1. In the NetBeans Files tab, select dev.properties, right-click and choose Edit.
2. Change run.mode to:
◦ OSDM for Creo Elements/Direct Model Manager
◦ OSDD for Creo Elements/Direct Drawing Manager
See the dev.properties file for an explanation of the properties.
Start the application
Start Creo Elements/Direct Modeling or Creo Elements/Direct Drafting from NetBeans.
1. Right-click the run script in the dev_tools directory and choose > . NetBeans will start the application you choose. (The application is often started behind other windows. If you don't see it, try minimizing other windows until you find it.)
2. If you started Creo Elements/Direct Modeling, start Creo Elements/Direct Model Manager by selecting Model Manager from > .
3. Log in to Creo Elements/Direct Model Manager or Creo Elements/Direct Drawing Manager as you normally would.
Attach the debugger
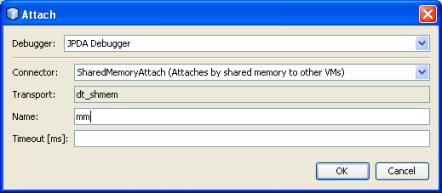
Once Creo Elements/Direct Model Manager is running, you can have the debugger attach to it.
1. In NetBeans, choose > .
2. Set Debugger to JPDA Debugger.
3. Set Connector to SharedMemoryAttach.
4. Enter mm for the name.
5. Click OK.

The debugger window will open in NetBeans and you may begin debugging. See the NetBeans online help for instructions on using the NetBeans debugger.