Add a Reserve Web Service method
You can add a new Web Services by creating and implementing Java classes for the required behaviour.
To add the Web Services, perform the following steps:
Prerequisites
You must have the NetBeans customization environment. Click here for more on NetBeans installation.
Setup
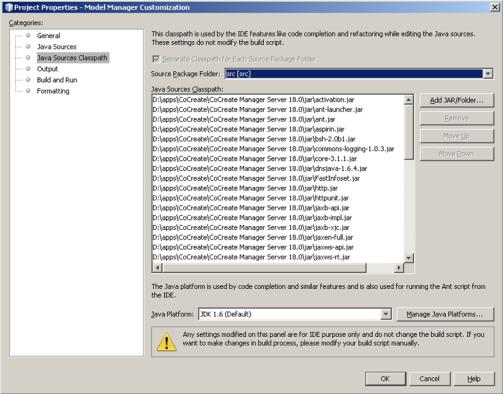
1. Add the JAR files to the project libraries:
a. Click > , in the NetBeans IDE.
b. Click Libraries. The Project Properties-Model Manager Customization window opens.
c. Click Add JAR/Folder.
d. Browse to the Creo Elements/Direct Manager Server installation directory (usually <Creo Elements/Direct Manager Server installation location>\jar) and select all the JAR files.
2. Create and implement the worker API:
a. In the Name and Location pane of the New Java Interface window, type IReserveService in the Class Name box.

b. Retain the remaining default values and click Finish. The IReserveService Java class is created.
c. Add the following code to the IReserveService Java class:
package com.acme;
import java.rmi.Remote;
public interface IReserveService extends Remote {
public void reserveElement(final String elid) throws java.rmi.RemoteException, Exception;
public void unreserveElement(final String elid) throws java.rmi.RemoteException, Exception;
}
import java.rmi.Remote;
public interface IReserveService extends Remote {
public void reserveElement(final String elid) throws java.rmi.RemoteException, Exception;
public void unreserveElement(final String elid) throws java.rmi.RemoteException, Exception;
}
d. In the Name and Location pane of the New Java Class window, type ReserveServiceImpl in the Class Name box.
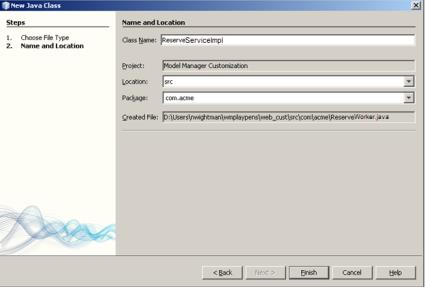
e. Retain the remaining default values and click Finish. The ReserveServiceImpl Java class is created.
f. Add the following code to the ReserveServiceImpl Java class:
package com.acme;
import java.rmi.RemoteException;
import java.rmi.server.UnicastRemoteObject;
import com.osm.biz.WMElement;
import com.osm.biz.WMSession;
public class ReserveServiceImpl extends UnicastRemoteObject implements IReserveService {
public ReserveServiceImpl() throws RemoteException {
super();
}
public void reserveElement(final String elid) throws Exception {
final WMElement element = WMSession.getWMSession().openElement(elid, false);
try {
element.reserve();
} finally {
element.close();
}
}
public void unreserveElement(final String elid) throws Exception {
final WMElement element = WMSession.getWMSession().openElement(elid, false);
try {
element.unReserve();
} finally {
element.close();
}
}
}
3. Create the Web Service:
a. In the Name and Location pane of the New Java Class window, type ReserveWebService in the Class Name box.
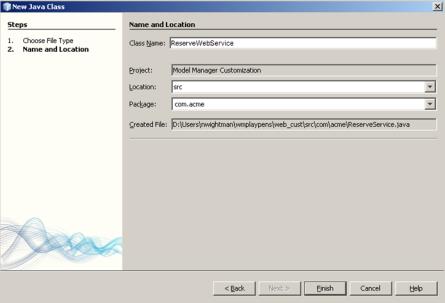
b. Retain the remaining default values and click Finish. The ReserveWebService Java class is created.
c. Add the following code to the ReserveWebService Java class:
package com.acme;
import javax.jws.WebMethod;
import javax.jws.WebParam;
import javax.jws.WebService;
import com.osm.services.webservice.JettyServer;
@WebService(name = "ReserveService", serviceName = "ReserveService")
public class ReserveWebService {
@WebMethod(operationName = "reserveElement")
public void reserveElement(@WebParam(name = "elid")
final String elid) throws Exception {
try {
final IReserveService s = JettyServer.getInstance().get(IReserveService.class);
s.reserveElement(elid);
} catch (Throwable t) {
throw new RuntimeException(t);
}
}
@WebMethod(operationName = "unreserveElement")
public void unreserveElement(@WebParam(name = "elid")
final String elid) throws Exception {
try {
final IReserveService s = JettyServer.getInstance().get(IReserveService.class);
s.unreserveElement(elid);
} catch (Throwable t) {
throw new RuntimeException(t);
}
}
}
d. The ReserveWebService Java class now implements a Web Service and provides the external API for reserving elements. The API accepts an argument called elid.
When the ReserveWebService is executed it requests the JettyServer class to find a worker. The worker then provides the IReserveService interface and calls the reserveElement to do the task.
4. Build the customization:
a. Right-click the ReserveWebService Java class and choose Build. The build creates a custom.jar file.
b. Copy the custom.jar file to <Creo Elements/Direct Manager Server installation location>/jar/custom.
5. Register the worker API:
a. Create a copy of the ServiceControllerConfig.xml file located in the Creo Elements/Direct Manager Server installation directory and rename it to CustomServiceControllerConfig.xml.
b. Edit the CustomServiceControllerConfig.xml file as follows to add a new PublishAPI tag to each JettyWorker entry in the XML file.
<!-- Enable the ReserveService api -->
<PublishedAPI implementation="com.acme.ReserveServiceImpl" interface="com.acme.IReserveService"/>
<PublishedAPI implementation="com.acme.ReserveServiceImpl" interface="com.acme.IReserveService"/>
You must manually add or remove the JettyWorker tags in the CustomServiceControllerConfig.xml file to change the number of Jetty Workers. |
6. Register the Web Service:
a. In <Creo Elements/Direct Manager Server installation location>/webapps/, create a directory structure as follows:

b. Create a web.xml file in <Creo Elements/Direct Manager Server installation location>/webapps/custom/WEB-INF according to the servlet web application specifications. For example,
<?xml version="1.0" encoding="UTF-8"?>
<web-app version="2.5"
xmlns="http://java.sun.com/xml/ns/javaee/"
xmlns:xsi="http://www.w3.org/2001/XMLSchema-instance"
xsi:schemaLocation="http://java.sun.com/xml/ns/javaee
http://java.sun.com/xml/ns/javaee/web-app_2_5.xsd">
<display-name>OSM Web Services</display-name>
<listener>
<listener-class>com.sun.xml.ws.transport.http.servlet.WSServletContextListener</listener-class>
</listener>
<servlet>
<servlet-name>ReserveService</servlet-name>
<servlet-class>com.sun.xml.ws.transport.http.servlet.WSServlet</servlet-class>
<load-on-startup>1</load-on-startup>
</servlet>
<servlet-mapping>
<servlet-name>ReserveService</servlet-name>
<url-pattern>/ReserveService</url-pattern>
</servlet-mapping>
<security-constraint>
<display-name>Web Services</display-name>
<web-resource-collection>
<web-resource-name>ReserveService</web-resource-name>
<description/>
<url-pattern>/ReserveService</url-pattern>
<http-method>PUT</http-method>
<http-method>POST</http-method>
<http-method>OPTIONS</http-method>
<http-method>TRACE</http-method>
<http-method>DELETE</http-method>
</web-resource-collection>
<auth-constraint>
<role-name>osm-user</role-name>
</auth-constraint>
<user-data-constraint>
<transport-guarantee>NONE</transport-guarantee>
</user-data-constraint>
</security-constraint>
<login-config>
<auth-method>BASIC</auth-method>
<realm-name>osmRealm</realm-name>
</login-config>
</web-app>
c. Create a sun-jaxws.xml file in <Creo Elements/Direct Manager Server installation location>/webapps/custom/WEB-INF to define the web service endpoint according to the jax-ws specification. For example,
<?xml version="1.0" encoding="UTF-8"?>
<endpoints version="2.0" xmlns="http://java.sun.com/xml/ns/jax-ws/ri/runtime">
<endpoint name="ReserveService" implementation="com.acme.ReserveWebService" url-pattern="/ReserveService"/>
</endpoints>
<endpoints version="2.0" xmlns="http://java.sun.com/xml/ns/jax-ws/ri/runtime">
<endpoint name="ReserveService" implementation="com.acme.ReserveWebService" url-pattern="/ReserveService"/>
</endpoints>
d. Register the web application in the CustomServiceControllerConfig.xml file by adding the new XML tags within the JettyServer tag but above the War tag. An example of the War tag follows,
<War context="/custom" location="webapps/custom/"/>
e. Restart the Web Services. The Jetty Worker now loads the new published worker API and the Jetty Server loads the web application.
7. Verify the Web Service:
You can use one of the following options to verify the Web Service:
a. The http://localhost:8580/custom/ReserveService?wsdl address.
b. The Soap User Interface for the simple testing. For more information, see http://www.soapui.org/.
c. The NetBeans Java application to test the Web Services. For more information, see How to write a Java client for Creo Elements/Direct Model Manager Web Services.