How to set up NetBeans
These instructions are designed to help you set up a development environment for Creo Elements/Direct Model Manager 20.6 Java customization using NetBeans 11.0.
These instructions are provided as-is, and are not supported by Creo Elements/Direct R&D or Technical Support. They are provided to offer guidance, but your computer or needs may require additional steps that are not addressed by this documentation. Please refer to the Sun Developer Network Web site for technical guidance if you have any problems.
You may use any Java Integrated Development Environment (IDE) for developing extensions for Creo Elements/Direct Manager Server. Creo Elements/Direct developers use the NetBeans IDE (a free, open-source IDE - see www.netbeans.org). The following instructions will help you set up your development environment.
|
|
If you are running Windows 11 or Windows 10, you need to do one of the following to be able to run the development environment:
• Turn off the User Account Control (UAC).
• Give yourself "Full Control" on the Creo Elements/Direct Manager Server 20.6 directory (and all subdirectories and files).
• Run NetBeans as an administrator (right-click and click Run as administrator).
|
Overview
|
|
The development environment for Creo Elements/Direct Model Manager 20.6 is not supported on Windows 2000.
|
The steps required to set up your development environment are:
C:\users\custom
C:\users\custom\classes
C:\users\custom\config
C:\users\custom\src\com
C:\users\custom\src\com\acme
C:\users\custom\test
C:\users\custom\WorkManager-src
◦ Copy dev_tools and nbproject to C:\users\custom
|
|
To activate Part Library from Creo Elements/Direct Model Manager NetBeans development environment, you must copy the tsmmcatalog.jar file located in C:\Program Files\PTC\Creo Elements\Direct Manager Server 20.6\jar to the jar directory in your development environment.
|
8. Verify setup by executing the build and run scripts
Install Java, NetBeans, Creo Elements/Direct Manager Server, Creo Elements/Direct Model Manager, and Creo Elements/Direct Modeling or Creo Elements/Direct Drafting
We recommend that you uninstall any previous versions of NetBeans or the Java SE Development Kit.
Download and install NetBeans and the Java SDK
1. Install the Java SE Development Kit (JDK 11). This version can be downloaded from: http://java.sun.com/javase/downloads/index.jsp (you may need to look under Previous Releases). The default install directory is: C:\Program Files\Java\jdk1.11.0_<release_number>.
2. (Optional) Download the Java documentation from the same page where you downloaded JDK 11. Unzip the documentation into C:\Program Files\Java\.
◦ The documentation will be placed in: C:\Program Files\Java\docs.
◦ The javadoc index will be in: C:\Program Files\Java\docs\api\index.html.
3. Install NetBeans. This document is based on NetBeans version 11.0, which can be downloaded from http://www.netbeans.org/.
The Web Services customization uses the GlassFish V2 application server, which may be installed with NetBeans (part of the Web & Java EE or the All installer).
Install Creo Elements/Direct Manager Server, Creo Elements/Direct Model Manager and Creo Elements/Direct Modeling or Creo Elements/Direct Drafting
1. Install Creo Elements/Direct Manager Server, the Software Distribution Server, and the Web Services Server on your development system using the instructions in the Creo Elements/Direct Manager Server Installation Guide. The Software Distribution Server must be installed on your development system for you to package customizations.
2. Install Creo Elements/Direct Modeling or Creo Elements/Direct Drafting.
Update your path
Add the clntwin directory to your Windows Path variable.
1. Go to your computer's Control Panel.
2. Double-click System.
3. Select the Advanced tab in the System Properties dialog.
4. Click Environment Variables.
5. Scroll to the Path variable and select it.
6. Click Edit.
7. Append the path to the Creo Elements/Direct Manager Server clntwin directory (usually C:\Program Files\PTC\Creo Elements\Direct Manager Server 20.6\clntwin).
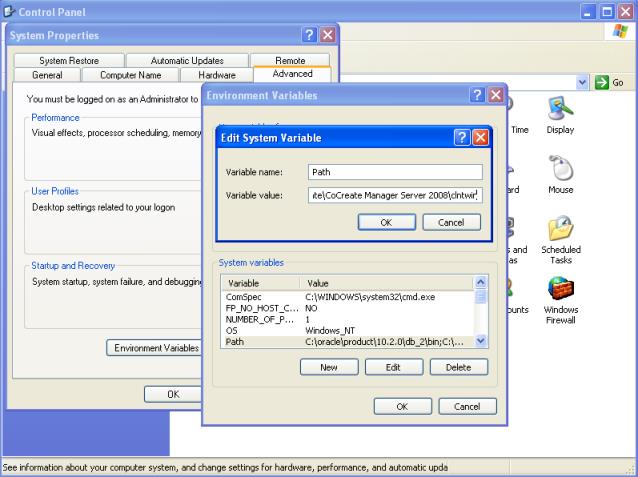
8. Click OK in all of the dialogs.
Create working directories
Create a working directory for your development. This document assumes the working directory is C:\users\custom.
In Windows Explorer, create the following directory structure: • <working directory> C:\users\custom • <working directory>\classes C:\users\custom\classes • <working directory>\config C:\users\custom\config • <working directory>\src C:\users\custom\src • <working directory>\src\com C:\users\custom\src\com • <working directory>\src\com\<project name> C:\users\custom\src\com\acme • <working directory>\test C:\users\custom\test • <working directory>\WorkManager-src C:\users\custom\WorkManager-src |  |
Copy files to your working directory
1. In Windows Explorer, the copy custom.xml file from the Creo Elements/Direct Manager Server install directory (C:\Program Files\PTC\Creo Elements\Direct Manager Server 20.6) to your working directory.
2. Rename custom.xml to <project name>.xml (e.g. acme.xml)

Extract Creo Elements/Direct Manager Server source files
1. Navigate to the WorkManager-src.jar file
(C:\Program Files\PTC\Creo Elements\Direct Manager Server 20.6\debug)
2. Using your favorite tool that can extract individual files from a jar file, extract the source files to C:\users\custom\WorkManager-src.
3. Copy C:\users\custom\WorkManager-src\com\osm\custom\dev_tools to C:\users\custom.
Copy C:\users\custom\WorkManager-src\com\osm\custom\nbproject to C:\users\custom.
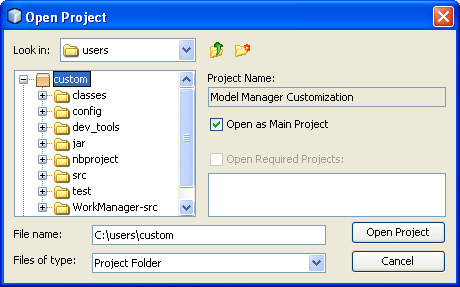
Open the acme project
1. Double-click the NetBeans IDE 11.0 shortcut on your Desktop (or choose > from the Start menu).
2. Choose > . Navigate to the C:\users directory, select custom, and click Open Project.
Verify server configuration
1. In the Files tab, double-click the re-named custom.xml file (acme.xml in this example) under the top level of the working directory.
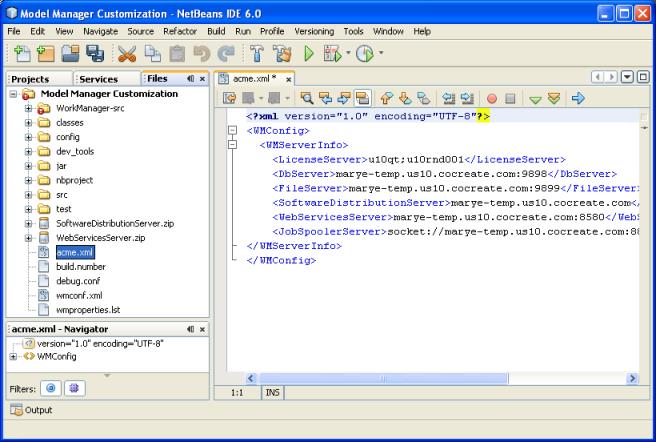
2. Check the server locations and change if necessary. Save the file if you made changes.
Configure the Javadoc documentation (optional)
1. Choose > .
2. In the Library Manager dialog, click the Classpath tab.
3. Click Add JAR/Folder.
4. Navigate to the jar directory in the install directory, C:\Program Files\PTC\Creo Elements\Direct Manager Server 20.6\jar. Select WorkManager.jar and click Add JAR/Folder.

5. In the Library Manager dialog, click the Sources tab.
6. Click Add JAR/Folder.
7. Navigate to the debug directory in the install directory, C:\Program Files\PTC\Creo Elements\Direct Manager Server 20.6\debug. Select WorkManager-src.jar and click Add JAR/Folder.

8. In the Library Manager dialog, click the Javadoc tab.
9. Click Add ZIP/Folder.
10. Navigate to the javadoc directory in the install directory, C:\Program Files\PTC\Creo Elements\Direct Manager Server 20.6\doc\C\javadoc and click Add ZIP/Folder.

11. Close the Library Manager dialog.
Configure dev.properties
You must edit dev.properties to match your configuration. The file contains a description for each setting.
1. In the Files tab, double-click Model Manager Customization\dev_tools\dev.properties.
2. Edit the file to match your configuration.
Settings that may need editing
◦ osm.dir
◦ modeling.dir
◦ osdm.mels.host
◦ drafting.dir
◦ jdk.dir
Directory names in this file cannot contain spaces. You can avoid this by specifying directory names in the 8.3 format. To find a directory's converted name, open a command prompt and type dir /x.  |
3. Save your changes.
Verify setup
1. Build the project. In the Projects tab, right-click your project and choose Build.
2. Run the project. In the Projects tab, right-click your project and choose Run.