◦ From the table toolbar, click the new activity icon  .
.
..Plan | If the context you are working within has more than one plan, you can select a plan from the drop-down menu. | ||
Activity | This field is optional. • If you leave this field blank, the new activity is added to the bottom of the Schedule table. • If you want to position your new activity relative to an existing activity, click the find icon  to open a new window that you can use to search for activities. to open a new window that you can use to search for activities.
| ||
Relative Position | This menu is only active when you have selected an activity in the Activity field: • Insert Activity Above—The new activity will be positioned above the selected existing activity in Schedule table. • Insert Activity Below—The new activity will be positioned below the selected existing activity in Schedule table. • Insert Activity as a Child—The new activity is added as a child activity to the selected existing activity. |
If you are creating a milestone, select the Mark activity as milestone checkbox before entering information. This removes inapplicable fields whose values are ignored once the milestone is created. |
If you are creating an activity that you plan on converting into a summary activity, note the following: • Summary activities cannot have resource assignments and most attributes are calculated based on the information provided for their child activities. If already added, the resource assignments and scheduling constraints are automatically removed when you convert the activity into a summary activity. If you later convert the summary activity back into an activity, all your previous attributes are lost. For more information, see Summary Activity Calculation Example. • Summary activities can only have the As Soon As Possible or the Start No Earlier Than scheduling constraint types. If you convert an activity that has the As Late As Possible or Must Finish On constraint, the constraint type is automatically converted to As Soon As Possible. |
Type | If an administrator has created custom activity types, the Type drop-down menu appears. | ||
Activity Name | The name of the activity. This can be up to 225 characters. | ||
Description | A brief summary of the activity. | ||
Owner | The team member who is responsible for the successful completion of the activity. Owners can track activity work and edit activity attributes. The activity owner can also be assigned as a resource.
|
Constraint | Select one of the following options: • As Soon As Possible—The activity is started at the earliest possible date. The start date is the plan start date or is calculated based on any predecessor relationships. • Start No Earlier Than—Click the calendar icon  to define a constraint date. The activity can start either on the constraint date or later than the constraint date, but it cannot start earlier. to define a constraint date. The activity can start either on the constraint date or later than the constraint date, but it cannot start earlier.• As Late As Possible—The activity finish date is scheduled at the latest possible date. The finish date is the plan finish date or is calculated based on any successor relationships. • Must Finish On—Click the calendar icon to define a constraint date. The activity cannot be completed before the constraint date, and must finish on the exact date specified.For more information, see Activity Date Constraints. |
Estimated Start Estimated Finish | You can only specify one of the following fields. Setting one field automatically calculates the others: • Estimated Start—This field only applies to activities with the Must Finish On constraint. Click the calendar icon to set the estimated start date.• Estimated Finish Date—This field only applies to activities with the Start No Earlier Than or As Soon As Possible constraints. Click the calendar icon to set the estimated finish date.• Duration—Use the following unit indicators when specifying duration: ◦ Minutes: m, min, mins, minute, minutes ◦ Hours: h, hr, hrs, hour, hours ◦ Days: d, dy, dys, day, days ◦ Weeks: w, wk, wks, week, weeks ◦ Months: mo, mon, mons, month, months |
Predecessors | A coded entry that describes how the activity is related to other activities within the project plan. For information on how to specify dependencies, see Predecessor Relationships. |
The estimated or planned amount of time required to complete the activity. This is typically entered in hours, but you can also use the unit indicators described above. |
 to open a new window from which you can select from all project resources filtered by type.
 .
.If you do not assign a resource and the Default Resource Assignments preference is set to Yes, a default resource assignment is automatically created for the activity owner. If no owner is assigned to the activity, then the resource assignment is created on your behalf as the activity creator. For more information, see Project Planning Preferences. |
Enter the percentage of workday hours that the resource can devote to the activity. For example, assigning 50 units to a resource who works a standard 8-hour workday means that resource can spend 4 hours per day working on the activity, or 20 hours per week in a 5-day work week.
| |||
If the resource is a Windchill User or Other resource type, then this field is set to Single and cannot be changed. If the resource is a Windchill Group or Windchill Team Role user type, then you can select from the following options: • Pool—Work is initially assigned to all users included in the group or role. When one user accepts the work, the corresponding assignment is removed from the assigned tasks of the other users. • Bulk—Work is split evenly between all members of the resource group or role. A distinct assignment is created for each user. • Shared—Work is assigned to all members of the resource group or role. Members complete work as they are able, and their work is added towards the overall completion status. One or more assignees can complete work; however, not all assignees are required to complete a task. |
Deadline | The date after which the activity is considered overdue. Click the calendar icon to select a specific date from the calendar and select a specific time using the drop-down menu.The deadline is displayed in red when it has passed.
| ||
Activity schedule is determined based on three variables: activity duration, work required to complete the activity, and resource availability. Choosing a task type allows you to define a fixed variable. The task type is only relevant if you later edit the activity to change one of the scheduling variables, and has no effect if you are not assigning resources to the activity. • Fixed Units—Set a fixed amount of resource units. Windchill does not change the resource units if you change the duration of the activity or work required. • Fixed Duration—Set a fixed amount of time required to complete the activity. Windchill does not change the activity duration if you add or remove resources or change the amount of work required by the activity. • Fixed Work—Set a fixed amount of work required to complete the activity. Windchill does not change the amount of work required to complete the activity regardless of whether you add or remove resources or change the activity duration.
For more information, see Task Types and Effort Driven. | |||
In an effort-driven activity, the work remains constant when you add or remove resources. Select this option to recalculate the duration of the activity when resources are added or removed, while the amount of work necessary to complete an activity remains unchanged. For more information, see Task Types and Effort Driven. | |||
Fixed Cost | Any unique cost associated with the activity that do not include resource costs. |
Status | Select one of the following: •  Green—Indicates that there are no risks or obstacles; ready to proceed. Green—Indicates that there are no risks or obstacles; ready to proceed.•  Yellow—Indicates caution; check before proceeding. Yellow—Indicates caution; check before proceeding.•  Red—Indicates an alert of high risk; do not proceed. Red—Indicates an alert of high risk; do not proceed.You cannot edit this field if the activity has assigned resources, if it is a summary activity, or if the activity type is configured to automatically calculate the status. For more information, see Project Status. |
Status Description | A brief explanation of the status setting. |
Risk | Identifies the probability that the activity can be completed by the due date. Possible values are Very High, High, Medium, Low, Very Low, and Unavailable. |
Risk Description | A brief explanation of the risk setting. |
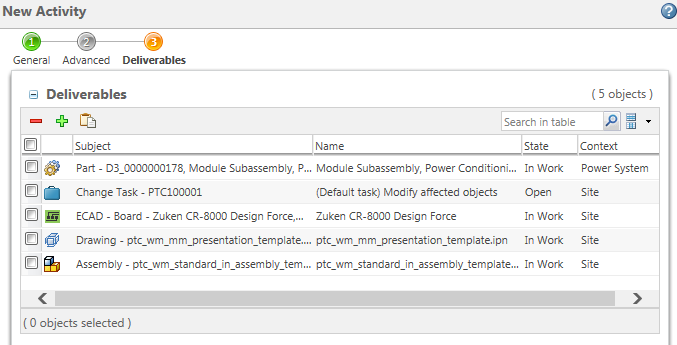
| Open the Find Subject Objects For Activity window. From here, you can search for eligible object types. Only eligible objects appear in the Search Results table. Whether an object is eligible depends on the tracking policy you selected and the context of the plan activity: • Project activities—The subject object must be located within the same project context. This can include objects that are shared to the project from a PDM context. • Program activities—The subject object must be located within the same program context. • Product activities—The subject object can be located in any PLM context (for example, a product, library, or quality context). You cannot include objects located in projects or programs. |
| Remove selected objects. |
 | Paste one or more objects from the clipboard. If you have ineligible objects included in your clipboard, only the eligible objects are added. An error message appears to alert you that ineligible objects have been rejected. |