You can offset any number of faces or recognized features belonging to parts. Using the Offset command you can:
• offset single faces
• modify the wall thickness of some faces of a shelled body
• modify the offset of a shelled body
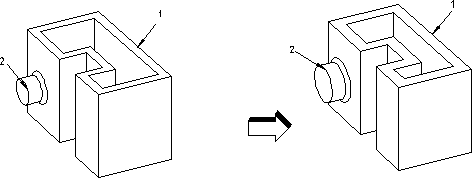
The figure above shows the following:
• The offset of the shell (1) has been modified by a negative value. A negative offset value means that the face or feature is offset inwardly.
• The offset of the boss (2) has been modified by a positive value. A positive offset value means that the face or feature is offset outwardly. The boss also has been blended. Blends are kept with their original radius.
All attributes are kept for faces which are offset.
To offset a face or recognized feature,
1. Click Modeling and then, in the Modify 3D group, click More.
2. Click Offset in the Modify section. The Offset dialog box opens.
3. Select the face(s) or feature(s) to offset:
◦ Click Faces and select a face to offset in the viewport. Press Shift to select multiple faces.
◦ Click Rec.Feat and select a feature to offset in the viewport. Press Shift to select multiple features.
You can select any of the following feature types from Feat Select:
• Automatic (selects the boss/pocket, rib, or slot with the smallest number of faces)
• Boss/Pocket
• Rib
• Slot
• Boss
• Pocket
• Composite Boss
• Composite Pocket
4. Set the following options:
◦ Keep Tan: Preserve the tangential transitions between neighboring faces. Click Control to fix or unfix edges and faces. If you choose not to Keep Tan, smooth tangential transitions are replaced by edges.
◦ Redo Blend: Allow the operation to make automatic adjustments to blends. Click Control to specify the blends to redo.
◦ Offset Selected Blends: Automatically changes the radii of selected blends.
Example A was offset without this option. Example B was offset with Offset Selected Blends.
◦ Chk & Fix: Use when you suspect a part is corrupt. Chk & Fix checks for self-intersections, knife edges, and void shells and attempts to fix them. If a part fails the check and fix, it is not modified and remains in its original state. Type the offset value in Distance.
5. Click Preview to see the impact of changes before accepting them.
6. The Upd Rels option is available when the Parametrics module is active. Select this option to update relations with your changes.
You can toggle between Realistic and Quick to see either realistic feedback or quick feedback when you offset a face or a recognized feature in the viewport. See
Realistic feedback.
7. Click Next to finish the operation and offset another face or recognized feature.
8. Click to complete the operation.
Limitations
• You cannot offset a freeform blend without adjacent faces and dependent blends.
• If you offset an analytic blend without adjacent faces the blend can no longer be modified.
• A face which has vertices with more than 4 edges cannot be offset.
• If you offset a face which has been chamfered, the chamfer can no longer be modified.
• It is not possible to select a blended face for offsetting while specifying that the same blended face be recreated using its original dimension with Redo Blend.
• If you select the Redo Blend option, the system will attempt to recreate the blend with the same blending options. However, in some situations that may not be possible. If the blend was created with the RollAtSharp or RollAtSmooth options, the blend may be recreated without those options.
• If you use the Offset command on multiple parts, the successful operations are displayed as a partial result and the failures are displayed as labels (error feedback). The feedback labels are attached to the faces, on which the operation has failed.
 Offset in the Modify section. The Offset dialog box opens.
 to complete the operation.