If dimension and extension lines become crowded or overlapped on the drawing, you can adjust the lines to preserve the clarity of the dimensioning. Extension and dimension lines can be broken, and extension lines can be staggered. Any modifications to the lines can be reset later.
Note that modified lines are automatically reset if the dimension is moved to within the range of the break or stagger.
To break, stagger, or reset dimension lines quickly and easily, follow the steps below:
To stagger an extension line,
1. Click Annotation and then, in the Annotate group, click Stagger; or
a. Select the dimension (with an extension line) in the viewport. The Option Mini Toolbar (OMT) opens.
b. Click on the OMT or right-click and select Stagger from the context menu.
2. Click the end point of the line stagger.
3. Click the position for the staggered line.
4. Continue clicking begin and end points or click to end the operation.
To modify a staggered line,
Click the handle at the point you wish to modify the line, and drag it to the desired location.
To break a dimension line or extension line,
1. Click Annotation and then, in the Annotate group, click Break; or
a. Select the dimension in the viewport. The Option Mini Toolbar (OMT) opens.
b. Click on the OMT or right-click and select Break from the context menu.
2. Click the end point of the line break.
3. Continue clicking begin and end points or click to end the operation.
To slant an extension line,
1. Click Annotation and then, in the Annotate group, clickSlant; or
a. Select the dimension (with an extension line) in the viewport. The Option Mini Toolbar (OMT) opens.
b. Click on the OMT or right-click and select Slant from the context menu. The Slant Line dialog box opens.
2. Select or type the slant angle in the Angle box.
3. Click to complete the operation.
To reset a broken, slanted or staggered extension line,
1. Click Annotation and then, in the Annotate group, click More.
2. Click Reset Line in the Dimension section; or
a. Select the dimension (with a staggered, broken, or slanted extension line) in the viewport. The Option Mini Toolbar (OMT) opens.
b. Right-click and select Reset Line from the context menu.
The following examples show how to stagger, break, slant, or reset an extension dimension line:
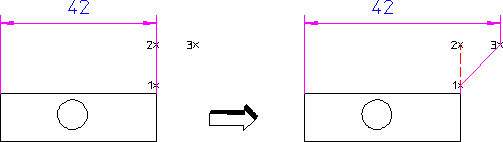
• To stagger an extension line,
1. Click Annotation and then, in the Annotate group, click Stagger.
2. Click the begin point for the stagger on the extension line (point 1 in the figure).
3. Click the end point for the stagger on the extension line (point 2).
4. Click the destination point for the stagger (point 3).
5. Continue staggering extension lines or click to complete the operation.
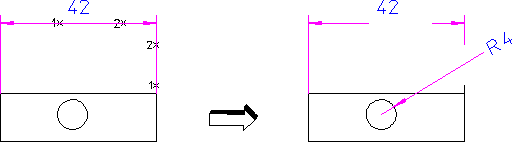
• To break a dimension line or extension line,
1. Click Annotation and then, in the Annotate group, click Break.
2. Click the begin point of the break on the dimension line or extension line (point 1 in the figure).
3. Click the end point for the break (point 2).
4. Continue breaking dimension or extension lines or click to complete the operation.
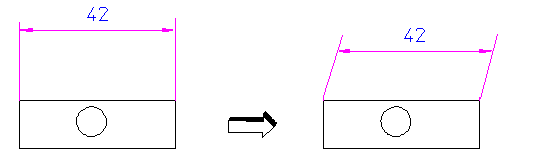
• To slant an extension line,
1. Click Annotation and then, in the Annotate group, clickSlant. The Slant Line dialog box opens.
2. Select or type the slant angle in the Angle box.
3. Select the dimension in the viewport.
4. Click to complete the operation.
• Slant angles must be between 0 and 60 degrees, or 0 and -60 degrees.
• Slanting is applicable to only a single and linear dimension with a parallel orientation.
• A slanted dimension cannot be further slanted.
• To reset a broken or staggered dimension line,
1. Click Annotation and then, in the Annotate group, click More.
2. Click Reset Line in the Dimension section.
3. Select the dimension to reset. All staggered and broken lines of the specified dimension are restored to their original states.
4. Continue resetting dimensions or click to complete the operation.
 Stagger; or
 to end the operation.
 Break; or
 Slant; or
 Reset Line in the Dimension section; or