Inserting a Warranty Data Set
When you insert a warranty data set, the Warranty Data Set Wizard starts and displays pages for indicating how to configure the data entry tables for this type of analysis.
1. If you have already inserted the warranty data set and the Warranty Data Set Wizard is started, go to step 2. If not, do the following:
a. Click in the LDA Navigator to activate it.
b. Under Analysis type, select Warranty so that warranty data sets are shown under Data sets.
c. Under Data sets, right-click the folder under which to insert the data set and select Insert Warranty Data Set.
The Warranty Data Set Wizard starts and displays the Data Format page.
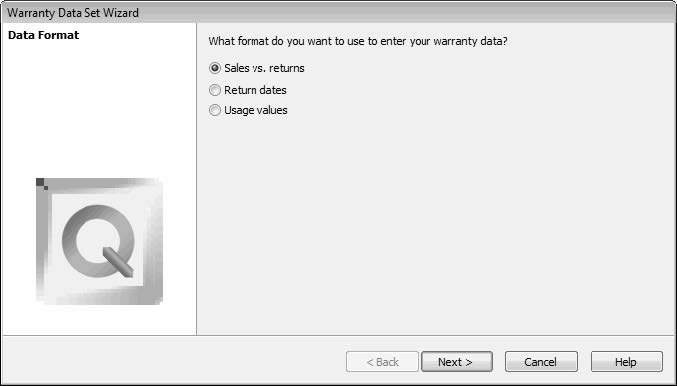
2. Select the data format for the data set, referring to the following table for
descriptions
Parameter | Description |
|---|---|
Sales vs. returns | The analysis is to assess sales and return data. The Weibull Sales and Returns panes for this data format are described in the following topics: |
Return dates | The analysis is to assess return dates, which are used as the dates of failures. The Weibull Sales and Returns panes for this data format are described in the following topics: |
Usage values | The analysis is to assess usage values. The Weibull Sales and Returns panes for this data format are described in the following topics: |
3. Click Next. The page that appears next depends on the data format option you selected.
◦ If you selected Return dates or Usage values, the Wizard Complete page appears. Go to step 10.
◦ If you selected Sales vs. returns, the Interval Type page appears.

4. Select the units for the time periods to use for all sales and returns data. On the Sale Intervals and Return Intervals pages that appear later, the selection you make here affects the default for Start on those pages.
Parameter | Description |
|---|---|
Years | When selected (default), sales and returns are recorded in yearly intervals. The control for Start defaults to the current year. |
Months | When selected, sales and returns are recorded in monthly intervals. The control for Start defaults to the current month and year. |
Weeks | When selected, sales and returns are recorded in weekly intervals. The control for Start defaults to Sunday of the current week. A week consists of seven days, beginning with the selected start date, which can be any day of the week. |
Days | When selected, sales and returns are recorded in daily intervals. The control for Start defaults to the current day. |
Numbers | When selected, sales and returns are recorded in intervals specified by numeric designations. The control for Start defaults to 1. |
5. Click Next. The Miscellaneous page appears.

6. Indicate whether returns can be recorded during the same time interval in which they are sold or only in intervals after they are sold.
7. Click Next. The Sale Intervals page appears. You use the options on this page to configure the tables in the Weibull Sales and Weibull Forecast panes.

8. Complete the Sale Intervals page.
Option | Description |
|---|---|
Start | The starting point for recording sales in the Weibull Sales pane. The control for this field depends on the interval type. For instance, if you selected Years as the interval type, the default is the current year. If you selected Months as the interval type, the default is the current month. |
Increment | The integer value that represents the step size to take between the periods shown in the Weibull Sales and Weibull Forecast panes. The default is 1, which means that a period, depending on the interval type, is every year, month, week, day, or consecutive number. For example, to have each period represent three months or a fiscal quarter, you select Months as the interval type and enter 3 as the increment value. |
Number of intervals | The number of periods for record sales in the Weibull Sales pane. The default is 10. If, based on the above example, you wanted to record quarterly sales for three years, you enter 12. |
Number of future intervals | The number of periods in which to display sales forecasts in the Weibull Forecast pane. The default is 10. |
9. Click Next. The Return Intervals page appears. You use the options on this page to configure the table in the Weibull Returns pane in the same manner that you use the options on the previous page to configure the Weibull Sales pane.
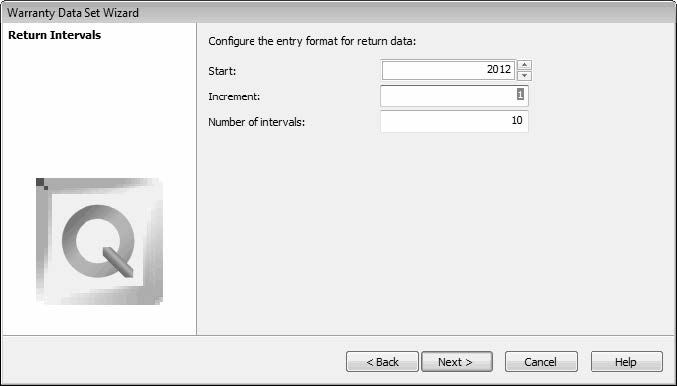
10. Complete the Return Intervals page and click Next. The Wizard Complete page appears.
11. Click Finish to insert the data set.
The newly inserted data set is named Warranty Analysis. If a data set with this name already exists, its names is Warranty Analysis (X), where (X) is the next available numeric value.
You can rename the data set, perhaps assigning it a name that reflects some distinguishing parameter.
12. In the panes in which you enter parameters, make any modifications that are necessary to the default values inherited from the parent folder.
13. In the panes for entering sales and returns, enter the data points to analyze.
For descriptions of the panes that are shown for the three different data formats for warranty data sets, see Weibull Panes for Warranty Analysis.
While the Warranty Data Set Wizard displays a page requesting whether returns can be logged during the same interval in which they are sold only for the sales vs. returns data format, the other two data formats inherently support this behavior. For the return dates format, a product can be returned on the same day as it was sold. For the usage values format, a product can be returned with a usage value of 0.