Configuring a Worker on a Different UNIX Machine
The configuration procedures for this scenario are exactly the same as those for
Configuring a Worker on the Same Machine, with one exception: the need for a common file system shared between the two machines.
|
|
On UNIX there is no need for the Worker Daemon.exe file that is used on Windows.
|
Creating a Common File System
For the server machine and the UNIX worker machine to exchange files, the two machines must share a common file system directory. This directory, which can be located on either machine (or on a third machine), serves as a file transfer point for the server and UNIX worker machines.
Create a shared directory that is accessible to both the server machine and the UNIX worker machine. It is important that the path the worker machine uses does not contain any special characters which the worker cannot handle. Because there are many ways to create a shared file directory, specific procedures are not provided in this guide. One common method of creating a shared directory is by creating the directory on the UNIX machine and accessing it using FTP on the server machine.
After creating the common file system, make note of the full path used by the server machine and the UNIX worker machine to access the common file system. These paths must be entered during a subsequent procedure.
In the example used in the following procedure, FTP is used to mimic a common file system. The full path from the server machine to the common file system is:
FTP:/CW/shared_dir
In this example, the full path from the UNIX worker machine to the shared file directory is:
/CW/shared_dir
Adding a UNIX Worker to the Worker Agent
The Worker Agent must know where the worker is located on the system. The next set of procedures explains how to configure the Worker Agent to use this worker.
2. In the Worker Location panel, select a different UNIX machine option, as in this scenario the Windchill server and the worker machines are different, and the worker resides on a UNIX machine.
4. In the Telnet Account panel, specify the information needed to start the remote worker.
Enter values for the following fields:
◦ Username — Specify the account to log on to the machine where the worker resides. This account must already exist and the log on process must not require any interactive log on scripts, the required environment variables must be defined automatically, and no special commands must be required to start the worker.
◦ Password — Specify the password used to log on to the Telnet account.
◦ Shell Prompt — Enter the shell prompt that the Worker Agent sees when logging on to the account. When the Worker Agent logs on to the account, it waits to receive this prompt. Once the prompt is detected, the worker executable starts.
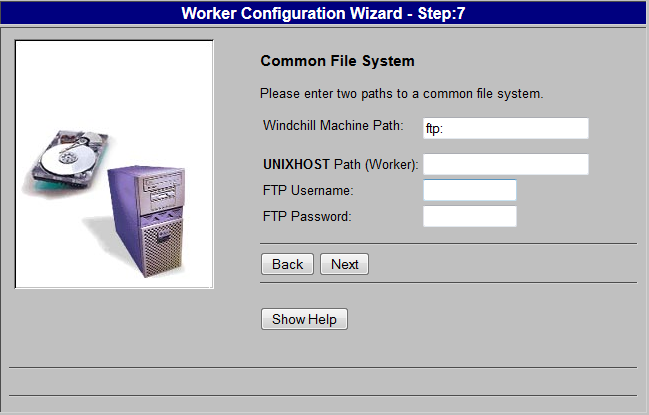
5. In the Common File System panel, specify the common file system information you prepared in Creating a Common File System.
If you used FTP, the Windchill Machine Path and the <machine name> Path (Worker) must be exactly the same except that the Windchill Machine Path starts with ’ftp:’.
Enter values for the following parameters:
◦ Windchill Machine Path — Specify the mount path of the common directory as seen from the Windchill server machine.
◦ <machine name> Path (Worker) — Specify the mount path of the common directory as seen from worker machine.
| It is important that the path the worker machine uses does not contain any special characters that the worker cannot handle. |
◦ FTP Username — If you used FTP, specify the account used to start the UNIX worker. The FTP connection is established based on this account. If you are using a network file system, the FTP account information is not required.
◦ FTP Password — Specify the password for the user name connecting to the account.
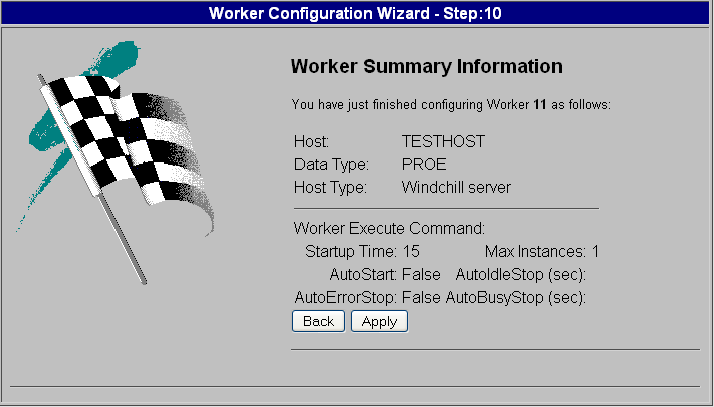
6. Click Next to display the Worker Summary Information panel. This panel displays the values you entered or selected during the add worker process.
7. Review the worker configuration information in this panel. If needed, use Back to return to the appropriate step and make any corrections. When you have verified that the worker information displayed in this panel is correct, click Apply.
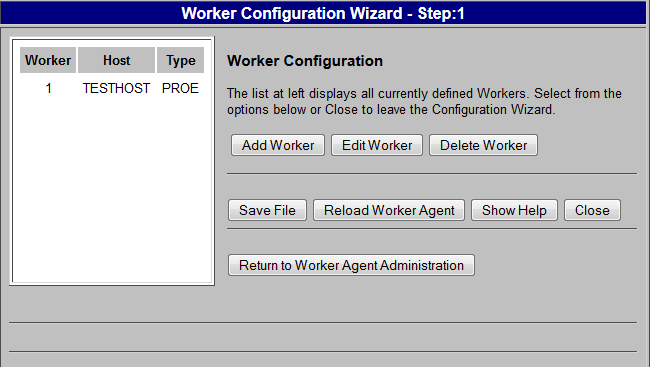
8. You are returned to the Worker Configuration window (step 1 of the configuration). Click Save File to update the <Windchill>\codebase\agent.ini file with your configuration changes.
9. Click Reload Worker Agent to commit the changes and update the Worker Agent Administration worker entries.
10. Click Return to Worker Agent Administration.
11. Follow the “Enhanced Security Measures in Worker Configuration” instructions below.
Enhanced Security Measures in Worker Configuration
When configuring a worker for WVS, the command used to start that worker, either on the Windchill server or on a remote worker machine, is configured in the agent.ini file by an administrator. A security update in Windchill 10.2 prevents malicious changes to that file that could allow other OS commands to be executed.
Beginning at Windchill 10.2, a new, mandatory WVS property called worker.exe.whitelist.prefixes was introduced to provide extra protection for the worker executables. A worker is used only if its executable matches one of the prefixes specified in the property; otherwise, the worker is ignored.
Before an OS command is executed, the prefix containing the command must be configured in wvs.properties by adding the appropriate values to the site.xconf file. The details of the property settings can be found in the wvs.properties.xconf file in the WORKER EXECUTABLE PREFIX SETTINGS section.
• The property worker.exe.whitelist.prefixes can be used to provide a list of command prefixes that can be used for any worker on any host.
• Additionally, properties of the form worker.exe.whitelist.prefixes.<worker_host> can be used to provide a list of command prefixes on a per-worker host basis.
The following sample use case illustrates the configuration of the worker.exe.whitelist.prefixes property.
<Property name="worker.exe.whitelist.prefixes" overridable="true"
targetFile="codebase/WEB-INF/conf/wvs.properties"
value=" C:\|D:\|G:\|/|nohup /"/>
This configuration honors all Windows workers residing on the C, D, and G drives, along with all the Unix/Linux workers. The vertical bar (pipe) is used to separate the prefixes.
You have now finished configuring the Worker Agent to use a worker on a different UNIX machine. Refer to
Troubleshooting the Worker Agent to confirm that your configuration is correct.
| The Worker Agent Configuration test is not be successful unless the worker.exe.whitelist.prefixes property is configured as described above. |
Configuring a UNIX-to-UNIX Network File Server (NFS)
Windchill supports NFS file transfer between a UNIX server and a UNIX worker machine.
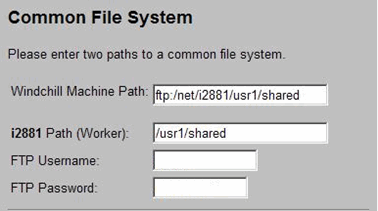
• Create a folder on the UNIX machine and provide full permissions. In the example below, the folder /usr1/shared has full permissions on the i2881 machine.
• When you reach the Common File System step of the Worker Configuration Wizard, refer to the example below for configuration details.
You can refer to
Testing the Worker Agent Configuration to confirm that your configuration is correct.