Testing the Worker Agent Configuration
Once you have completed any one of the four worker configuration scenarios, you can test the operation of the worker. The tests are fairly generic among Creo View Adapters. This section uses the Creo Parametric Adapter as an example.
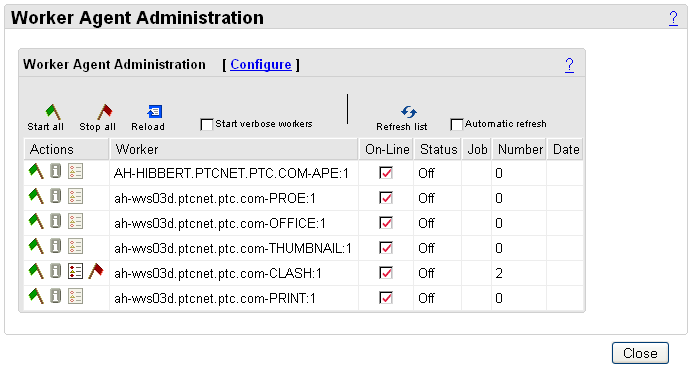
Test 1: Starting the Worker
1. From within the Worker Agent Wizard, return to the Worker Agent Administration panel. This panel displays a list of the configured workers and their current status.
2. To start the worker, click the green flag icon in the Actions column. After the worker has started, the Status column displays On.
3. When the connection tests prove successful, you can turn off the worker by clicking the left-most red flag icon in the Actions column.
Test 2: Create a Viewable on Demand
To perform this test, you need document data loaded on the Windchill system. This data must be in its native state, meaning that it has not already been converted to a viewable (published). You use this data to test the publishing capabilities. This test is valid for 3D models and Office Documents.
| The worker must be running to perform this test. If you did not enable Auto Start in the worker configuration, the worker must be manually started. See Test #1: Starting the Worker. |
1. Open Windchill in a web browser.
2. Browse to a Document, and open the information page for that document. When Documents are loaded into Windchill through a Windchill Workgroup Manager or an EPM gateway, WVS can publish a representation of this data.
A Creo View icon appears under the Content tab, in the Representations/Annotations list. Hovering over the icon displays “New Representation.”
3. Select the Creo View icon.
4. A page opens that notifies you that the request was “Sent to Publisher”, followed by a link to the WVS Job Monitor, which displays the publishing processes. You can observe the worker, through the WVS Job Monitor, as it converts the document to a viewable.
If successful, a thumbnail image is generated.
5. Select the thumbnail image to open the new viewable.
If the object fails to publish, see
Troubleshooting the Worker Agent.
Test 3: Creating a Representation from Local Data
To perform this test, you need part data loaded on the Windchill system. This data must be in its native state, meaning that it has not already been converted to a viewable (published). Use this data to test the publishing capabilities.
1. Open Windchill in a web browser.
2. Create an empty WTPart, which serves as a placeholder for the part.
3. Open the information page for the WTPart.
4. Under the Structure tab, from the New drop-down list, click New Representation to create a representation associated with WTPart.
◦ In Step 1, assign the representation a name.
◦ In Step 2, select “Local data” and then select the worker data type from the drop-down list.
◦ Browse to a part on the local system.
These steps set the action for the Windchill server to retrieve a part (for example, a Creo Parametric part), and the properly configured worker (PROE) is triggered to create the viewable and populate the representation.
5. Complete the remaining steps described by the wizard accepting the defaults.
6. Upon finishing, you are presented with a link to the WVS Job Monitor where you can observe the viewable conversion take place.
If the worker has been properly configured and the data is valid, the Publisher concludes successfully and a thumbnail link is presented. Click the thumbnail link to view the image.
If the object fails to publish, see
Troubleshooting the Worker Agent.