Configuring a Worker on the Same Machine
In the simplest scenario, the worker and the Worker Agent are on the same machine. The instructions for Windows and UNIX are the same when the Windchill server and the worker reside on the same machine. Access Worker Agent Administration as follows:
1. Open Windchill in a Web browser.
2. In the Site context, click the Utilities link from the container, and then click Worker Agent Administration.
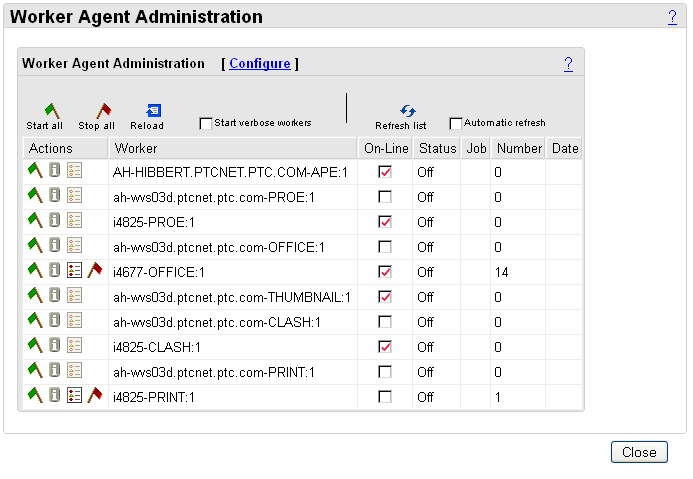
3. The Worker Agent Administration window opens.
This window allows administrators to create new workers or reconfigure existing workers, and also displays the current status of workers. Click Configure to configure a worker.
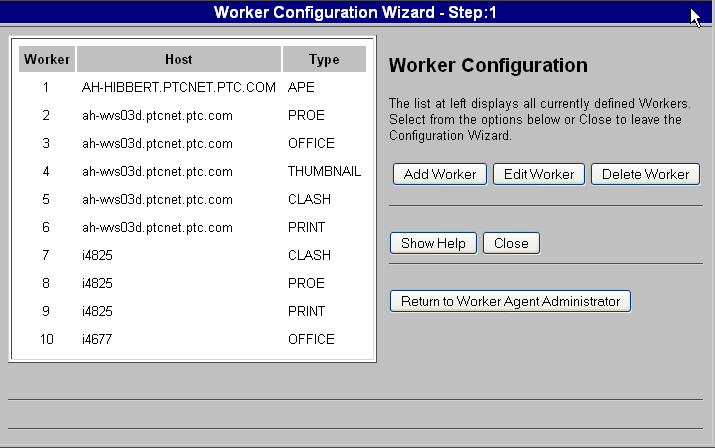
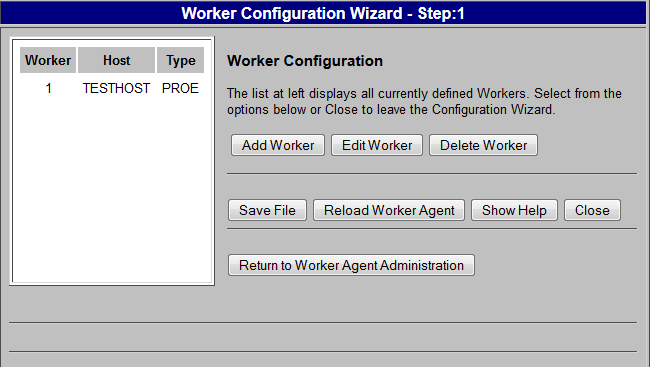
4. In the Worker Configuration panel, you are presented with three options: Add Worker,Edit Worker, and Delete Worker. In this example, the Add Worker option is described. (The Edit Worker and Delete Worker buttons are only available when you have workers configured - if this is the first worker you are configuring, then these commands will not be displayed.) Click Add Worker to add a new worker configuration.
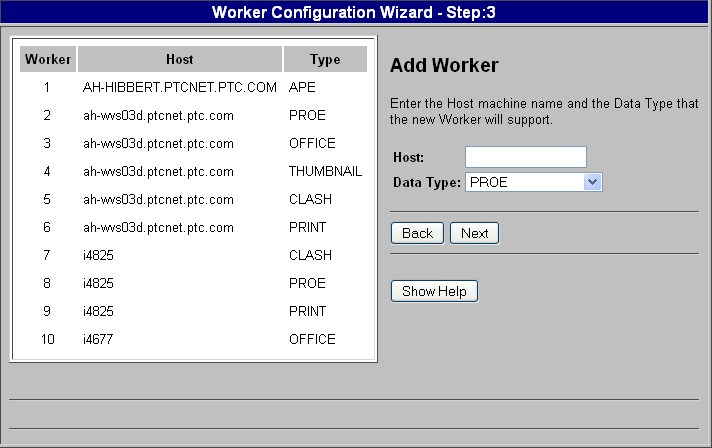
5. In the Add Worker panel, you specify the host name of the Worker machine and the data type of the Worker to be created. For example, if you are processing Creo Parametric CAD Documents or parts, then you will create a Creo Parametric worker to translate the objects into a viewable image.
◦ Host — Specify the Host Machine name (hostname) of the Worker machine. In this example, TESTHOST is used.
◦ Data Type — Specify the data type of the worker to be created.
Following categories of data type options are available.
MCAD — Mechanical Computer-Aided Design (MCAD) software
Document — Word, PDF
Creo View, Creo Illustrate
◦ Click Next to display the Worker Location panel.
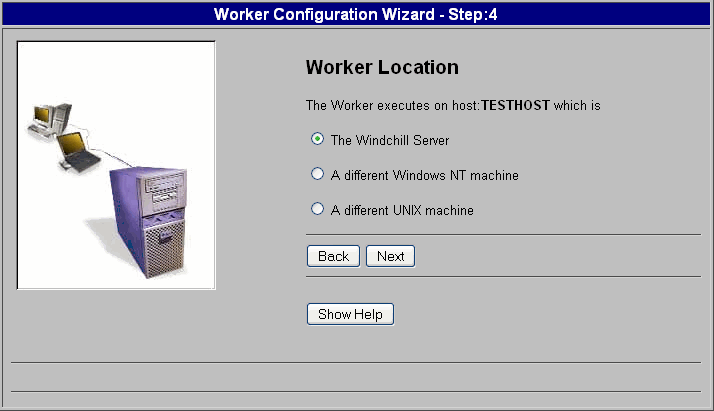
6. In the Worker Location panel, select the location where the worker resides.
◦ The Windchill Server — The worker resides on the same machine as the Windchill server.
◦ A different Windows NT machine — The worker resides on a Windows machine other than the Windchill server.
◦ A different UNIX machine — The worker resides on a UNIX machine other than the Windchill server.
In this example, since the worker resides on the same machine as the Windchill server, select The Windchill Server.
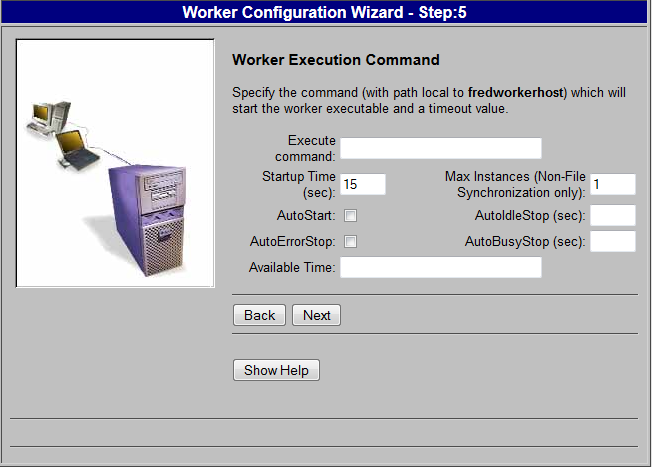
7. Click Next to display the Worker Execution Command panel.
In this panel, you specify the script used to start the worker and the execution settings. Enter values for the following parameters:
◦ Execute command— The execute command is the worker script created during the Creo View Adapter configuration. (For more information, refer to the Server-Controlled Publishing chapter in the relevant Adapter section of the “Creo View Adapters Installation and Configuration Guide.”) Type the complete path to this script in the Execute Command text field. Specify the batch file which starts the worker executable on the host machine; for example, C:\ptc\creo_view_adapters\inventor_setup\inventorworker.bat. (Your path is different.)
◦ Startup Time (sec) — Specify an amount of time in seconds that it takes for the worker and the system to completely start, initialize, and be able to return a message confirming this. If this value is not large enough, the worker does not start reliably. Adjust the setting to work on your system.
◦ Max Instances (Non-File Synchronization only) — Specify the maximum number of instances of this worker that can be started. Only set this value to be greater than one (1) if the worker machine is capable of running multiple copies of the CAD application effectively (i.e. multiprocessor, sufficient memory resources), and you are not configuring the worker to use File Synchronization.
◦ AutoStart — Select this option to set the worker to start automatically whenever it is needed. Use this option if you want your system to automatically start up after a reboot or if you want the Worker Agent to automatically satisfy heavy demand.
◦ AutoIdleStop (sec) — Specify an amount of time in seconds that determines how long the worker can remain idle before it is automatically stopped. If you leave this field empty or set it to zero (0), the worker is not stopped automatically at idle time. Use this option if you need to release the license when it is not being used.
◦ AutoErrorStop — Click this option to set the worker to stop automatically whenever it returns an error from a conversion request. Use this option if you need to make sure that the application is not left in an unstable state after an error condition.
| It is better to control the worker’s error behavior using the related worker Recipe Editor settings ( > > ). |
◦ AutoBusyStop (sec) — Specify an amount of time in seconds that determines how long the worker can spend on a single conversion request without automatically being stopped upon finishing that conversion. If you leave this field empty or set it to zero (0), the worker is not stopped automatically when it has completed a conversion.
| It is better to control the worker’s conversion request activity using the related worker Recipe Editor settings ( > > > ). |
◦ Available Time — You can control the availability of this worker by listing the time and days for the worker to be enabled. This is a comma-separated list of times in the following format: <start-time> - <end-time> -<day-of-week>. Refer to the Windchill Help Center for more information.
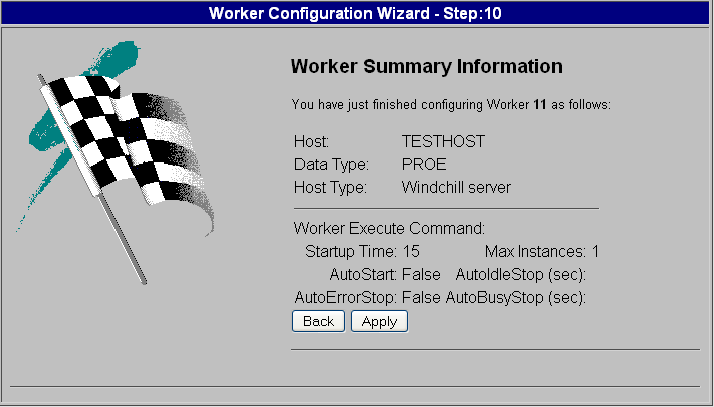
8. Click Next to display the Worker Summary Information panel. This panel displays the values you entered or selected during the add worker process.
9. Review the worker configuration information in this panel. If needed, use Back to return to the appropriate step and make any corrections. When you have verified that the worker information displayed in this panel is correct, click Apply.
10. You are returned to the Worker Configuration window (step 1 of the configuration). Click Save File to update the <Windchill>\codebase\agent.ini file with your configuration changes.
11. Click Reload Worker Agent to commit the changes and update the Worker Agent Administration worker entries.
12. Click Return to Worker Agent Administration.
13. Follow the “Enhanced Security Measures in Worker Configuration” instructions below.
You have now finished configuring the Worker Agent to use a worker on the same machine as the
Windchill server. Refer to
Testing the Worker Agent Configuration for details on how to test and confirm that your configuration is correct.
| The Worker Agent Configuration test is not be successful unless the worker.exe.whitelist.prefixes property is configured as described above. |