Check In
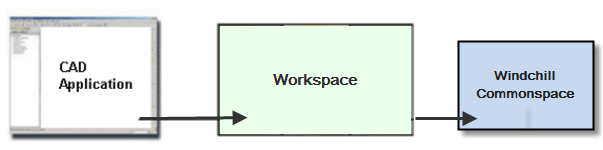
The Check In command makes your new or modified CAD document available to the other users in the Commonspace (a shared area in Windchill). The following figure shows the information flow for the Check In command.
You can access the Check In command either in the Windchill Workgroup Manager client or in SOLIDWORKS.
To use Check In in the Windchill Workgroup Manager client:
1. Select one or more objects in Windchill using the check boxes.
2. Click > . Alternatively, you can right-click the object and on the context menu, select
Check In or click

in the Toolbar or in the Actions column.
To use Check In from SOLIDWORKS, there are two modes of the Check In command available: Auto Check In and Custom Check In. Note that Check In initiated from SOLIDWORKS operates on the CAD document that is active in SOLIDWORKS (and its references). Therefore, unlike initiating the command from the Workspace, no selection is needed.
• Auto Check In— Performs a check in using preset default values, this avoiding the need for any customer input. In SOLIDWORKS, click > to access the command.
• Custom Check In — Allows you to select various options as a part of the check in of CAD Documents to the Commonspace.
1. In SOLIDWORKS, select > , to access the command. The Check In window opens.
2. In the list of objects that are displayed on the Collect Objects page, select the objects to be checked in to the Commonspace.
3. Select Next. The Set Options page opens.
4. Specify the following values, as required:
▪ Create a baseline.
▪ Auto associate parts to CAD documents.
▪ Undo check out of unmodified objects.
▪ Remove objects from the workspace.
▪ Auto-resolve incomplete objects.
For information about
Check In, see
Checking in Objects to Windchill.