Import to Workspace
Import of CAD documents and attached files is supported only via the Windchill Workgroup Manager embedded browser, where the workspace has access to cache (offline workspace is not supported).
The Import to Workspace wizard has two steps:
1. Select Files to Import
2. Specify Options
You can navigate to a subsequent step by clicking Next. Navigate to a preceding step by clicking Back or clicking the numeral corresponding to a previously completed step.
Select Files to Import
To select objects to import to a workspace, use the following procedure:
1. Select > .
The Import to Workspace window opens at the first step, Select files to import.
2. The Target Workspace field indicates the active workspace from which you invoked the import and into which the imported objects will be placed.
3. In the Add Dependencies field, set a rule for dependent objects to be collected with any selected objects, either All (default), Required, or None.
4. Click the add object icon

to navigate to objects you would like to import from your local file system. When you have navigated to the object, click
Open to add it to the
Files table. The
Files table lists the files you have collected for import and is described in the following table:
Column | Description |
(Select all rows) | Use check boxes to select rows to which to apply toolbar actions. The top check box selects/deselects all rows. |
(Object Type Indicator) | Displays object type icon |
File Name | Displays object file name |
Size | Displays the file size of the object |
Last Modified | Displays date and time of last modification of the file |
File Path | Displays the directory path to the file to be imported |
5. Optionally, select an object and click the remove object icon

to remove the object from the table.
6. Click Next to go to the second step, Specify Options; or click Finish to initiate the import without specifying options.
Specify Options
The options available in the second step of import can help resolve conflicts with objects in the target workspace or commonspace. Use the following procedure to specify import options:
1. On the Specify Options page, the objects you selected in the first step are listed in the Object List table, which is outlined in the following table:
Column | Description |
(Select all rows) | Use check boxes to select rows to which to apply toolbar actions. The top check box selects/deselects all rows. |
(Workspace content status) | (Active workspace only) Displays object local workspace status icon (if applicable) |
(Action status) | Indicates if object is set for check out |
(General status) | Displays object general status icon (if applicable) |
(Status Messages) | Displays status message icon and text message in tooltip (if applicable) |
(Object Type Indicator) | Displays object type icon |
File Name | Displays object file name |
Size | Displays the file size of the object |
Last Modified | Displays date and time of last modification of object |
Location | Displays the storage location for the object |
File Path | Displays the directory path to the file to be imported |
2. In the View menu, you can select from the following alternative views of the Object List table:
◦ All except Family Instances
◦ All
◦ All with conflicts
3. You can further modify the collected set of objects by selecting objects and using toolbar controls as explained in the following table:
Control Icon | Action |
| Invoke the Set Location window to select a database location for the selected object |
| Add the imported object as a new object |
| Add the imported object as a modified object |
| Reuse an existing workspace or commonspace object of the same name, rather than importing the selected object. |
| Check out the selected object upon import |
| Revise the selected object upon import. |
| Excludes selected object from the import. Clicking again (while the same object is selected) re-includes the object. |
4. Clicking the reset icon

resets the
Object List to its initial state.
5. You can click Back at any time to return to the Select files to import step.
6. Click Finish to commit the import of the collected objects. The imported objects are populated in the target workspace.
The following file types are supported for the Import to Workspace action:
• NX files (.prt, .krx)
• Windchill files (.xls, .xlsx, .doc, .docx, .ppt, .pptx)
• Graphic Editor files (.jpg, .jpeg, .bmp, .cgm, .tif, .tiff, .gif, .png, .exr, .rgb, .pic, .psd, .tga, .hdr, .pcx, .wrl, .cvg, .svg, .vda, .eps, .cc4, .ai, .hpl, .obj, .pvz, .edz, .avi)
Advanced Import to Workspace Capabilities for NX
The Import to Workspace capabilities of NX are enhanced for working with the NX Reuse Library as follows:
• Users can import native NX Knowledge Reuse Extension (KRX) files and graphic editor files (such as CGM, BMP, and other types).
• Users have the ability to import these additional file types (along with existing file extensions) at the same time.
Advanced Import to Workspace Capabilities for NX when Working with Independent Family Table Generic/Instances
The Import to Workspace capabilities of NX are enhanced when working with the Independent Modification of Instances/Generic capability. The use cases below provide examples of these enhancements.
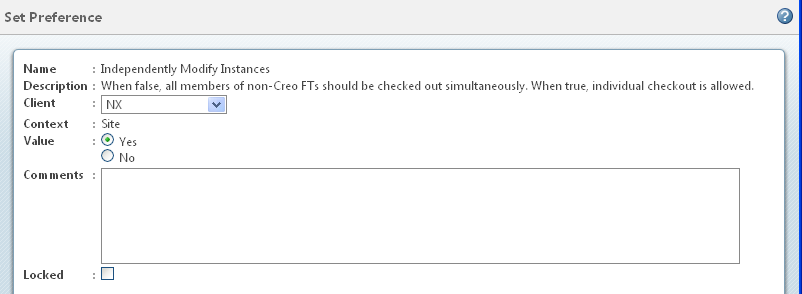
All the use scenarios in the table below refer to the Independently Modify Instances preference located in the Workgroup Manager Client section of Preference Management.
Prerequisites—The Independently Modify Instances preference for NX is set to Yes (the default value).
• Import to Workspace of the standalone generic is supported. After importing the generic, it will not flush the instances in the workspace.
• Import to Workspace of the standalone instance is supported, but only when the instance’s Generic is present in the Windchill Server (or at least in the Active Workspace). Otherwise, import of the instance will fail and Windchill will display an error message.
• When an instance is imported independently, it will be added to the family table of the respective generic on the server.
• Import to workspace of an assembly which is using a Family Table instance as its dependent is supported, provided the generic of the respective instance is present in Windchill OR at least in the active workspace. Otherwise, import of the instance will fail and Windchill will display an error message.
• Import to workspace of a Family Table member and an assembly file needs to be done separately. Importing both at a time will not work, even if the Family Table members are not a part of the assembly.
Use Case Scenarios
Setup | Steps | Result |
• In the Independently Modify Instances preference, the Value should be set to YES and the Client field set to NX • A Family Table generic with some instances created should be available on the local file system . | 1. Launch NX in connected mode. 2. Open the generic in NX from the local file system. 3. Perform Save to Workspace. 4. Check to see if the content of the generic is copied to the Local Workspace. | • Only the generic is imported to the workspace. No instance is created or imported to workspace. • Local Workspace shows content of the generic. |
• In the Independently Modify Instances preference, the Value should be set to YES and the Client field set to NX • A Family Table generic with some instances created should be available on the local file system . | 1. Launch NX in connected mode. 2. Ensure that the Family Table generic (in the Setup column) is not present on the server. 3. Open any one instance mentioned in the Setup column in NX from the local file system. 4. Perform Save to Workspace. | The import of the instance fails with the error, “Generic is not present on the server.” |
• In the Independently Modify Instances preference, the Value should be set to YES and the Client field set to NX • A Family Table generic with some instances created should be available on the local file system . | 1. Ensure that the Family Table generic (in the Setup column) is present on the server. 2. Open any one instance mentioned in the Setup column in NX from the local file system. 3. Perform Save to Workspace. 4. Check the family tree of the generic and instance. | • The generic is downloaded to the active workspace (if it was not already there). • The generic is automatically checked out and the instance is imported successfully. • A family tree generic/instance shows the generic with those instances that are in Windchill. |
• In the Independently Modify Instances preference, the Value should be set to YES and the Client field set to NX • An assembly with one of its dependents as a Family Table instances should be available on the local file system . | 1. Launch NX in connected mode. 2. Ensure that the generic is not present on the server. 3. Open the assembly mentioned in the Setup column in NX from the local file system. 4. Perform Save to Workspace. | The import of the assembly fails with the error, “Generic is not present on the server.” |
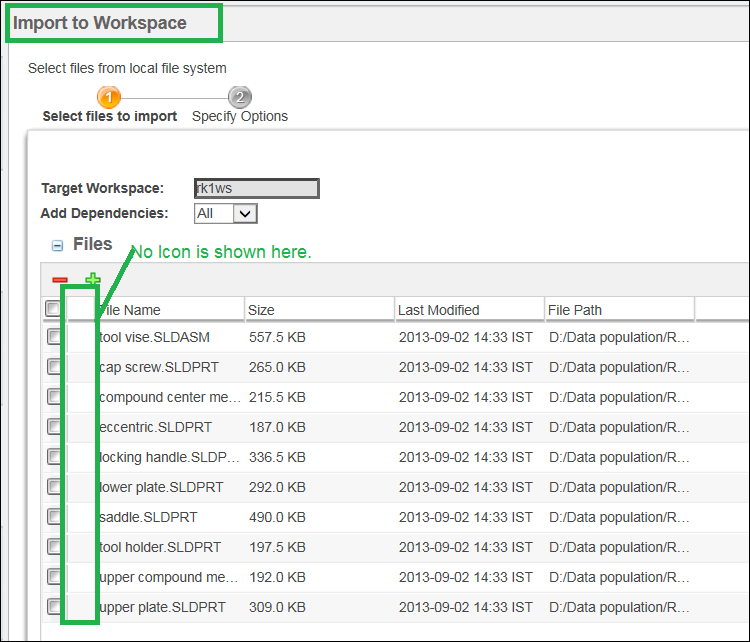
| The CAD icons do not appear in the Select files to import step in the Import to Workspace operation as shown in the following image |
For more information, see
Importing to the Workspace.