Inserting A New Routing Plan
Use the  Insert New Routing Plan action to insert a new routing plan. Consider the following points related to the Insert New Routing Plan action:
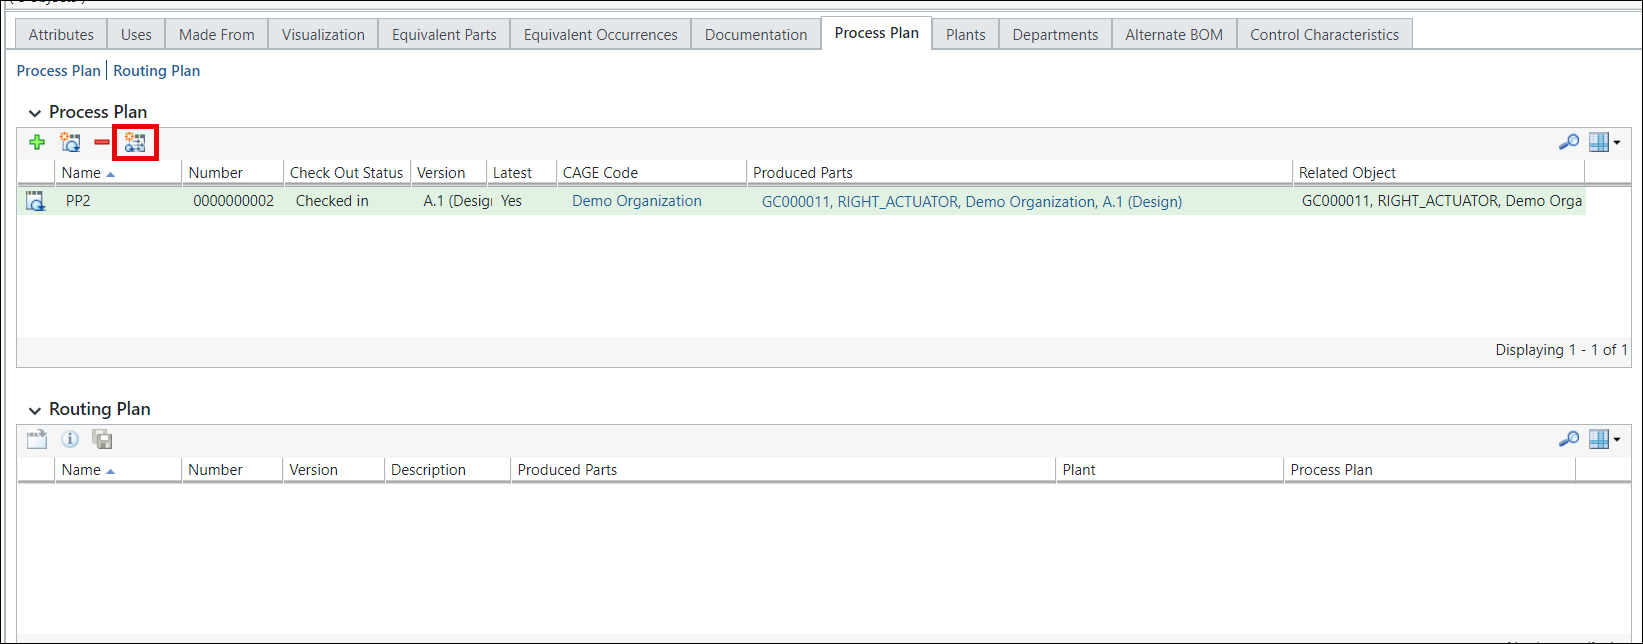
Insert New Routing Plan action to insert a new routing plan. Consider the following points related to the Insert New Routing Plan action:• The Process Plan tab of the BOM Transformer consists of the Process Plan and Routing Plan table. This action is available in the Process Plan table toolbar. It is available in the upstream and downstream views of the BOM Transformer.
• You can associate multiple routing plans with a process plan.
• The system enables the Insert New Routing Plan action only if a process plan is associated with a part.
• Object Initialization Rules (OIRs) specify object attributes and values to be applied at the time of the object creation. The routing plan object respects the Object Initialization Rules. For more information, see Using OIRs for Naming and Numbering.
Consider that a structure is opened in the BOM Transformer. Perform the following steps to insert a new routing plan:
1. Select a part in the upstream or downstream view.
2. Select the Process Plan tab of the BOM Transformer.
3. In the Process Plan table, select the process plan you want to associate with the routing plan.
4. Click the Insert New Routing Plan action available in the toolbar of the Process Plan tab.
Insert New Routing Plan action available in the toolbar of the Process Plan tab.The New Routing Plan dialog box opens.
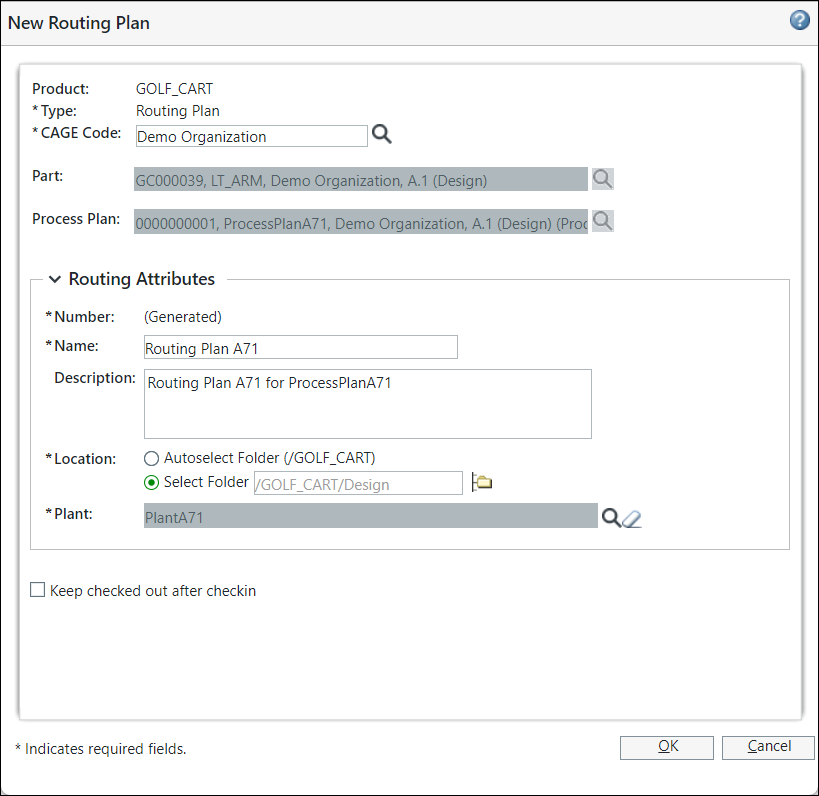
The Part and Process Plan information appears by default in this dialog box.
The custom attributes that you define in layouts for a routing plan also appear in the New Routing Plan dialog box. |
5. In the Routing Attributes table, specify the following details for a routing plan:
◦ In Name, enter a name for the routing plan.
◦ In Location, click Autoselect Folder if you want the routing plan to be created in the product folder from which you launched the action. Otherwise, click Select Folder and enter a path to an alternate folder.
◦ If a plant is already associated with the process plan, the plant value is displayed in the Plant field. If plants are not associated with the process plan, the system populates the value in the Plant field according to the value set in the Automatically Populate Plant for Routing Plan preference. For more information, see the Key Points section.
To associate a different plant with the routing plan, use  to clear the Plant field. Then, click the search icon
  to open the Find Plant dialog box. Enter the search criteria and click Search. The search results appear in the Search Results table of the Find Plant dialog box. Select the plant and click OK. The Find Plant dialog box closes, and the plant name appears in the Plant field.
to open the Find Plant dialog box. Enter the search criteria and click Search. The search results appear in the Search Results table of the Find Plant dialog box. Select the plant and click OK. The Find Plant dialog box closes, and the plant name appears in the Plant field.The plant information is also displayed in the Details tab of the routing plan information page. The plant information is displayed in the Attributes table. For more information, see Routing Plan Information Page. |
6. Optionally perform the following actions:
◦ Enter the appropriate information in the Description field.
◦ Select the Keep checked out after checkin checkbox to immediately check out the new routing plan.
7. Click OK. The process of inserting a new routing plan is complete.
◦ The routing plan entry is added to the Routing Plan table of the Process Plan tab of the BOM Transformer.
◦ The newly created routing plan entry appears on the folder browser page.
Key Points
• You can open the Routing Plan in the Process Plan Browser by using the Open in Process Plan Browser action. For more information, see Opening a Routing Plan in the Process Plan Browser.
• You can also view the custom attributes in the Insert New Routing Plan dialog box.
• You can relate multiple routing plans to a process plan. You can view the information about all the related routing plans in the Related tab of the Process Plan Browser.
• You can change the layout of the New Routing Plan dialog box. For more information about attribute layout, see Layouts Tab and Editing Attribute Layouts.
• The system populates the value in the Plant field of the Insert New Routing Plan dialog box according to the value set in the Automatically Populate Plant for Routing Plan preference. Consider the following points:
◦ If a plant is already associated with a process plan, the system populates the identity of the associated plant in the Plant field. In this case, the system ignores the value set for the Automatically Populate Plant for Routing Plan preference.
◦ If a plant is not associated with a process plan, the system populates the value in the Plant field based on the value set for the Automatically Populate Plant for Routing Plan preference. You can use the  search picker to change the plant.
search picker to change the plant.◦ Note that the system only considers the value you set for this preference when inserting a new routing plan. After inserting a new routing plan, if you change the value of the preference, it does not impact the already created routing plans.
◦ The default value of this preference is null. When the value is null, no value is populated in the Plant field of the Insert New Routing Plan dialog box. In such case, you can use the search picker available near the Plant field of the Insert New Routing Plan dialog box to pick a plant.
search picker available near the Plant field of the Insert New Routing Plan dialog box to pick a plant.◦ The system always picks the latest version of a selected plant when you set the plant value in the Automatically Populate Plant for Routing Plan preference.
• You can customize the layout and add new attributes according to your business requirement. The custom attributes that you define for a routing plan also appear in the New Routing Plan dialog box. For more information about attribute layout, see Layouts Tab and Editing Attribute Layouts.