WBM Migration with Windchill+
Use the Windchill Bulk Migrator (WBM) module for migration. This topic explains the various Windchill Bulk Migrator (WBM) activities.
Prerequisites
A WBM migration scenario has some specificities, but it is built consistently from the concepts developed in the other sections of this help center.
• A WBM migration scenario is an advanced Windchill+ scenario that involves the migration and QA environments. The environment landscape is as follows:
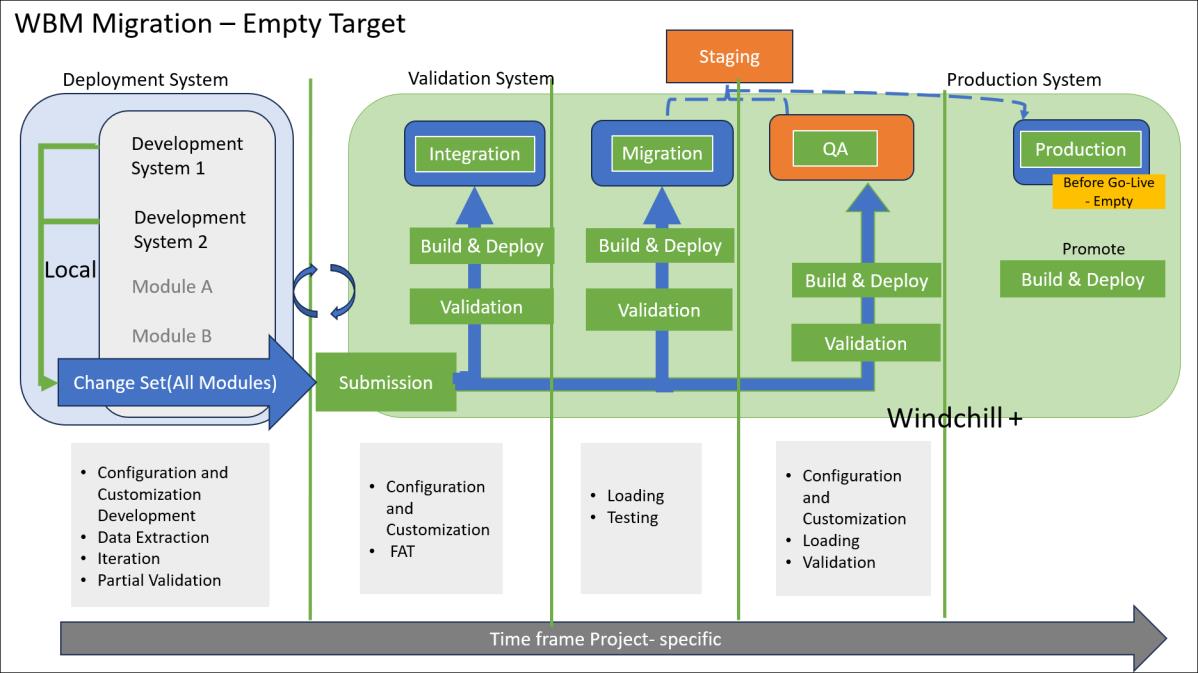
• The WBM migration leverages an automated framework specifically built for Windchill+. No backend access is required and granted on the migration environment.
• Every migration is unique. This section describes the services available on Windchill+ to support the majority of the WBM migration scenarios. However, according to the complexity, as a customer or partner, you need to design and plan the migration project and adjust it to specific requirements. For example, the number of rehearsals, prerequisites, and additional required tasks to be performed on-premises, and so on.
• The structuring of to be migrated metadata requires a database. To avoid several transformations, it is assumed an on-premises staging database is used. You must use the Oracle database. The use of the Oracle database is necessary according to the Windchill version requirements. The database structure must comply with the Windchill WBM staging database requirements.
• It is recommended to create a separate database schema on-prem for the WBM staging database.
• Windchill has transitioned from the Change Management Legacy Data Model to the new Flexible Data Model, using a conversion utility, as Windchill+ does not support Mixed mode. Hence, before performing a bulk migration process with Windchill Bulk Migrator, the source system must be converted to Flexible mode. For more information, see Flexible Change Link Conversion.
Migration Environment
A migration environment is a place where a prescriptive process of bringing together code, configuration, and data occurs. In addition to submitting a build package for migration, use Windchill Bulk Migrator (WBM) to submit the staging data. This data is loaded into the migration staging database for evaluation. The moving of code, configuration, and data is all part of the Windchill+ core operational framework. For example, you generate data from system A and put it in a location, then Windchill+ automatically migrates everything into system B.
After migration, submit your build packages to the QA environment and then to the production environment.
WBM Migration Activities
Consider the following information related to the WBM migration activities:
Before the Go Live Stage
The system uses the integration environment to integrate all code changes and reach a maturity level with the build before starting the migration load testing. The process to deploy a build is similar to the process described in the Submitting and Promoting Your Package topic.
Perform the following steps:
1. Submit a build and manifest file with deploy_pipe : int. For more information, see Deploying Code and Configuration Package.
2. Complete the integration and Functional Acceptance Test (FAT) cycle. At the end of the testing cycle, the task is complete, and the environment is reverted to its previous state.
If this step is not completed within seven days, the environment is reverted to its previous state. |
Migration Environment Steps
The migration environment is used for load testing. Perform the following steps:
1. Upload the staging database dump to the storage area using AzCopy.
For more information, visit the following links:
2. Open a service request to request to import the staging database dump. For more information, see Opening a Service Request.
3. Deploy the build. The process to deploy a build is similar to the process described in the Submitting and Promoting Your Package topic. This topic applies to deploying a build to the migration environment.
4. Submit a build and manifest file with deploy_pipe : mig. For more information, see Deploying Code and Configuration Package.
By default, for the migration environment, the backup created during this step is retained for 30 days. |
5. Open a service request to execute loading.
6. In case of content migration, retrieve the content map file from the storage account and prepare a content copy script. Afterward, open a service request with the script attached to run the final content transfer. For more information, see Opening a Service Request.
7. Complete the migration test cycle. At the end of the testing cycle, the environment is reverted to an empty state, through one of the following actions requested via a service request (in the preferred order):
◦ Rehosting from the production environment
◦ Reprovisioning (used only for the initial migration, not to be used for subsequent data migrations).
QA Environment Steps
The QA environment is used for UAT.Perform the following steps:
1. Repeat the same process with the latest state of data imported into the staging database.
◦ Submit a build and manifest file with deploy_pipe : pipeline.
By default, for the QA environment, backup taken during this step is retained for 30 days. |
2. Open a service request to request loading execution on the QA environment. For more information, see Opening a Service Request.
3. In case of content migration, retrieve the content map file from the storage account and prepare a content copy script. Afterward, open a service request with the script attached to run the final content transfer. For more information on creating a content map file, see WBM Stages.
4. Complete the UAT test cycle. You have up to 30 days to make one of the following decisions:
◦ If the testing cycle is successful — the task is approved, and only the build is promoted to the production environment.
◦ If the testing cycle is not successful:
▪ The task can be rejected, and the environment is reverted to the previous state.
▪ The task can be approved, and the build is promoted to the production environment. A subsequent build can be submitted to fix bugs.
◦ If the testing cycle is not completed within 30 days, the environment is automatically reverted to its previous state. To retain the environment, you have to approve the task.
If another QA full loading is required, the environment is reverted to an empty state, through one of the following actions requested using a service request (in preferred order): • Rehosting from the production environment. • Reprovisioning (only if for initial migration, not to be used for subsequent data migration). |
Optionally, if delta loading is planned for Go-Live, loading must be done to production independently. Open a service request to request or repeat a loading execution on the production environment. For more information, see Opening a Service Request.
Go Live Stage
• At this stage, the previously approved build is already on the QA and production environments.
• Additionally, previous data loading may be available on the production environment.
• If there are no build submissions required during the Go-Live cutover (or if you have submitted the Go-Live required build upfront), perform the following steps:
1. Upload the latest staging database dump to the storage account.
2. Open a service request to request an import of the latest staging database.
3. Open a service request to execute loading on the production environment.
4. In case of content migration, after the script creation, open a service request for the final content transfer.
• If a build submission is required, follow the process described in the QA Environment Steps section for the build submission and promotion. Afterward, execute the production activities and service requests as described in the QA Environment Steps section.
• Once Go-Live is acknowledged by you, it is mandatory to rehost the production environment to the QA and Integration (and to migration if there are subsequent migration planned). A service request must be opened for the rehost activities.
Run Stage
• After a successful Go-Live, as all environments are rehosted from the production environment, PTC strongly recommends propagating the changes to your development environments.
◦ Data model is the minimum that is required and must be used as your starting point on your development environment.
◦ You can reuse the latest build.
• If there are subsequent migrations, the process described in Before Go Live section must be repeated.
To avoid any loss of the existing data, you should carefully consider the environment refresh activities during the project design and planning stages. |
Final Considerations
• For a large-scale migration and to mitigate the impact during the go-live cutover, it is strongly recommended to design your migration activities to allow for delta loading.
• All the migration projects are unique. To ensure that migration projects are successful, you must perform activities such as strong planning, scoping, risk, and dependencies management. These activities ensure proper migration design and smooth go-live cutover.
• The migration testing is often underestimated. For simple migration projects, PTC recommends starting with three test migration cycles. As the complexity increases, you can plan to implement more cycles.