Submitting and Promoting Your Package
When the CCD package is ready, use the automated build deployment to proceed. The automated build deployment process involves orchestrating the promotion of your configuration and customization aligned with your entitlements and the environment landscape.
You can submit a build by uploading a CCD package and manifest file to the respective locations on your storage account. You must first upload the CCD package at /data/builds. You must then upload the manifest file at /data/builds/deploy.
This action triggers the automated build deployment workflow. The process is driven through notifications tasks received by e-mail. The information in the e-mail guides you through the different steps. The task receivers and approvers are declared in the manifest file. An example of a manifest file is available in the Deploying Code and Configuration Package topic.
|
|
Consider the following points as a prerequisite:
• You must set an Azure BLOB storage location. The authorization details must be obtained from the PTC Cloud.
◦ PTC provides you with a SAS URL for this activity.
◦ You should submit a request with PTC Support Portal to have your IP address in the allowed list. In the details for the case, provide a stable IP address.
• You must submit a request to have your pipeline configured to match the value mentioned in your manifest file. Examples are int1 or pipeline1. For more information about the deploy_pipe attribute, see the Creating Manifest File section in the Trigger Automated Deploy topic.
|
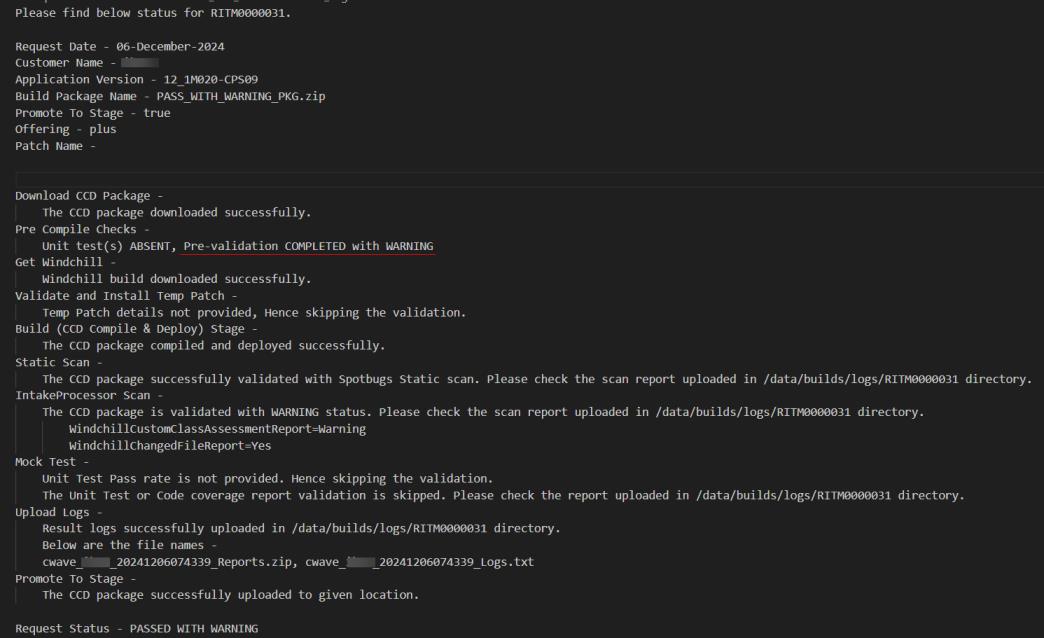
The first step of the Automated build Deployment workflow is the inspection of the CCD package. The system inspects the CCD package to determine its compliance with Windchill+ guidelines. After the inspection, the system generates the reports and makes them available on the storage account.
You can find the reports and logs at: /data/builds/logs/<RITM Number>/. The syntax of the generated reports and log files are as follows:
• Reports syntax — cwave_<CustomerShortName>_<Date-Time>_<Control Label>.html. Here, <Control Label> can be IntakeProcessor, SpotBugs, Logs and so on.
• Logs syntax — ccd_<environment>_<Date-Time>_<ant target>_Logs.zip. Here, <ant target> can be deploy, load and so on. For more information, see External Targets.
|
Report Name
|
Implemented Checks
|
|---|---|
|
cwave_<CustomerShortName>_<Date-Time>_IntakeProcessor.html
|
Windchill+ checks (Windchill+ allowed customization, deprecation, unsupported APIs, security)
|
|
cwave_<CustomerShortName>_<Date-Time>_SpotBugs.html
|
Static Code check (Java best practices)
|
Consider the following points:
• If the CCD package fails any of the checks, a notification is sent to you, and the submission process is halted.
• If the CCD package is compliant, the process continues, and the build is promoted to the target defined in the manifest file.
• Once a build deployment is successful, you have seven days to complete your testing.
|
|
As a customer, you are responsible for the CCD package content. By submitting a build, you certify that the development was done in compliance with PTC Security Guidelines. For information about the PTC Security Guidelines, see Security Customization Guidelines.
|
Windchill+ Guardrails for Composition of a CCD Package
Your CCD package and its composition must adhere to a specific directory structure. Follow the guardrails given for the directory structure and the file contents of a CCD package:
• The size of a CCD package must not exceed 100MB.
• The CCD package can contain the following folders:
|
Folder
|
Description
|
|---|---|
|
Configurations
|
None or one Configurations folder
|
|
Generated
|
None or one Generated folder
|
|
<custom module(s)>
|
One or more custom module folders
|
|
|
Out of the three folders, at least one folder must be present in your CCD package.
|
• The descriptor.xml file must be present in all the custom module folders of your CCD package.
• The Generated folder can be empty, or it can contain either or both of the following folders:
◦ db folder — The db folder can be empty. If not, it must contain the db/conf/SchemaConfig.xml file.
◦ BAC folder — Only one BAC .zip file is allowed in the BAC folder. The BAC mappings can be provided in the Mapping.xsl file located in the BAC folder.
• The allowed offering values are plusselect and meddev.
• A CCD package must be free from blocked or unexpected files, as per the following rules —
◦ List of files not allowed in the package — .jar, .class, .exe, .ser, .sql, .ddl, .pks, .pkb, .ora, .jasper, .cs, .cpp, .so, .dll, .jnilib, .dylib, .h, .cgf, .out, .ldif, .sh,.pl, .groovy, .gwt.xml, .gwt.modules.xml
◦ Valid files within the xconf folder — .xconf
◦ Valid files within the conf folder — .xml,.ini
◦ Valid files within the resources folder — .tpl, .bas, .ddx, .html, .yml, .xjb, .ftl, .xml, .dtd, .xsl, .properties, .txt, .ini, .json, .js
◦ Valid files within the src folder — .java, .rbInfo
◦ Valid files within the jsp folder — .jsp, .jspf
◦ Valid files within the tags folder — .tag, .tagf
◦ Valid files within the tlds folder — .tld
◦ Files not allowed inside the src_web folder — .java
◦ Valid path for JasperReports folder — module/main/resources and module/main/src_web (not valid at configurations level)
◦ Valid files within the JasperReports folder at resources path — .jrxml, .jasperProperties and .properties
◦ Valid file type within the JasperReports folder at src_web path — .gif
◦ Folders with the name apps are not allowed within the following folders:
▪ configurations/resources
▪ main/resources
▪ main/src_web
These guardrails are checked when the package is submitted for deployment. Any non-compliance is reported. The deployment logs contain an RITM summary report, for example, RITM0910921.txt. This report summarizes whether the package complies with the Windchill+ guardrails. An example of an RITM summary report is as follows:
You can find the RITM detailed logs in a detailed report zip file containing these guardrail check details. This zip file includes a log file that provides the guardrail check details.
An example of a zip file is RITM0910921_Reports.zip.
An example of a log file is preValidate_20240402-142645.log.
Although these rules are not enforced, you must take note of any deviations and actively correct them. PTC would enforce some of these rules in future, and any non-compliance would render the package invalid thereafter. For more details about disallowed customization and warnings, see Disallowed Customization. |
Before the Go Live
You can use Windchill+ without the Quality Assurance (QA) environment. You can also use advanced Windchill+ with the QA environment. Depending on the scenario, you can follow the steps mentioned in the following approaches:
Advanced Windchill+ with QA Environment
Perform the following steps when you use advanced Windchill+ with Quality Assurance (QA) environment:
1. Submit your package to the integration environment for the Integration and Functional Acceptance Test cycle. You can trigger this test cycle often. For example, several times a week.
◦ Submit a build and manifest file with deploy_pipe : int.
For more information, see Deploying Code and Configuration Package.
◦ Complete the testing cycle. At the end of the testing cycle, the task is considered complete and the environment is reverted to its previous state.
If this step is not completed within seven days, the environment is automatically reverted to the previous state. |
2. Submit your package to the QA environment for UAT and then promote the package to the production environment. You can trigger the UAT test cycle once or twice a month, as this process promotes the build to the production environment.
◦ Submit a build and manifest file with deploy_pipe : pipeline. For more information, see Deploying Code and Configuration Package.
◦ Complete the testing cycle. Consider the following points:
▪ If the testing cycle is successful, the task is approved, and the build is promoted to the production environment.
▪ If the testing cycle is not successful, the task is rejected, and the environment is reverted to the previous state.
▪ If the testing cycle is not completed within seven days, the environment is reverted to its previous state.
Basic Windchill+ without a QA Environment
Perform the following steps when you use a basic Windchill+ Select without a Quality Assurance (QA) environment:
1. Submit a build and manifest file with deploy_pipe : int. For more information, see Deploying Code and Configuration Package.
2. Complete the Integration and Functional Acceptance Test cycle. At the end of the testing cycle, the task is complete, and the environment is reverted to the previous state.
If this step is not completed within seven days, the environment is reverted to its previous state. |
3. Resubmit the same build and an updated manifest file with deploy_pipe : pipeline. For more information, see Deploying Code and Configuration Package.
4. Complete the user Acceptance test cycle on the integration environment. Consider the following points:
◦ If the testing cycle is successful — the task is approved, and the build is promoted to the production environment.
◦ If the testing cycle is not successful — the task is rejected, and the environment is reverted to the previous state.
◦ If the testing cycle is not completed within seven days, the environment is automatically reverted to the previous state
All the testing activities use only one environment. At a time, the system can perform only one testing activity. If a build is submitted using deploy_pipe : int during this window, it is automatically rejected. |
Go-Live Stage
Once you acknowledge the go-live stage, it is mandatory to rehost the production environment to QA and integration environments.
You must open a service request in the PTC Support portal for this activity. For more information, see Opening a Service Request.
Run State
• After a successful go-live, all the environments are rehosted from the production environment. Therefore, PTC strongly recommends propagating the changes to the development environments. The recommended approach is to use BAC and export a complete BAC package from the integration environment. For more information, see Importing a BAC Package Using CCD Utility.
Consider the following points:
◦ Data Model is the minimum that you must export to rebuild your system (type and attribute manager).
◦ For objects not supported by BAC, you can either export from Integration from the UI (when possible) or recreate the loadfile on your development environment.
• After that, the submission cycle is similar to the one mentioned in the Before Go Live section in the Submitting and Promoting Your Package topic.
• After Major Go Live, you must rehost your production environment to the QA and integration environments. A service request must be opened for the rehost activities. For more information, see Opening a Service Request.