WBM Workflow Process and Stages
This topic explains the Windchill Bulk Migrator (WBM) workflow process and various WBM stages.
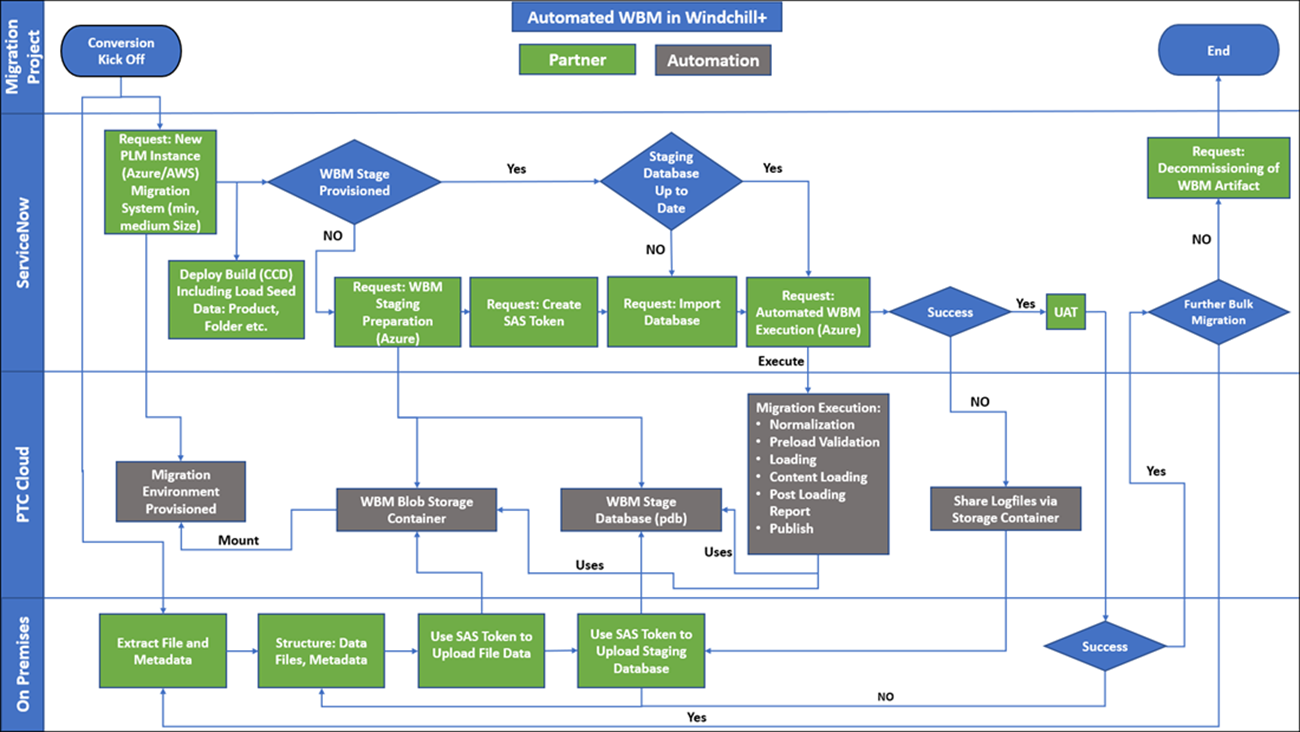
WBM Workflow Process
The following workflow diagram illustrates the execution of WBM migration:
On-Premises Staging Database
Data migration is typically an iterative process. The first phase usually involves extracting files and metadata from a source system. To structure the migration metadata, a staging database is required. To eliminate multiple data transformations, it is assumed that an on-premises staging database is used. For more information, see https://support.ptc.com.
• The database must be Oracle according to Windchill version requirements. • The database structure must comply with Windchill WBM staging database requirements. |
Creating a Windchill WBM Staging Database
This procedure assumes that you have an existing development environment.
Ensure that WBM is installed on your system. |
1. In your development environment, start from the WT_HOME directory.
2. Run the following command:
WT_HOME/bin/wbmgen
This generates and prepares the staging structure according to the module set and Windchill configuration.
3. To create a new schema user in an Oracle Database, use the create_user.sql script. Follow these steps:
a. Log in to your Oracle Database using an account with administrative privileges, such as a user with the DBA role or the SYSTEM user.
b. Execute the following script to create a staging user:
@db/sql(3)/create_user.sql
c. Log in to your Oracle Database using the previously created staging user.
d. Execute the following script to create the staging schema:
@db/sql(3)/wbm/create_staging_schema.sql
e. Execute the following script to create audit tables:
@@db/sql(3)/wbm/create_audit_schema.sql
For more information, see the Configuring the Loading Infrastructure and Object loaders topic in the WBM Install and Usage Guide.
Export Your Database Dump with Oracle Data Pump Export (expdp)
The Oracle Data Pump, often referred to as expdp (export data pump) and impdpm (import data pump), is a set of command-line utilities provided by Oracle Database to perform high-speed data and metadata operations. These utilities are used for tasks like data export, data import, and data migration. For more information, see .Azure Storage Account.
The following section explains how to create a dump file using Oracle data pump, and export the data using expdp.
Creating a Dump File Using Oracle Data Pump
Follow these steps to create a dump file using Oracle data pump:
The dumps are extracted from the Windchill system. Ensure that Windchill is shut down during the extracting process. |
1. Open the Windchill shell or command prompt in Windows or Linux, and execute the following command to create a directory on your system to store the data pump files:
mkdir <directory name>
For example:
mkdir D:\datapump
Ensure that you have enough space to store the Windchill database user schema. |
2. Log in to sqlplus from the Windchill shell or command prompt and execute the following command to create a logical directory object in Oracle:
sql> create directory EXP_DIR as '<path to operating system directory created previous step>';
This object should point to the physical directory created in the previous step. |
For example:
sql> create directory EXP_DIR as 'D:\datapump';
3. In the same sqlplus session, execute the following command to grant the user permission to export the logical directory object:
sql> grant all on directory EXP_DIR to <user performing the export dump>;
For example:
sql> grant all on directory EXP_DIR to pdmadmin;
• The data pump imports can always read lower-compatible versions. • For Windchill 11.0 M030 supported with Oracle 11g, the dump is compatible for import on Oracle 19c. |
4. Execute the following command to export the Windchill database user:
expdp userid=system/<password> directory=EXP_DIR
dumpfile=<dump_file_name>%u.dmp logfile=<log_file_name>.log
schemas=<staging db user> filesize=<size>M
dumpfile=<dump_file_name>%u.dmp logfile=<log_file_name>.log
schemas=<staging db user> filesize=<size>M
• In <staging db user>, specify the username for the local on-premise staging database used for preparing WBM data migration. • In <size>, specify the desired size of each DMP file created. • The export must be performed by a privileged user, such as system user, to include schema information in the dump file. |
5. Create an LST file with tablespace sizing information by executing the given SQL script. The output ${PDB_NAME?}.lst file must be provided to PTC.
Prerequisites:
◦ Ensure that the staging database is created using Windchill compatible scripts.
◦ Before executing the SQL script, ensure that you have the required permissions. For example, staging database users must have the right to query.
SQL script:
read -p "Please, provide PDB_NAME: " PDB_NAME
export PDB_NAME
export LST_FILE_NAME=${PDB_NAME?}.lst
echo "
SET FEEDBACK off;
SET HEADING off;
SET TRIMSPOOL ON
WHENEVER SQLERROR EXIT SQL.SQLCODE;
ALTER SESSION SET container=${PDB_NAME?};
SPOOL ${LST_FILE_NAME?};
SELECT tablespace_name || '*' || ceil((USED_SPACE*8192*1.2)/(34359738368)) files_required
FROM dba_tablespace_usage_metrics
WHERE tablespace_name NOT IN ('TEMP','SYSTEM','SYSAUX','UNDOTBS1');
" | sqlplus -s / as sysdba
ls -l ${LST_FILE_NAME?}
6. Upload the dump files and tablespace details (LST file) to the <customer storage account>/container data/database directory.
Use of Oracle Data Pump Export (expdp)
The expdp command is used to export data and metadata from an Oracle database into a binary file, which can be used for various purposes, such as backup, data migration, or transfer of data between databases. Follow these steps to use expdp:
1. Open the Command Prompt or Terminal window on the machine where the Oracle database is installed.
2. Log in to the Oracle database using a privileged account. For example, a user with the DBA role or the system user.
sqlplus username/password
3. Once you are connected to the database, you can use the expdp command to export data. The basic syntax is as follows:
expdp username/password@database_name DIRECTORY=directory_name DUMPFILE=dumpfile_name [other options]
where,
◦ username/password — Your Oracle database credentials.
◦ database_name — The name of the database from which you want to export data.
◦ DIRECTORY — Specifies the directory object in the database where the export file is written.
◦ DUMPFILE — Specifies the name of the export dump file.
4. You can include various options to customize the export process according to your requirements. Here are some commonly used options:
◦ TABLES: Export specific tables or schemas.
◦ SCHEMAS: Export data from specific schemas.
◦ INCLUDE: Specify what to include in the export (e.g., tables, indexes, constraints).
◦ EXCLUDE: Specify what to exclude from the export.
◦ PARALLEL: Perform the export in parallel to improve performance.
◦ COMPRESSION: Enable data compression during export.
◦ LOGFILE: Specify a log file for recording export-related information.
For example, expdp HR/password@orcl DIRECTORY=DATA_PUMP_DIR DUMPFILE=hr_export.dmp SCHEMAS=HR
5. Press Enter to execute the expdp command. Depending on the size and complexity of the export, it may take some time to complete the process.
6. Once the export is finished, you can view a binary dump file in the specified directory.
Content Migration Steps Post Content Loader
1. Upload the content files to the WBM Azure Blob storage container.
<wbm blob storage container>/files
2. A preload content verification can be used from there. The WBM blob storage is mounted to the Windchill Application Server that is executing WBM.
3. The content metadata load must be finished.
4. The content map file is generated and uploaded to your storage account.
5. The content map file must be used to generate a file transfer script from <wbm blob storage container>/files to <vault blob storage container>.
6. From the content map file, the columns SRCFILEPATH, SRCFILENAME, TARGETFILEPATH, TARGETFILENAME can be received and used for creating a copy script.
For example,
azcopy cp 'https://ptccustomerblobstorage.blob.core.windows.net/'%SRCFILEPATH%'/'%SRCFILENAME%' 'https://ptccustomerblobstorage.blob.core.windows.net/'%TARGETFILEPATH%'/'%TARGETFILENAME%'" --exclude-path="MOUNT_VALIDATION_DATA" --recursive=true'
A high degree of parallel execution increases the performance of moving the files.
For example, the code to be adapted using ant is as follows:
<foreach list="${contentmapfile}" delimiter="${,}" target="copy"
param="SRCFILEPATH, SRCFILENAME, TARGETFILEPATH, TARGETFILENAME"
parallel="Yes" maxThreads="32"/>
<target name="copy">
<exec failonerror="true" executable="azcopy">
<arg value="cp"/>
<arg value="https://ptccustomerblobstorage.blob.core.windows.net/${SRCFILEPATH}/${SRCFILENAME}"/>
<arg value="https://ptccustomerblobstorage.blob.core.windows.net/${TARGETFILEPATH}/${TARGETFILENAME}"/>
<arg value="--exclude-path=MOUNT_VALIDATION_DATA"/>
<arg value=" --recursive=true"/>
</exec>
</target>