ThingWorx Remote Access Client (RAC)
The ThingWorx Remote Access Client (RAC) is a standalone application that enables ThingWorx customers to access their devices at remote sites through the Remote Access features of a ThingWorx Platform. As a ThingWorx system administrator or developer, you may want to create a custom mashup for your service technicians. Alternatively, you can use the RAC through the Remote Access and Control module of ThingWorx Asset Advisor. For any end user to connect to a remote device, the user needs to have a tunnel created between the local machine and the remote device.
The RAC connection to a ThingWorx Platform is called a command channel. In a single node ThingWorx Platform installation, the command channel goes directly to the platform from a RAC instance. In a high availability (HA) environment, the RAC connection requires a ThingWorx Connection Server to establish the command channel to an available ThingWorx Platform server in the cluster. For more information on using remote access in an HA environment, refer to Remote Access in a High Availability Cluster.
You can download the RAC from the ThingWorx Remote Access Client Downloads page. The RAC download is an installer that you can run on your system.
The following sections provide details about the RAC, including a quick start for using it, followed by more detailed steps. Click a section title to display the content. Click the title again to hide the content.
Administrator Setup Tasks
Remote sessions are supported for devices that are running ThingWorx Edge MicroServer (EMS), applications written using the ThingWorx Edge SDKs, and Axeda eMessage agents. Administrators need to ensure that the requirements are met and perform setup tasks. For details, refer to Requirements for Remote Access for ThingWorx Edge Agents and Administrator Tasks for Remote Access.
Silent Installation
In a scenario where the Remote Access Client (RAC) needs to be installed to a group of laptops used by service technicians, administrators may want to install the RAC silently on those laptops. The following table lists the commands for silent installation by supported operating system:
For each of the commands in the table, you need to replace <version> with the version number in the name of the executable file for the RAC. For example, use tw-ra-client-2.3.0 instead of tw-ra-client-<version>. |
Operating System | Commands |
|---|---|
Windows | As an Administrator user, run the executable as follows:
|
MAC (iOS) | Run the following commands:
|
Ubuntu | Run the following command:
|
Fedora | Run either of the following commands:
OR
|
Security
By default, the ThingWorx Remote Access Client (RAC) is configured to use TLS for network connections. The use of TLS is a security best practice and should be used, especially in production deployments.
Quick Start
As long as your ThingWorx environment is set up for remote access, follow these steps:
1. From ThingWorx Composer, set up a Thing and then connect it to your ThingWorx Platform. When setting up a Thing, make sure that it meets the following criteria for remote access:
a. The Thing must have the RemoteAccessible Thing Shape applied. Axeda eMessage Agent Things have this shape applied automatically.
b. The Thing must have the appropriate RemoteAccessProvider configured in the RemoteAccessProvider property.
c. The Thing must be reporting. That is, the value of the isReporting property must be true, which is indicated by a check mark icon. A reporting Thing typically is a remote device bound into the ThingWorx Platform.
d. The Thing must have a tunnel endpoint configured. Good candidates for testing are protocols such as:
▪ SSH — for a machine without desktop components, TCP port 22
▪ VNC — for a machine with desktop, TCP port 5900
By design, the tunnel created by RAC remains active as long as neither side breaks the connection. For this reason, ThingWorx Edge tunneling does not support protocols that make multiple connections to and disconnections from the Edge, such as using a browser to access an HTTP server. For example, RDP triggers disconnects when you use the wrong credentials and when you are connecting to an RDP server that is not trusted by your computer. To be most effective, make sure you understand the connection and disconnection behavior of the protocol you are trying to forward. |
2. Download the latest version of ThingWorx Remote Access Client (RAC) installer for your operating system from the ThingWorx Remote Access Client Downloads page. The RAC is always backwards compatible. Unless you have the latest version of the Remote Access Extension, however, you cannot use all of the features available in the latest version of RAC.
3. Navigate to the location where you downloaded the installer, and run it.
4. Using ThingWorx Mashhup Builder, add the raClientLinker widget to a mashup and set the properties described in the following table:
Property | Description | ||
|---|---|---|---|
ThingName | The name of the Thing that represents the asset with which you want to establish a remote session. | ||
RemoteEndpoint | You need to bind this property to a row returned by the GetRemoteAccessibleEndpoints service. This service is provided on the RemoteAccessProvider Thing Shape and therefore to the Remote Access Server you are using for remote sessions. For example, the Global Access Server (GAS). | ||
ProviderConfig |
This property is JSON that is specifically formatted to the type of RemoteAccessProvider being used, either the ThingWorxInternalRemoteAccessProvider Thing for ThingWorx AlwaysOn agents, such as the ThingWorx Edge MicroServer (EMS), or the GASRemoteAccessProvider Thing for Axeda eMessage Agents. For more information, refer to RemoteAccessProvider providerConfig Property Details. | ||
SessionDescription | The JSON-formatted metadata field from the RemoteSessionParameters Data Shape supports this property. When the widget calls the StartSession service, it adds the content of this field with the key description and the vavlue of the SessionDescription property. |
For more details about adding the widget to a mashup, refer to Adding the
Widget to a Mashup.
5. Using your mashup, start a Remote Session with the Edge Thing that you set up and connected in step 1. The following sequence takes place:
a. A remote session is requested for the selected Thing in ThingWorx Platform by invoking the StartSession service on the Thing.
b. The RAC application (tw-ra-client) is launched.
c. The RAC application establishes a connection with the Remote Access Server and displays the session information.
The RAC application connects by default to WebSocket Secure (WSS). If you must access the mashup through a clear-text HTTP endpoint (not recommended), the RAC client must be configured to allow a connection to an un-encrypted WebSocket (WS). To do this, modify the config.json file to contain the { "secure": false } element. Refer to the bulleted list in Step 10 in the topic, Administrator Setup Tasks for Remote Access for the location of the file on your operating system. Disabling encryption is an insecure and bad practice, so do not use this unless absolutely necessary. Keep in mind that the RAC application can connect to either WSS or WS endpoints, but not to both of them at the same time. |
6. Connect your client application to the local port. The RAC application forwards client data to the Remote Access Server (and on to the remote device), and vice versa.
The RAC uses port cycling when attempting to establish a session. During port cycling, the RAC tries to connect using the connect port defined at the Agent. Failing that, it uses a random port.
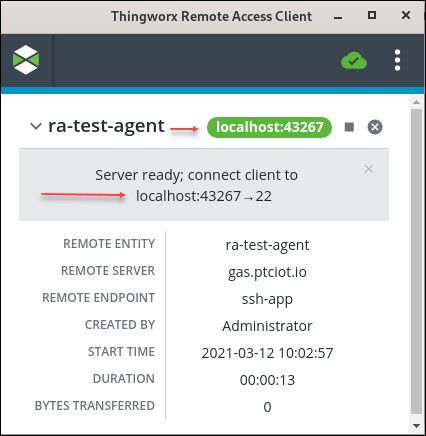
The RAC always shows the IP address and actual port used and an arrow pointing to the Agent's connect port. Showing the Agent's connect port as well as the port actually used enables you to identify any ports that have been aliased. For example, in the green oval and in the grey text area in the following figure, RAC displays "localhost" with the local random TCP port used, 43267. The grey text area also includes an arrow pointing to the Agent's configured connect port, 22:
For detailed instructions and illustrated usage information for the widget and the Remote Access Client, refer to Using the RAClientLinker Widget.
Exploring the ThingWorx Remote Access Client (RAC)
The ThingWorx Remote Access Client (RAC) launches when the LaunchClient service on the raClientLinker widget is invoked. When setting up your own mashup for remote sessions, you could have a button labeled Start RAC that invokes the service. The rest of this section explains the user interface of this client.
When launched from a mashup, the RAC user interface looks similar to this upon session startup:
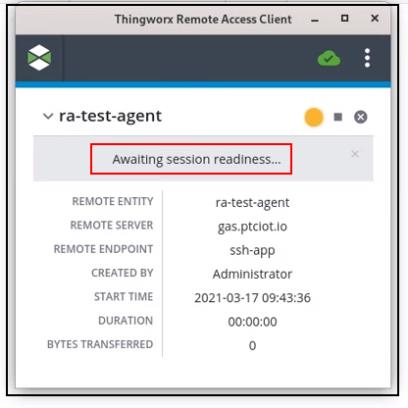
The name of the Thing that the RAC is connecting to in the above screenshot is ra-test-agent. The message window displays the current status, which in the example above is Awaiting server readiness. The icons that appear on the right, above the message window, are described as follows:
•  — An indicator of the connection status. The color yellow means that it is connecting. The indicator animates to indicate that the client is doing something.
— An indicator of the connection status. The color yellow means that it is connecting. The indicator animates to indicate that the client is doing something.The list of parameters below the status message include:
◦  — An indicator of the connection status. The color yellow means that it is connecting. The indicator animates to indicate that the client is doing something.
— An indicator of the connection status. The color yellow means that it is connecting. The indicator animates to indicate that the client is doing something.The list of parameters below the status message include:
▪ REMOTE ENTITY — The name of the Thing that represents the remote device in ThingWorx. In the example above, the Thing name is ra-test-agent
▪ REMOTE SERVER — The name of the remote access provider that is used to establish the remote session. In the example above, the remote server is a ThingWorx Global Access Server (GAS), with the name, gas.ptciot.io.
▪ REMOTE ENDPOINT — The type of remote interface for this remote session. In the example above, the type of remote interface is ssh-app, which refers to SSH or Telnet interfaces.
▪ CREATED BY — The name of the user who started this remote session. In the example above, the user name is Administrator.
▪ START TIME — The day of the week, date, time, and timezone that the remote session was initiated by the remote server. In the example above, the session was started on March 17, 2021 at 09:43:36.
▪ DURATION — The number of hours, minutes, and seconds that the remote session has lasted, from initialization to disconnection. In the example above, the session has not yet been established so this field shows a zero in every time field.
▪ BYTES TRANSFERRED — The number of bytes exchanged between the remote device and the computer from which the RAC was started. For ThingWorxInternal tunnels, the value is initially a non-zero value once the device-side server is ready. In the example above the value is 0 because the RAC is waiting to connect.
When the session is ready, this indicator changes to display "localhost:" and the port number in use on a green background and on the grey background, the message that the remote access server is ready to connect to the device on "localhost:port 43267", which is mapped to the Agent's connect port, 22:
You can click the port number to copy it to paste into your client application. |
◦  — Click the black square icon if you want to stop the current session.
— Click the black square icon if you want to stop the current session.◦  — Click this icon to remove the session from the screen. If you have not already stopped the session, clicking this icon stops the session and then removes it from the screen.
— Click this icon to remove the session from the screen. If you have not already stopped the session, clicking this icon stops the session and then removes it from the screen.On the right side of the top bar are the following:
•  — This icon indicates the status of your connection to ThingWorx Platform. When a check mark appears in the green cloud, you are connected.
— This icon indicates the status of your connection to ThingWorx Platform. When a check mark appears in the green cloud, you are connected.• 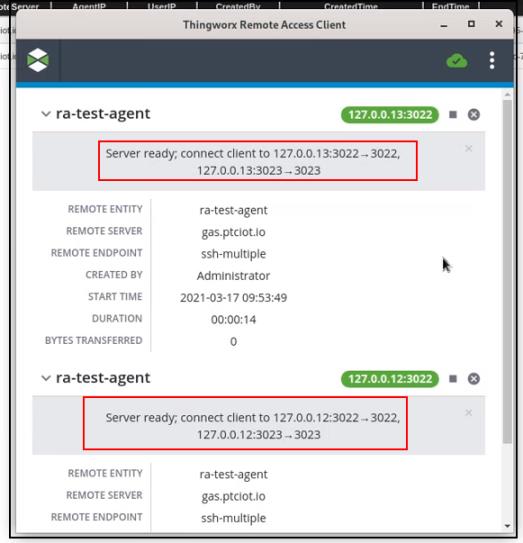 — Click this icon to display the menu for the RAC:
— Click this icon to display the menu for the RAC: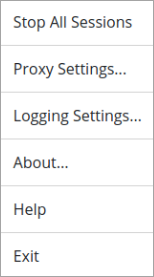
To stop all of the sessions, select the Stop All Sessions option from the menu. Note that the information for each session remains visible until you click to remove it.
to remove it.To configure the logging settings for the current RAC instance, select Logging Settings. For more information. see Configuring Data Logging for RAC.
If you must use a proxy server between your computer and the remote device, you can specify the host name and port number to use by selecting the Proxy Settings option from the menu:
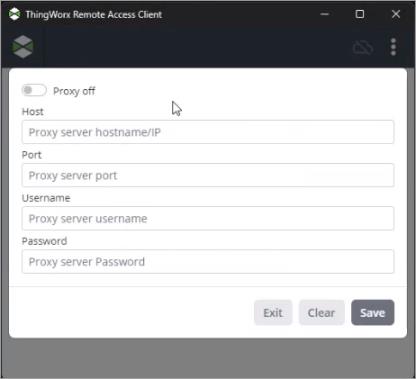
It's important to note that the RAC can be launched with no arguments for the purpose of setting up the proxy settings. Once the settings are saved, the RAC continues to use the proxy settings that were configured when launched by a ThingWorx mashup. |
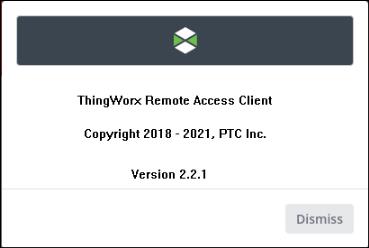
To display version information about the RAC, select the About option on the menu:
To open the Remote Access help center, select the Help option on the menu.
When you are ready to close the client, select the Exit option on the menu. Exiting prompts you to end all active sessions, if there are any.
Configuring Proxy Settings Using the User Interface
You can configure the settings using the RAC user interface, as follows:
1. Launch the RAC locally or from ThingWorx.
When RAC is launched locally, it does not connect to ThingWorx. However, you can still configure the proxy settings and save them.
2. Click the menu button:, then select Proxy Settings.
3. In the proxy settings dialog, enable the proxy toggle button, then specify the following options:
◦ Host—The host name of the proxy server.
◦ Port—The port number on the proxy server.
◦ Username—The name of the proxy user (Optional).
◦ Password—The password for the proxy user (Optional).
The password for the proxy server is masked and stored in an encrypted format in the config.json file. The encryption uses the safeStorage API of the Electron library and is supported by major operating systems. For more information, see safeStorage | Electron (electronjs.org). |
Click Save.
Connections Proxied by the RAC
If the proxy configuration is specified in RAC, the following outbound connections are tunneled through the proxy server:
• ThingWorx Platform, using the AlwaysOn protocol.
• Axeda Global Access Server (GAS), using TCP.
• ThingWorx Internal Remote Access Provider, using the AlwaysOn protocol.
Status of Remote Sessions
The Remote Access Client (RAC) can detect a change to CLOSE_REQUESTED in the status of a remote session. This change occurs when the RemoteAccessSubsystem determines that a remote session has exceeded the maximum time that it can remain active.
To refresh the lastActivityTime for a remote session, the RAC periodically (every 20 seconds) updates the session to refresh the bytesTransferred for any sessions that meet the following conditions:
• The bytes transferred tracked by the RAC are greater than 0
• The bytes transferred tracked by the RAC has changed since the last update for the session
• The session status is not TERMINATED.
If the session update fails due to the session no longer existing, the session status is forced to the TERMINATED state. This change effectively stops the refresh bytes processing.
This timer is only enabled/required for the clients of the ThingWorxInternalRemoteAccessProvider. Since the Axeda Global Access Server (GAS) sends a periodic status update to the ThingWorx eMessage Connector, this timer is not required for a client of a GASRemoteAccessProvider. The lastActivityTime for GAS client sessions is refreshed automatically. |
There are two levels of information, warning, and error messages that are displayed in the RAC user interface:
• Application messages are displayed under the top banner.
• Sessions messages show information about a session and are displayed under the session name. The following image shows an error message for a specific session:

For more information on troubleshooting RAC, see General.