HTTP Request
Use the HTTP Request action to make an HTTP request to the OData server.
Complete the following steps to use the HTTP Request action in your workflow:
1. Drag the HTTP Request action under OData to the canvas, place the pointer on the action, and then click  or double-click the action. The HTTP Request window opens.
or double-click the action. The HTTP Request window opens.2. Edit the Label, if needed. By default, the label name is the same as the action name.
3. To add an HTTP connector type, refer to Supported Odata Connector Types.
If you previously added a connector type, select the appropriate Connector Type, and under Connector Name, select the connector.
4. Click TEST to validate the connector.
5. Click MAP CONNECTOR to execute the action using a connector that is different from the one that you are using to populate the input fields. In the Runtime Connector field, provide a valid HTTP connector name. For more information about MAP CONNECTOR, see Using Map Connector.
6. In the Relative URL enter the relative URL to be appended to the connection URL.
Depending on the connector type that you selected, do one of the following:
◦ For Basic and 2–way SSL connector type, in the Relative URL field, enter the part of the URL that must be appended to the Connection URL that you specified while creating the Basic connector.
◦ For OAUth (Named User) or OAuth (Session User) connector type, in the Relative URL field, enter the part of the URL that must be appended to the BASE_URL that you specified while loading the HTTP OAuth provider.
7. In the Select HTTP Method list, select one of the following options:
◦ GET—Retrieves information from the server using a specified URI.
◦ POST—Sends data to the server using HTML forms.
◦ PUT—Replaces all current representations of the target resource with the uploaded content.
◦ DELETE—Removes all current representations of the target resource specified by URI.
◦ PATCH—Makes partial changes to an existing resource.
◦ OPTIONS—Describes communication options for the target resource.
◦ HEAD—Retrieves the status line and header from the server using a specified URI.
8. If you selected POST, PUT, DELETE, or PATCH as the HTTP method, in the Set Body Type list, select the correct body type:
◦ Select x-www-form-urlencoded, and then select Form to provide inputs for individual input fields listed in the form, or select Assign JSON to specify a single JSON with all required inputs.
If you chose Form |
|---|
Under the Body group, click Add to add a Name and Value pair. Click Add to add multiple name-value pairs. Click  to delete any name-value pair that you added. to delete any name-value pair that you added. |
OR
If you chose Assign JSON |
|---|
In the Body field, enter all required inputs in the [{"name":"string", "value":"string"}] format. |
◦ Select multipart-form-data, and then select Form to provide inputs for individual input fields listed in the form, or select Assign JSON to specify a single JSON with all required inputs.
If you chose Form |
|---|
Under the Body group, click Add to add a Key and Value pair. If you entered values in the Key and Value fields, select Type as Text. If you mapped the output of a previous action to the Key and Value fields, select the type as File. Click Add to add multiple key-value pairs. Click to delete any key-value pair that you added. |
OR
If you chose Assign JSON |
|---|
In the Body field, enter all required inputs in the [{"name":"string", "value":"string"}] format. |
◦ Select raw, and in the Body field, specify the text, or map the output of a previous action to provide the text.
9. In the Timeout field, enter the time in seconds before a server sends response headers. The default is set to 60.
10. In the Decode Gzip Response list, select true to automatically decode the gzip response; otherwise, select false. The default is set to false.
11. In the Response Encoding list, select the response encoding type. The default is set to UTF8.
12. In the Follow Redirect list, select true to follow HTTP 3xx responses as redirects; otherwise, select false. The default is set to true.
13. In the Follow Non-GET Redirects list, select true to follow non-GET HTTP 3xx responses as redirects; otherwise, select false. The default is set to false.
14. Click Show additional fields.
15. For the URL Params section, select Form to provide inputs for individual input fields listed in the form, or select Assign JSON to specify a single JSON with all required inputs.
If you chose Form |
|---|
Under the URL Params group, click Add to add a Key and Value pair. Click Add to add multiple key-value pairs. Click to delete any key-value pair that you added. |
OR
If you chose Assign JSON |
|---|
In the URL Params field, enter all required inputs in the [{"name":"string", "value":"string"}] format. |
16. For the Headers section, select Form to provide inputs for individual input fields listed in the form, or select Assign JSON to specify a single JSON with all required inputs.
If you chose Form |
|---|
Under the Headers group, click Add to add a Key and Value pair. Click Add to add multiple key-value pairs. Click to delete any key-value pair that you added. |
OR
If you chose Assign JSON |
|---|
In the Headers field, enter all required inputs in the [{"name":"string", "value":"string"}] format. |
17. In the SSL Certificate Verification list, select true to verify that SSL certificates are valid for HTTPS calls; otherwise, select false. The default is set to true.
18. In the CSRF section:
◦ In CSRF URL field, enter the relative CSRF URL to be appended to connection URL after webapp name.
◦ Select Form to provide inputs for individual input fields listed in the form, or select Assign JSON to specify a single JSON with all required inputs.
If you chose Form |
|---|
Under the Headers group, click Add to add a Key and Value pair. Click Add to add multiple name-value pairs. Click to delete any name-value pair that you added. |
OR
If you chose Assign JSON |
|---|
In the Headers field, enter all required inputs in the [{"name":"string", "value":"string"}] format. |
19. In the Get CSRF Token from, select Response Body or Response Header.
If you chose Response Body |
|---|
In the JSON path for the field field, provide JSON path for the field. |
OR
If you chose Response Header |
|---|
In the Header Name field, enter the header name. |
20. In the Set CSRF Token using, select URL Parameter or Request Header.
If you chose URL Parameter |
|---|
In the Parameter Name field, enter the URL parameter |
OR
If you chose Response Header |
|---|
In the Header Name field, enter the header name. |
21. Click Done.
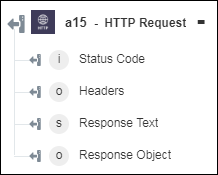
Output schema