TLS Support for Flink
TLS protection for Flink connections is available starting with Platform Analytics, release 9.1. TLS support for Flink includes mutual authentication and is enabled by default. If you opt to disable TLS for Flink during installation, your Flink REST port will be exposed to outside networks.
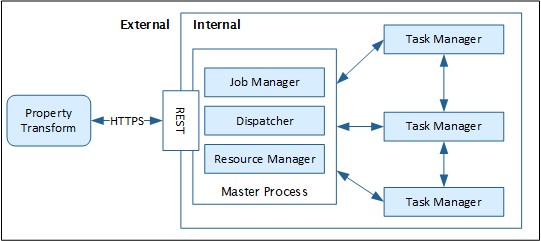
External vs. Internal Flink Connections
When configuring TLS support, Apache Flink differentiates betweenexternal and internal connectivity:
• External – REST endpoint connections between Flink processes and any external tools or services. These connections include commands to start and control Flink jobs and communication with the Property Transform microservice.
• Internal – Communication between the Flink job manager and Flink task managers. These connections run Flink custom protocols behind the scenes.
The image below depicts both the external and internal connections that can be protected with TLS support.
Flink TLS Overview
TLS support for Flink is enabled by default but requires some configuration before you deploy Platform Analytics. The configuration steps required differ depending on which release you are installing:
• 9.0 – 9.1 – Individual REST server, REST client, and internal TLS configurations are manual and can be performed separately.
• 9.2 and later – REST server and REST client configurations are manual but the internal TLS configuration is handled automatically during installation.
If you are using an existing external instance of Flink, instead of the instance available from the Platform Analytics installer, configuration of internal TLS communication is not required, manually or automatically. |
TLS support for Flink is optional. However, if you opt to disable TLS support, you will be exposing the Flink REST port to outside networks.
Follow the links below to complete the necessary tasks:
• Generate the Flink REST Truststore – This process establishes a root certificate authority and places it inside a truststore that the other Flink TLS certificates will reference.
• Generate the Flink REST Server Certificate – This process generates a signed server-side certificate with a keystore to provide TLS protection for the external REST connection between Flink and the Property Transform microserver.
• Generate the Flink REST Client Certificate – This process generates a signed client-side certificate with a keystore to provide TLS protection for the external REST connection between Flink and the Property Transform microserver.
• Create the Internal Certificate – This process generates a keystore to provide TLS protection for the internal communication between the Flink job and task managers. This step is necessary unless you are using an existing Flink instance, or installing Platform Analytics 9.2 or later. In those scenarios, this step is not necessary.
• During Platform Analytics Installation – Gather the parameters you will need during the Platform Analytics installation in order to enable TLS for Flink.
• Accessing the Flink Dashboard with Mutual Authentication Enabled – Some extra steps are required if you intend to use the built-in Flink monitoring dashboard.
For more information about Flink TLS configuration, see the Flink Deployment and Operations website.
Using an Existing Flink Server?
If you are using an existing Flink server, instead of installing the new Flink instance provided with the Platform Analytics installer, you can still enable TLS protection but you must also enable mutual authentication. If you do not enable both TLS and mutual authentication, you will be exposing the Flink REST port to outside networks.
Generate the Flink REST Truststore
You can either follow the procedure below to generate a self-signed certificate, or you can obtain a TLS certificate from any trusted Certificate Authority (CA). If you obtain a signed root certificate from a trusted CA, you will still need to generate a truststore and import the certificate into it. Step 3 below can help with this procedure.
1. Run the following keytool command to create a ca.keystore file and password. The keystore will contain a public certificate and a private key.
keytool -genkeypair -alias <ca alias> -keystore <ca name>.keystore -dname "CN=<common name>" -storepass <ca keystore password> -keyalg RSA -keysize 4096 -ext "bc=ca:true" -storetype PKCS12
In this command, note the following:
◦ dname – A common name parameter is sufficient.
◦ ext – Must be included as shown in order to generate the CA certificate.
Sample Command: keytool -genkeypair -alias ca -keystore ca.keystore -dname "CN=localhost" -storepass changeit -keyalg RSA -keysize 4096 -ext "bc=ca:true" -storetype PKCS12 |
2. Run a the following keytool command to export information about the ca.keystore you created in the previous step. This information is necessary to create a truststore in the next step.
keytool -exportcert -keystore <ca name>.keystore -alias <ca alias> -storepass <ca keystore password> -file <ca file name>.cer
Sample Command: keytool -exportcert -keystore ca.keystore -alias ca -storepass changeit -file ca.cer |
3. Run the following keytool command to create a ca.truststore file and password. The truststore will contain the signed root certificate.
keytool -importcert -keystore <ca name>.truststore -alias <ca alias> -storepass <ca truststore password> -file <ca file name>.cer -noprompt
Sample Command: keytool -importcert -keystore ca.truststore -alias ca -storepass changeit -file ca.cer -noprompt |
Generate the Flink REST Server Certificate
You can either follow the procedure below to generate a self-signed certificate, or you can obtain a TLS certificate from any trusted Certificate Authority. If you obtain a server-side certificate from a trusted CA, you will need to create a keystore and import the both the server-side certificate and the signed root certificate into it. Step 4 below can help with this procedure.
1. Run the following keytool command to create a signed rest.keystore file and password. The keystore will contain a public certificate and a private key.
keytool -genkeypair -alias <flink alias>.rest -keystore <rest name>.signed.keystore -dname "CN=<common name>" -ext "SAN=dns:<hostname>,ip:<IP address>" -storepass <keystore password> -keyalg RSA -keysize 4096 -storetype PKCS12
In this command, note the following:
◦ dname – A common name parameter is sufficient.
◦ ext – A host name or IP address, or both.
Sample Command: keytool -genkeypair -alias flink.rest -keystore rest.signed.keystore -dname "CN=localhost" -ext "SAN=dns:localhost,ip:127.0.0.1" -storepass changeit -keyalg RSA -keysize 4096 -storetype PKCS12 |
2. Run the following keytool command to create a certificate signing request (CSR) file necessary to request a new certificate from the Certificate Authority.
keytool -certreq -alias <flink alias>.rest -keystore <rest name>.signed.keystore -storepass <keystore password> -file <rest file name>.csr
Sample Command: keytool -certreq -alias flink.rest -keystore rest.signed.keystore -storepass changeit -file rest.csr |
3. Run the following keytool command to generate a rest certificate that is signed by the root CA.
keytool -gencert -alias <ca alias> -keystore <ca name>.keystore -storepass <keystore password> -ext "SAN=dns:<hostname>,ip:<IP address>" -infile <rest file name>.csr -outfile <rest file name>.cer
Sample Command: keytool -gencert -alias ca -keystore ca.keystore -storepass changeit -ext "SAN=dns:localhost,ip:127.0.0.1" -infile rest.csr -outfile rest.cer |
4. Run the following keytool commands to import the CA and REST certificates into the signed rest keystore.
keytool -importcert -keystore <rest name>.signed.keystore -storepass <keystore password> -file <ca file name>.cer -alias <ca alias> -noprompt
keytool -importcert -keystore <rest name>.signed.keystore -storepass <keystore password> -file <rest file name>.cer -alias <flink alias>.rest -noprompt
Sample Commands: keytool -importcert -keystore rest.signed.keystore -storepass changeit -file ca.cer -alias ca -noprompt keytool -importcert -keystore rest.signed.keystore -storepass changeit -file rest.cer -alias flink.rest -noprompt |
Generate the Flink REST Client Certificate
You can either follow the procedure below to generate a self-signed certificate, or you can obtain a TLS certificate from any trusted Certificate Authority. If you obtain a client-side certificate from a trusted CA, you will need to create a keystore and import both the client-side certificate and the signed root certificate into it. Step 4 below can help with this procedure
1. Run the following keytool command to create a signed client.keystore file and password. The keystore will contain a public certificate and a private key.
keytool -genkeypair -alias <flink alias>.client -keystore <client name>.signed.keystore -dname "CN=<common name>" -ext "SAN=dns:<hostname>,ip:<IP address>" -storepass <keystore password> -keyalg RSA -keysize 4096 -storetype PKCS12
In this command, note the following:
◦ dname – A common name parameter is sufficient.
◦ ext – A host name or IP address, or both.
Sample Command: keytool -genkeypair -alias flink.client -keystore client.signed.keystore -dname "CN=localhost" -ext "SAN=dns:localhost,ip:127.0.0.1" -storepass changeit -keyalg RSA -keysize 4096 -storetype PKCS12 |
2. Run the following keytool command to create a certificate signing request (CSR) file necessary to request a new certificate from the Certificate Authority.
keytool -certreq -alias <flink alias>.client -keystore <client name>.signed.keystore -storepass <keystore password> -file <client file name>.csr
Sample Command: keytool -certreq -alias flink.client -keystore client.signed.keystore -storepass changeit -file client.csr |
3. Run the following keytool command to generate a client certificate that is signed by the root CA.
keytool -gencert -alias <ca alias> -keystore <ca name>.keystore -storepass <keystore password> -ext "SAN=dns:<hostname>,ip:<IP address>" -infile <client file name>.csr -outfile <client file name>.cer
Sample Command: keytool -gencert -alias ca -keystore ca.keystore -storepass changeit -ext "SAN=dns:localhost,ip:127.0.0.1" -infile client.csr -outfile client.cer |
4. Run the following keytool commands to import the CA and REST certificates into the signed client keystore.
keytool -importcert -keystore <client name>.signed.keystore -storepass <keystore password> -file <ca file name>.cer -alias <ca alias> -noprompt
keytool -importcert -keystore <client name>.signed.keystore -storepass <keystore password> -file <rest file name>.cer -alias <flink alias>.client -noprompt
Sample Commands: keytool -importcert -keystore client.signed.keystore -storepass changeit -file ca.cer -alias ca -noprompt keytool -importcert -keystore client.signed.keystore -storepass changeit -file client.cer -alias flink.client -noprompt |
Create the Internal Keystore
This step is not necessary if you are using an existing Flink instance or if you are installing Platform Analytics 9.2 or later. |
To configure TLS support for Flink internal communication, run the following command to generate a file that can be used as both a keystore and a truststore. For the internal TLS communication, a self-signed certificate is sufficient. A certificate signed by a trusted Certificate Authority is not necessary.
keytool -genkeypair -alias <flink alias>.internal -keystore <store name>.keystore -dname "CN=<common name>" -storepass <keystore password> -keyalg RSA -keysize 4096 -storetype PKCS12
In this command, note the following:
• dname – A common name parameter is sufficient.
Sample Command: keytool -genkeypair -alias flink.internal -keystore internal.keystore -dname "CN=flink.internal" -storepass internal_store_password -keyalg RSA -keysize 4096 -storetype PKCS12 |
During Platform Analytics Installation
During the Platform Analytics installation, you will be asked if you want to enable TLS protection for your Flink REST connections and your Flink Internal communication. If you want to enable TLS authentication for Flink, you will be prompted to provide certain information during installation. Be prepared to provide the following:
• For REST TLS:
◦ Location of the Flink REST Keystore
◦ REST Keystore Password
◦ REST Key Password (usually the same as the Keystore Password)
◦ Location of the Flink Client Keystore
◦ Client Keystore Password
◦ Client Key Password (usually the same as the Keystore Password)
◦ Location of the Flink REST Truststore (where the CA root is stored)
◦ REST Truststore Password
• For Internal TLS (if applicable):
◦ Location of the Flink Internal Keystore
◦ Internal Keystore Password
◦ Location of the Flink Internal Truststore (if different from the Keystore)
◦ Internal Truststore Password (if different from the Keystore)
◦ Internal Key Password (usually the same as the Keystore Password)
For more information about configuring Flink during Platform Analytics installation, see one of the following procedures:
Accessing the Flink Dashboard with Mutual Authentication Enabled
Apache Flink includes a built-in monitoring dashboard where you can view your Flink components and Flink jobs. The dashboard can be useful for troubleshooting, when necessary. However, when mutual authentication is enabled, as part of the TLS support for Flink, additional steps are necessary in order to access the Flink dashboard. The specific steps will depend on the browser you are using, but follow the general steps below to import the Flink Client Keystore certificate to your browser so that it can communicate with the Flink dashboard:
1. Identify the location of your signed client-side REST keystore certificate. This is the certificate you generated or imported in the Generate the Flink REST Client Certificate procedure above.
Depending on your browser, you might need to rename the certificate file so that it has a specific file extension. For example, if using Firefox, the file might need to have a PFX extension. |
2. Open your browser and navigate to the certificate manager. For example, in the Chrome browser, navigate to > > > .
The Certificates dialog box opens.

3. Click Import and browse for the signed Flink client-side REST certificate.
4. When prompted, enter the Client Keystore Password.
5. To complete the setup, log into the Flink Dashboard and select the signed Flink client-side REST certificate.