Managing Service Zones for a Territory
Adding a Service Zone
To add a service zone for a territory:
1. Click the radio button adjacent to the Territory record. Any existing coverage records associated with the selected Territory appear at the bottom in the Territory Coverage tab.
2. Click the Service Zones tab.
a. Use the Draw icons, located on the top left corner of the map, to select an area on the map.
b. Click a shape icon (Circle, Rectangle, or create your own shape icon).
c. Move your cursor over your desired coverage area on the map. The map highlights the coverage zone.
d. After you have designated your coverage zone, enter the service zone name in the Zone Name field.
e. Expand, retract, or reposition a zone by dragging the circles displayed on the zone perimeter. A circle-shaped zone can be moved by dragging the circle displayed at the center of the zone. A reverse arrow will appear; click this arrow if you want to undo that action.
f. Use the Zoom slider to zoom in/out of the map and the hand icon to move the map.
3. In the Work Order Volume area, select a filter item from the Filter On picklist (for example, Completed Date).
4. Type in a Start Date and an End Date in the appropriate fields.
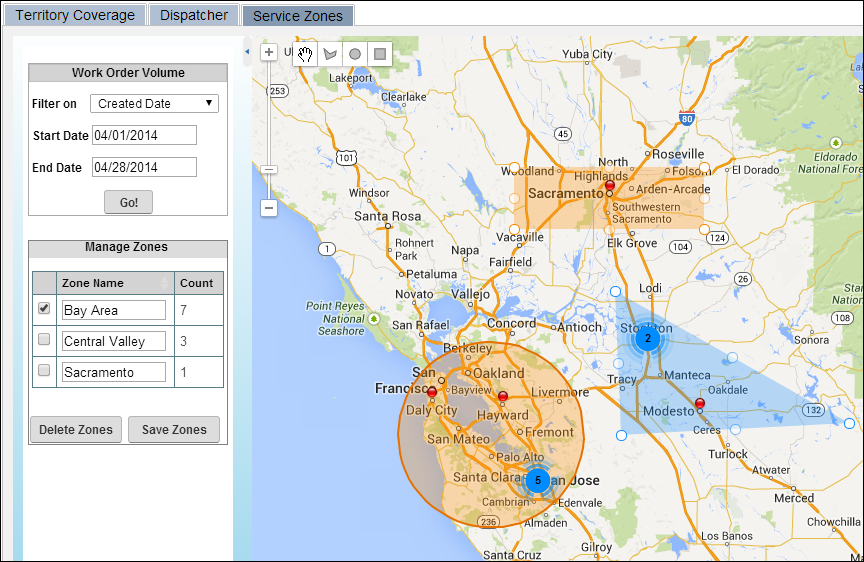
5. Click the Go! button. The plots display on the map, as shown in the figure below:

6. Save the zone by selecting a Zone Name from the Manage Zone area, and clicking the Save Zones button.
Editing a Service Zone
You can expand, retract, or reposition a zone by dragging the circles displayed on the zone perimeter. A circle-shaped zone can be moved by dragging the circle displayed at the center of the zone. A reverse arrow will appear; click this arrow if you want to undo that action.
You can also edit a Zone Name by clicking and then typing inside the Zone Name textbox. Select the newly revised Zone Name, and click the Save Zones button to ensure that the zone is saved.
Deleting a Service Zone
To delete a service zone, perform the following steps:
1. Check the checkbox next to the Zone Name of the service zone you want to delete.
2. Click the Delete Zones button. When prompted, click OK to confirm the deletion. The selected Service Zone gets deleted permanently.