Creating Time Based PM Plan Templates
To create Time-Based PM Plan Templates:
1. Go to ServiceMax Setup > Installed Base, PM & FCO > PM Plan Templates. The PM Plan Templates page is displayed.
2. Click New. The Select Preventive Maintenance Plan Template Type page is displayed.
|
|
Ensure that you set up the Task Template prior to setting up your PM template.
|

3. Select Time/Frequency Based from the Template Type drop-down list and click Continue. The Time Based PM Plan Template page is displayed.

4. Enter the details for the following fields:
Fields | Description | ||
|---|---|---|---|
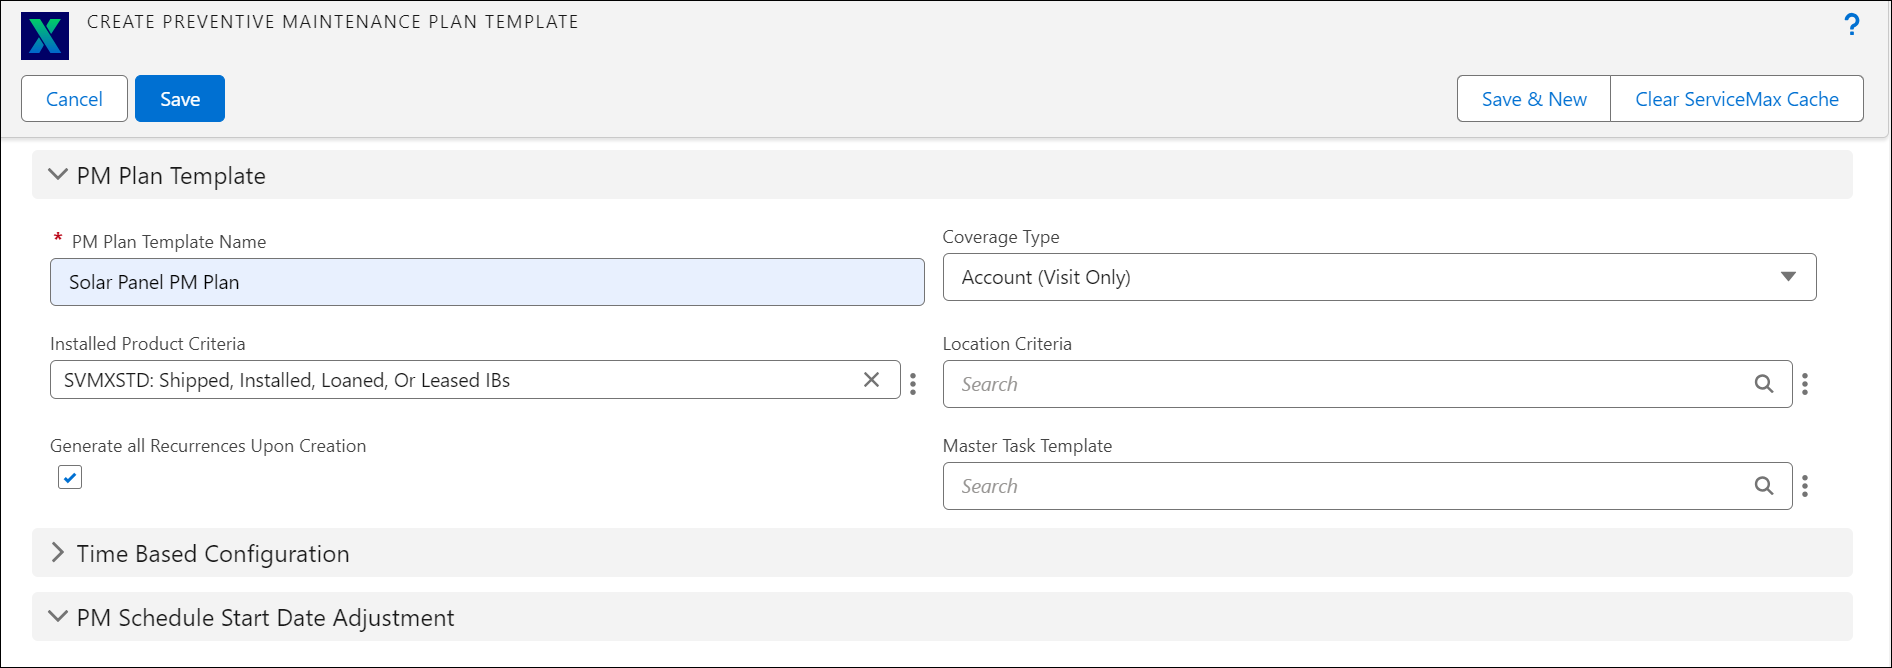
PM Plan Template | |||
PM Plan Template Name | Enter a name for the PM Plan template. | ||
Coverage Type | Select any one of the following options for the coverage type. • Account (Visit Only): If you select Account, it means that you are using the template when you want to cover the maintenance at the account level. You can use the template when creating the PM Plan from Account or Service Contract objects. • Product (Must Have IB): If you select Product, you must have an Installed Based (IB) product, and the coverage is at the IB level. You can use the template when creating the PM Plan from IB or Service Contracts if it has a covered product. • Location (Must Have Location): If you select Location, the coverage is at the location level. You can use the template when creating the PM Plan from Locations or Service Contracts with a covered location. | ||
Installed Product Criteria | In the Installed Product Criteria field, enter or select the Installed Product to be included for the PM plan. You can use the SFM expression for filtering and picking the Installed Products to be used. | ||
Location Criteria | In the Location Criteria field, enter or select the location criteria included in the PM plan. | ||
Master Task Template | Click the Master Task Template lookup field to associate Task Template to the PM Plan Template header. This provides additional mapping for required parts to the PM Work Orders generated from the PM Plan. This field is available in Create PM Plan Template and Edit PM Plan Template out-of-the-box SFMs. For already created PM Plans, you can drag and drop this field on the PM Plan record page layout. | ||
Time-Based Configuration | |||
Type | Select either Actual or Fixed. • Actual: If you select Actual, the scheduled date is calculated based on the Actual date of the work order activity • Fixed: If you select Fixed, the scheduled date is calculated based on the Min Activity Changed, Maximum Activity Changed, and the Adjusted Values. Min Activity Changed and Max Activity Changed is common to both actual and fixed type. For example, the minimum value can be one day, and the maximum is three days. The value is always calculated in days. For fixed type, the calculation is based on the Adjusted Value and Adjusted Units of the activity. | ||
Activity Work Order | Select either First Activity or Last Activity. • First Activity: If you select First Activity, the following preventive maintenance is scheduled based on the first work order activity. If there are multiple work orders and you select First Activity, the date and time (as picked up using the Activity field) of the work order that gets completed first is considered. • Last Activity: If you select Last Activity, the preventive maintenance is scheduled based on the previous activity you select. If there are multiple work orders, the last work order activity is considered for schedule calculation. | ||
Activity | A detailed description of the task to be performed. | ||
Min Activity Changed | Enter the minimum number range to calculate the adjustment for the scheduled date. | ||
Max Activity Changed | Enter the maximum number range to calculate the adjustment for the scheduled date. | ||
Adjusted Units | Select the unit to be adjusted. The available options are Weeks, Months, Years, and Days. | ||
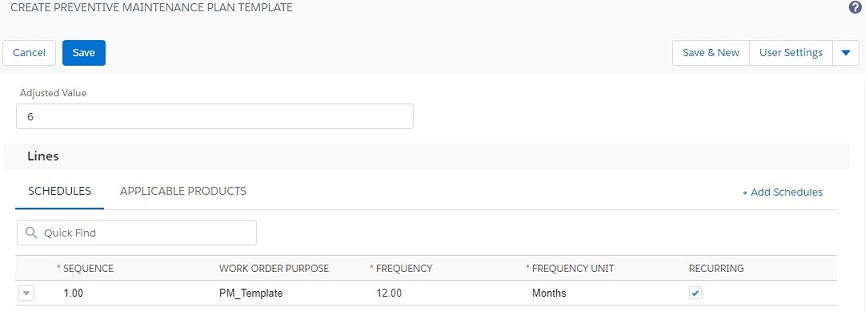
Adjusted Value | Enter a number based on which the scheduled date is calculated. | ||
PM Schedule Start Date Adjustment While creating a PM Plan, you may include delay and delay units so that the first service date can be delayed according to the values given. The first scheduled date was set as Start Date + Frequency. If you specify a delay, the first schedule date is set as Start Date + Delay, and the subsequent schedules will be the Last Run Date + Frequency. If the delay is not specified, the first service date will be Start Date + Frequency.
| |||
Start Date Delay Unit | Enter the delay unit in the Start Date Delay Unit field. These fields need to be configured separately; they are not part of the standard SFM. Also, note that the concept of delay is different from adjustments. | ||
Start Date Delay | Enter the delay in the Start Date Delay field. These fields need to be configured separately; they are not part of the standard SFM. Also, note that the concept of delay is different from adjustments. | ||
Schedule Tab Create the schedule for the PM plan in the Schedules tab. PM Schedule Template determines the frequency of work order creation and whether the schedule is recurring or non-recurring. | |||
Sequence | Enter the sequence number. It designates the sequence of a particular task template/work orders if multiple task templates are involved. | ||
Work Order Purpose | Enter the task template name. You must set up your Task Template before setting up your PM template. | ||
Frequency | Enter the frequency number. | ||
Frequency Unit | Select Years, Months, or Weeks as the frequency unit. | ||
Work Order Duration | Indicates the duration (in days) of any Work Order generated from the PM Schedule Definition. It is used by the PM Engine to populate the Preferred End Date on the Work Order Record by combining the Work Order Duration with the Preferred Start Date. For more information, see Configuring Work Order Duration for PM Work Orders. | ||
Recurring | Select this checkbox for the sequence to recur. If you do not select this checkbox, the sequence occurs only once. | ||
Add Schedules | To add a row in the grid, click Add Schedules. Add data to the required fields in the row. | ||
Delete | To delete a row in the grid, click Delete next to the row you want to delete. | ||
Applicable Products Tab | |||
Product | Enter a product name or use the Lookup tool to search for the product. | ||
Product Line | Select a product line (Accessory, Network, Software, and so on) from the picklist. | ||
Product Family | Select a product family. | ||
Add Applicable Products | To add a row in the grid, click Add Applicable Products. Add data to the required fields in the row. | ||
Delete | To delete a row in the grid, click Delete next to the row you want to delete. | ||

5. Click Save .