AcV-2 Programme timelines (UPDM - MODAF aliases)

Creation
To create an AcV-2 Programme Timelines:
• Right-click the
Architectural Description or
Service Description that is to own the AcV-2 Programme Timelines, point to New, point to Diagram, point to MODAF, and then click AcV-2 Programme Timelines.
When you open an AcV-2 Programme Timelines, Modeler can generate it as HTML for viewing in your Internet browser, or generate it as a spreadsheet for viewing in Microsoft Excel. To specify how matrices and tables are opened for a model: in the Packages pane, right-click the Model, point to > , click Matrix/Table Generation Format, and then select HyperTextMarkupLanguage_HTML or Excel_XLS.
Each time you open an AcV-2 Programme Timelines, Modeler generates the product using the latest data from the model.
Purpose
On an AcV-2 Programme Timelines:
• View Actual Project elements and their milestones on a time line.
• For each milestone, view its date and the values set for its Project Theme elements.
A milestone can be an Actual Project Milestone, Deployed Milestone, Increment Milestone, No Longer Used Milestone or Out Of Service Milestone element.
To specify the date range that is covered by the AcV-2 Programme Timelines, specify the start date or end date: right-click the AcV-2 Programme Timelines, point to Set, click Start Date or End Date, and from the Date/Time Editor dialog set the required date and time. If no date range is specified for the AcV-2 Programme Timelines, the date range is derived from the date ranges of the Actual Project elements that are displayed.
To specify the scale of the lifeline on the AcV-2 Programme Timelines: right-click the AcV-2 Programme Timelines, point to Set, click Lifeline Scale, and then from the Value Selector dialog select Days, Weeks, Months or Years.
To show or hide Milestone Sequence and Project Sequence elements: right-click the AcV-2, point to Set, click Show Sequences, and then from the Value Selector dialog select TRUE or FALSE.
Analyzed Packages
By default, the AcV-2 Programme Timelines searches for Actual Project elements that are contained within the Architectural Description or Service Description that owns the AcV-2 Programme Timelines.
To search for Actual Project elements from other Architectural Description and Service Description packages: right-click the AcV-2 Programme Timelines, point to Links, and then click Analyzed Packages. From the Links Editor, select the Architectural Description and Service Description packages from which you want to search for Actual Project elements.
Diagrams Elements
An AcV-2 Programme Timelines can show the following elements.

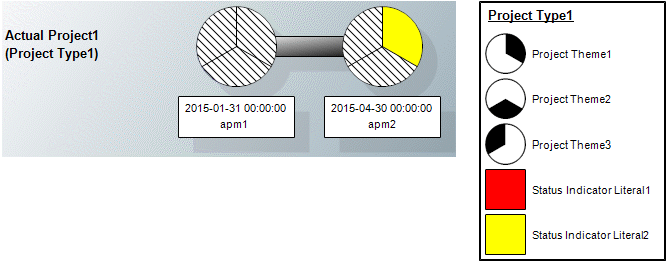
For each Actual Project found in the Analyzed Packages, the AcV-2 Programme Timelines displays a lifeline that shows its milestones.
The name of the Actual Project element's Project Type is shown below the Actual Project. An AcV-2 Programme Timelines shows a key for each Project Type that is shown.
An Actual Project element's Actual Project Milestone elements are shown on the Actual Project lifeline as segmented circles. The name and date of the Actual Project Milestone are shown below the segmented circle.
The sections of the Actual Project Milestone represent the Project Theme elements of the Actual Project Milestone and the values that are set for those Project Theme elements.
An Actual Project element's Deployed Milestone elements are shown on the Actual Project lifeline as segmented circles. The name and date of the Deployed Milestone are shown below the segmented circle.
The sections of the Deployed Milestone represent the Project Theme elements of the Deployed Milestone and the values that are set for those Project Theme elements.
An Actual Project element's Increment Milestone elements are shown on the Actual Project lifeline as segmented circles. The name and date of the Increment Milestone are shown below the segmented circle.
The sections of the Increment Milestone represent the Project Theme elements of the Increment Milestone and the values that are set for those Project Theme elements.
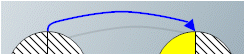
A Milestone Sequence is shown as a blue arrow that links the predecessor milestone to the successor milestone.
An Actual Project element's No Longer Used Milestone elements are shown on the Actual Project lifeline as segmented circles. The name and date of the No Longer Used Milestone are shown below the segmented circle.
The sections of the No Longer Used Milestone represent the Project Theme elements of the No Longer Used Milestone and the values that are set for those Project Theme elements.
An Actual Project element's Out Of Service Milestone elements are shown on the Actual Project lifeline as segmented circles. The name and date of the Out Of Service Milestone are shown below the segmented circle.
The sections of the Out Of Service Milestone represent the Project Theme elements of the Out Of Service Milestone and the values that are set for those Project Theme elements.
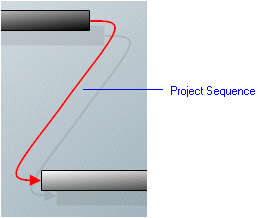
A Project Sequence is shown as a red arrow that links the predecessor Actual Project lifeline to the successor Actual Project lifeline.
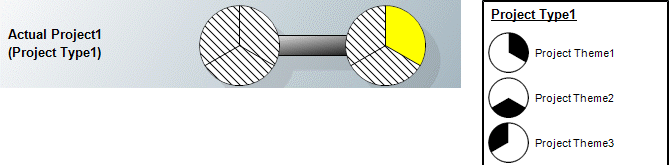
A Project Theme is shown as a section of a milestone.
The key shows which Project Theme is represented by each section of the milestone.
The color of the section shows which value (Status Indicator Literal) has been set for the Project Theme. A striped section means that no value has been set.
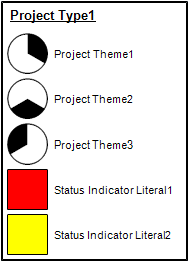
A key is shown for each Project Type that is used as the type of a shown Actual Project.
The key shows which Project Theme is represented by each milestone section, and which Status Indicator Literal is represented by each milestone section color.
When a Status Indicator Literal has been selected as the value of a Project Theme, the color of the milestone section indicates which Status Indicator Literal has been set.
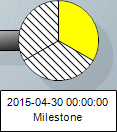
In the preceding example you can see that the top-right section of the apm2 milestone represents Project Theme1 and its yellow color shows that its value has been set to Status Indicator Literal2.
Example
In this example we create an Actual Project that has two milestones, and we set a project theme value for the second milestone.
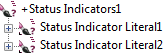
We start by creating Status Indicators1, which can be used as a type for the Project Theme elements we create. For Status Indicators1 we create Status Indicator Literal1 that is red, and Status Indicator Literal2 that is yellow.
On an AcV-3 Project Type Definition we create the following elements:
• Project Type1 and Project Milestone1, connected through a Project Milestone Role that is created using a composite Association.
• On Project Milestone1 we create Project Theme1 and Project Theme2, both of which use Status Indicators1 as their type.

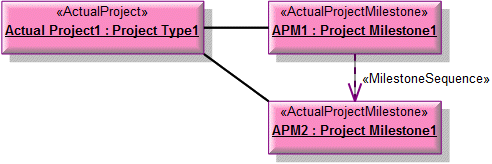
On an AcV-3 Actual Project Definition we create the following elements:
• Actual Project1 that uses Project Type1 as its type. We set its start date to 2014-12-01 and we set its end date to 2015-6-1
• An Actual Project Milestone named APM1 that uses Project Milestone1 as its type. We set its date to 2015-01-01.
• An Actual Project Milestone named APM2 that uses Project Milestone1 as its type. We set its date to 2015-04-01.
• We link Actual Project1 to the Actual Project Milestone elements APM1 and APM2 using the  Link button.
Link button.• We create a Milestone Sequence from APM1 and APM2.
Note that in the preceding example we have hidden the slot values and full type names through the view options.
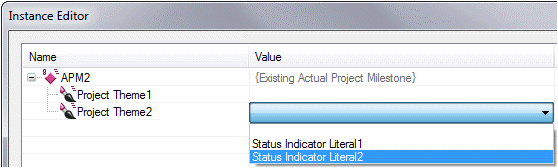
We now want to set the value of Project Theme2 for APM2: we right-click APM2, point to Set, and then click Values. From the Instance Editor dialog, we set Project Theme2 to Status Indicator Literal2.
We create the AcV-2 Programme Timelines and set its start date to 2014-12-01 and its end date to 2015-06-01. We now open the AcV-2 Programme Timelines.
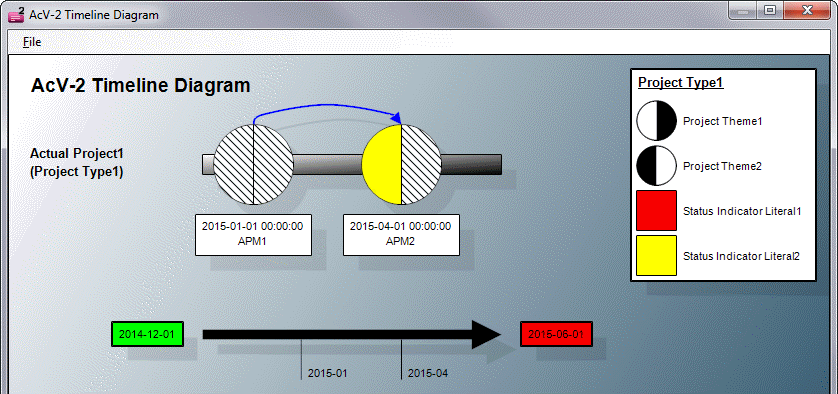 from the AcV-2 Programme Timelines, you can see the following:
• Actual Project1 has a start date of 2014-12-01 and an end date of 2015-06-01.
• Actual Project1 has two Actual Project Milestone elements named APM1 and APM2. The blue arrow shows that they are connected through a Milestone Sequence.
• APM1 has a date to 2015-01-01 and does not have any values set for its Project Theme elements.
• APM2 has a date to 2015-04-01 and has its Project Theme2 set to Status Indicator Literal2.
The following sections provide information about how an AcV-2 Programme Timelines is used in the model.
Create an AcV-2 Programme Timelines from


Creates or shows these UPDM elements


