Customization > Extensibility Through Profiles, Stereotypes, Tag Definitions and Scripts > Extensibility through stereotype scripts and script items > Extending linking capabilities through stereotypes and tag definitions > Worked example of extending linking capabilities through stereotypes and tag definitions
  
Worked example of extending linking capabilities through stereotypes and tag definitions
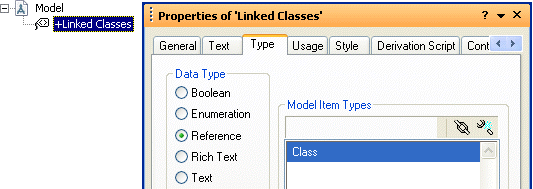
In this example, we create a Reference Tag Definition that allows you to create a link from an Increment to a Class. We then apply the Stereotype to an Increment and link that Increment to a Class through the Tag Definition.
This example does not make use of a profile. To see a worked example (extending model item properties through Profiles, Stereotypes and Tag Definitions) that makes use of a profile, see: Worked example of extending model item properties through profiles, stereotypes and tag definitions
To extend linking capabilities through Stereotypes and Tag Definitions, we carry out the following steps:
1. Create a Tag Definition that allows linking to a Class
2. Specify inverse name and publish the Tag Definition
3. Create a Stereotype to apply the Tag Definition
4. Link the Stereotype to its Tag Definition
5. Apply the Stereotype to an Increment
6. Link an Increment to a Class through the Tag Definition
7. Navigating from the source item to the referenced item
8. Navigating from a referenced item to the source item
1 Create a Tag Definition that allows linking to a Class
We create a Tag Definition named Linked Classes, set its Data Type to Reference, and specify Class as a valid item type. see: Creating a tag definition to extend linking capabilities
How?
2 Specify inverse name and publish the Tag Definition
We set the Inverse Name to Linked Items. You can use the Inverse Name of a reference Tag Definition to navigate to source items from a target item.
We publish the Tag Definition, so that it can be applied to model items. We click the Publish button on the Usage tab of its Property Pages.
3 Create a Stereotype to apply the Tag Definition
We create a Stereotype named Classes, and specify that it is valid only for an Increment. see: Creating a stereotype to extend linking capabilities
4 Link the Stereotype to its Tag Definition
We link the Classes stereotype to the Linked Classes tag definition by dragging the Linked Classes tag definition to the Classes stereotype.see: Creating a stereotype to extend linking capabilities
5 Apply the Stereotype to an Increment
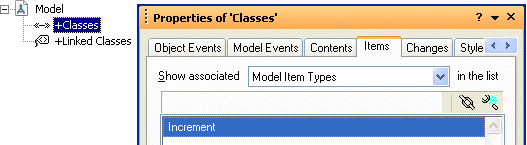
We link the Classes Stereotype to an Increment named Increment1 by dragging Increment1 to the Classes Stereotype.
6 Link an Increment to a Class through the Tag Definition
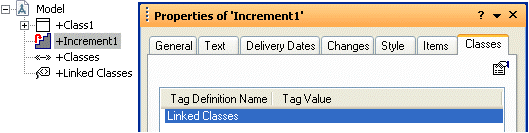
We open Increment1's Property Pages and notice that a Classes tab is now included for the linked Classes stereotype. The Linked Classes tag definition is shown on the tab.
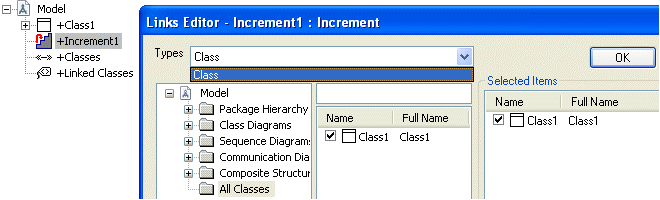
We select the Linked Classes entry, and then click its Tag Value cell. Because the Linked Classes Tag Definition has a Reference Data Type, Modeler opens the Links Editor. The Linked Classes Tag Definition allows linking to only Classes, so only Class is listed in the Types list. We select the check box associated with Class1. see: Linking to an item through an applied tag definition
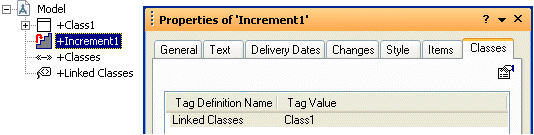
We have now linked an Increment to a Class through a reference Tag Definition. The Increment1's Property Pages show that Class1 is a linked item.
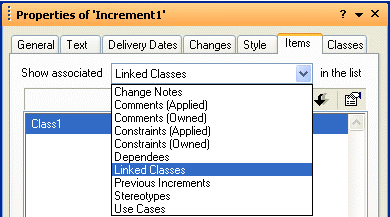
7 Navigating from the source item to the referenced item
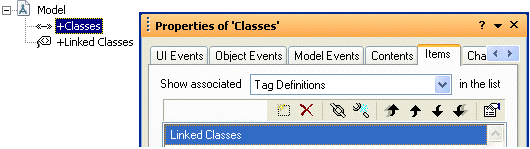
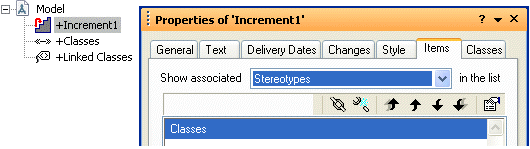
On the Items tab of Increment1's Property Pages, the Linked Classes tag definition has been added to the list. We can select Linked Classes in the list and then navigate to any Classes referenced through the Linked Classes tag definition.
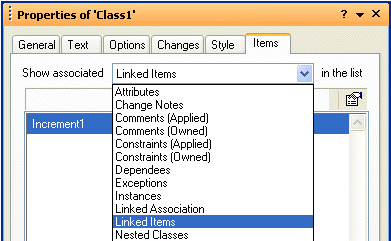
8 Navigating from a referenced item to the source item
On the Items tab of Class1's Property Pages, the Linked Classes tag definition has been added to the list using its Inverse Name, that is, Linked Items. We can select Linked Items in the list and then navigate to any Increments that reference Class1 through the Linked Classes tag definition.