Adding a new PTC RV&S OSLC Server
To allow Modeler users to access a remote PTC RV&S system, an OSLC Server must be added to the OSLC browser.
To add a new OSLC Server:
1. Launch Modeler and open a model.
2. Select the OSLC browser.
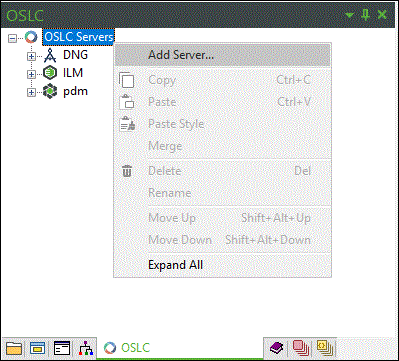
3. Right-click on the OSLC Servers node and select Add Server….

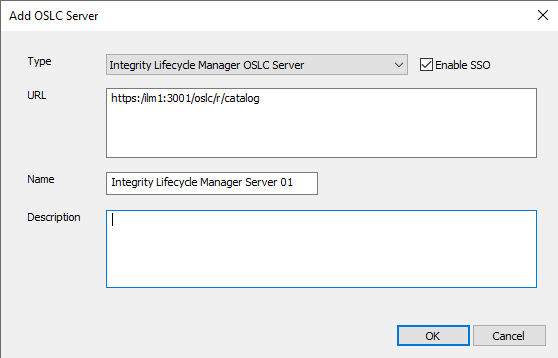
4. Select the PTC RV&S OSLC Server option from the Type drop-down menu.
5. To enable single sign-on authentication when connecting to this OSLC server, select the Enable SSO check box.
6. Enter the URL for the remote system's OSLC Provider Service. For example: https:/ilm1:3001/oslc/r/catalog
7. Enter a Name for the new server.
8. Optionally enter a Description for the new server.

9. Click OK.
10. If you have selected the Enable SSO check box, then a dialog to enter the Client and Key appears.
11. A login dialog for PTC RV&S server appears. Enter a valid username and password for that PTC RV&S server.
12. Confirm that the server has now been added and is visible in the OSLC browser.
If the PTC RV&S OSLC server has its own PTC RV&S server residing on a different server, the user must add the Windchill RV&S server URL to the server mapping file to re-route view requests to the correct server. PTC Modeler creates an empty PTC RV&S server mapping file when you add an OSLC server. This mapping file is located at %PROGRAMDATA%\PTC Integrity Modeler\OSLCConsumer. The name of the mapping file contains the full URL of the PTC RV&S OSLC server including the port number with ILMMap as the extension.
For example, if the PTC RV&S OSLC server URL is https://10.216.245.127:3001/oslc/r/catalog, then the mapping file name would be http___10_216_245_127_3001.ILMMAP. The user must add the PTC RV&S server URL as the first line in this mapping file.