Exercise 2: Extending the Animation from Exercise 1
When observing the animation, the viewer’s attention is to be drawn to the part that is moving. To do this, each animated part is highlighted in color prior to the point when movement begins. Once the movement has been completed, the part is to return to its original color.
1. Select the > menu.
Both the Edit Animation and Timeline dialog boxes appear with the completed animations from exercise 1.
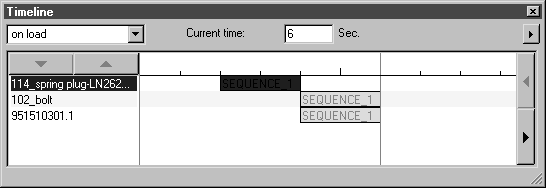
The current time in the Timeline dialog box is at 6 seconds. No objects are selected and no sequences are active. This is indicated by the fact that there are no sequence bars with a red S. The Edit Animation dialog box is empty.
2. To provide a better overview for further work, the timeline with the sequences is to be enlarged.
To do this, click the arrow on the right and select the Set timeline scale command. Enter 40 next to Pixels per second in the subsequent dialog box.
3. Click on the sequence bar for the entry 114_spring plug in the Timeline dialog box.
The Timeline dialog box appears as indicated below.
The spring plug in the drawing is selected and SEQUENCE_1 with STEP_1 and the action Move appears in the Edit Animation dialog box.
4. The action for the colored highlighting of the spring plug is created in a new step. This step is added on to the sequence.
Enter 4 next to Current time in the Timeline dialog box. Press the RETURN key to confirm the entry.
The timeline skips to the end of the sequence bar of SEQUENCE_1 for the object 114_spring plug.
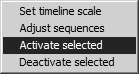
5. Click on the arrow at the top right of the Timeline dialog box and select the Activate selected command from the pop-up menu.
The name SEQUENCE_1 in the Timeline dialog box turns red.
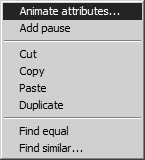
6. In the Edit Animation dialog box, click on the arrow and select the Animate attributes command from the pop-up menu.
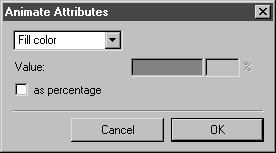
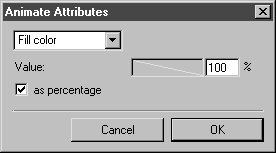
The Animate Attributes dialog box appears.
7. Select the Fill color attribute from the pop-up menu.
8. Now click in the color panel. Select the primary color Red from the Color dialog box that appears and confirm by clicking OK.
9. Click OK in the Fill color dialog box.
| The Fill color attribute can only be applied if a fill color already exists for the object’s surfaces. |
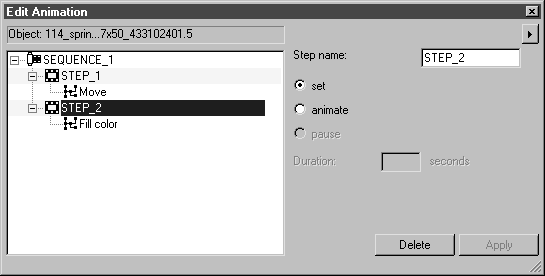
The Edit Animation dialog box now appears as depicted below.
The action Fill color appears in the new step STEP_2.
The spring plug in the drawing is now filled with the color red.
10. The action of color highlighting the spring plug is to take place before the plug is moved. STEP_2 must therefore occur before STEP_1.
To achieve this, click the entry STEP_2 and, holding the mouse button down, drag the entry above the entry STEP_1. Now release the mouse button.
STEP_2 is now positioned before STEP_1.
| The automatic numbering of steps (_X) indicates the order in which the steps have been created. When the step begins depends entirely on the chronological order of the steps. You can rename the steps and sequences at any time as desired. |
11. If you wish to check whether the animation is running correctly, simply move the timeline backwards and forwards between 0 and 4 seconds.
You will then see the color of the spring plug change to red. Then the move starts. The color red is still applied.
12. On completion of the movement the spring plug is to return to its original color.
To achieve this, the colored highlighting (fill color red) must be reset in a further action as part of a new step. This is to occur at the end of the sequence.
4 must be selected in the panel next to Current time in the Timeline dialog box.
13. Click on the arrow at the top right of the Edit Animation dialog box and select the Animate attributes command from the pop-up menu.
The Animate Attributes dialog box appears.
14. Select the Fill color attribute from the pop-up menu.
15. Now check the box next to as percentage and enter 100 next to %. Confirm by clicking OK.
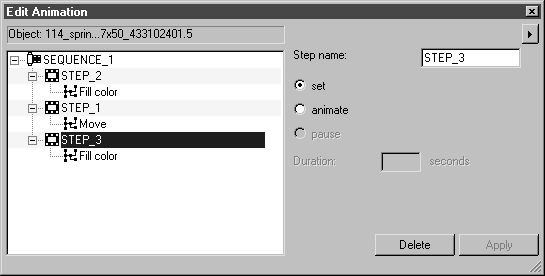
SEQUENCE_1 appears in the Edit Animation dialog box with the new STEP_3 and the action Fill color.
The spring plug in the drawing returns to its original color. This completes the extension to the spring plug animation.
16. The animations for the bolt (102_bolt) and lever (9515103301.1) now need to be extended in the same way. These animations begin simultaneously at the current time of 4 seconds.
The following actions, as described for the spring plug animation, are to be carried out for each of these objects:
a. Select the sequence for the object (Timeline dialog box)
b. Set the current time to 6 seconds (Timeline dialog box)
c. Select the Activate selected command (Edit Animation dialog box)
d. Select the Animate attributes command (Edit Animation dialog box)
e. Select the color Red (Edit Animation dialog box)
f. Use Drag & Drop to move the new STEP_2 ahead of STEP_1 (Edit Animation dialog box)
g. Select the Animate attributes command (Edit Animation dialog box)
h. Select the original color for the object (100%) (Edit Animation dialog box)
This completes the extension of the existing animation. If you click on the timeline now, hold down the mouse button and move the timeline backwards and forwards between 0 and 6 seconds, you will see the entire animation.
17. Click the close box of one of the two dialog boxes you used to create the animation.
18. Save the file.
19. Select the > menu.
Arbortext IsoView is launched. After a short time, the drawing of the support appears in the Arbortext IsoView window as it is depicted in the 3D mode of Arbortext IsoDraw CADprocess. Two seconds later, the animation begins.
The file, support_ani1.idr, with the completed animation can also be found in the Arbortext-IsoDraw-install-path\Tutorial\Tutorial CADprocess folder.