Color Parts
The drawing is to be made into a colored graphic. To do this, the parts are to be assigned new colors in place of the standard color.
1. Change the display mode.
Click on the symbol for
Smooth rendering
display mode.
| The drawing is also depicted with color rendering in this display mode. However, the depiction has a smoother appearance that in Rendering display mode. The grading of the rendering is smoothed. |
2. Select the > menu.
The Fills window opens on the drawing sheet as depicted below.
| A surface, object, or area of a drawing can only be assigned a new color when it has been selected. |
3. Select assembly metal.101 in the object window.
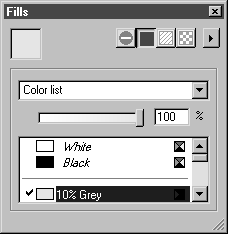
4. Click on the button for Color in the Fills window then on the color 10% Gray in the list of colors.
The metal (metal.101) appears in the new color.
5. Select receiving.102 in the object window.
6. Click on the color Color 24 in the color list in the Fills window and enter 50 (%) for the tone (in the pop-up menu for color selection).
7. Select cover.119 in the object window and select the same color (10% Gray) as for receiving.102.
8. Select spindle.114 in the object window. Select the color Color 24 and enter 40 (%) for the tone.
9. Select metal.115 in the object window and select the same color as for spindle.114.
All the cylindrical and countersunk screws are to be assigned the same color.
10. Click the uppermost countersunk screw (countersunk screw) in the object window list. Holding down the SHIFT key, click the cylindrical screw (cylindrical screw) at the bottom.
All the screws are now selected.
11. Click the color 25% Gray in the color list in the Fills window.
All the screws have now been assigned the selected color.