Create a Free Axis
1. Click on the symbol for
HLR
display mode.
Using HLR display mode makes it easier to recognize and select the contour lines needed to select the element for the free axis.
| Subsequent figures will depict the colored contour lines of the objects using thick/thin black lines in order to illustrate them more clearly. In the case of small elements or concealed parts, it is best to switch to Wireframe display mode in order to click on the desired contour for the element. |
2. Click the symbol for
3D Select axis
.
The axis selector symbol appears next to the cursor.
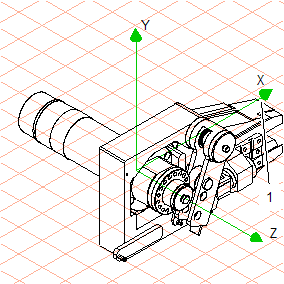
3. The orientation of the free axis is to match the orientation of contour line (1) of assembly BIG-000861-BIB_MODELL.
Click on contour (1) of assembly BIG-000861-BIB_MODELL with the cursor.
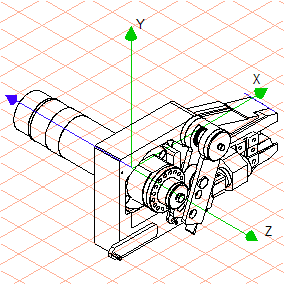
Having hit the contour, a blue line appears. This is the free axis. A blue line with a directional arrow simultaneously appears in the coordinate system. The directional arrow indicates the positive direction for the axis.
| The free axis is now active. All selected surfaces and objects can now be rotated around the axis. In this exercise, the blue line is situated on the negative Z axis. This line always runs in parallel to the free axis. |