Example: PingFederate as the Identity Provider and Windchill DS as the Data Store
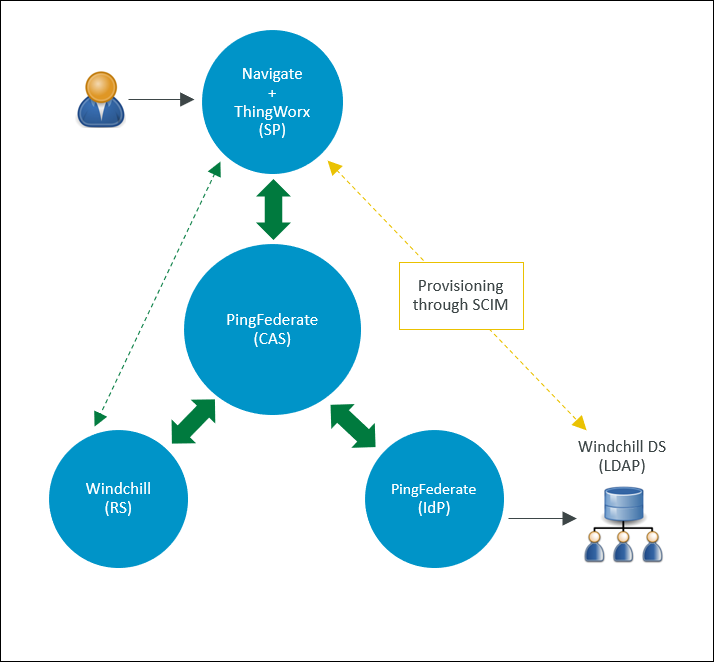
This example provides detailed steps on how to configure an SSO environment that has ThingWorx configured for single sign-on with PingFederate as the Central Auth Server (CAS) and the Identity Provider (IdP), and Windchill DS as the Data Store.
The following table displays the applications configured and their role in this example:
|
Role
|
Application
|
||
|---|---|---|---|
|
Service Provider
|
ThingWorx
|
||
|
Authorization Server
|
PingFederate
|
||
|
Identity Provider
|
PingFederate (supported by Windchill DS)
|
PTC provides automation scripts for the PingFederate configuration discussed in this example. For more information, see Configuring PingFederate as the Central Auth Server automatically.
The following diagram displays the configuration discussed in this example.
Part A: Prerequisites
• Download the automation scripts and extract them to a folder on your machine.
• Ensure that you have a fresh installation of ThingWorx.
Stop the ThingWorx server after the installation.
• Ensure that you have set up Windchill DS.
Install the appropriate Java version for the PingFederate version. On the PingFederate machine, set the JAVA_HOME environment variable and update the PATH variable to include Java accordingly. |
Part B: Before You Run the Scripts
Step 1: Create the PingFederate global SSL certificate and export it
1. Log in to PingFederate as an Administrator and navigate to > .
2. Click Create New to create the global SSL certificate, and do the following:
1. In the Common Name field, provide the FQDN of the PingFederate machine.
2. Provide other details on the page, and click Next.
3. Click Done, and click Save.
4. Click SSL Server Certificates.
5. For the SSL certificate that you created, in the Select Action list, select Activate Default for Runtime Server, and then select Activate Default for Admin Console. Click Save.
This SSL certificate is marked as default for the Admin console and Runtime Server.
3. For the localhost certificate, do the following:
1. In the Select Action list, select Deactivate for Runtime Server, and then select Deactivate for Admin Console.
2. Delete the localhost certificate, and click Save.
4. To export the PingFederate global SSL certificate, do the following:
a. For the certificate that you created, click Export.
b. Select Certificate Only, and click Next.
c. Click Export.
The certificate is exported to the default Downloads folder.
d. Click Done and click Save.
For more information, refer to Configure the SSL certificate for PingFederate.
Step 2: Save certificate files to the PingFederate automated configuration input folder
Certificates are required as an input to the automated configuration process. You must save the following certificate files to the input folder of the automated configuration tool. The input folder is available at sso-config-pingfed-X.Y/input, where X.Y denotes the PingFederate version.
◦ Copy the PingFederate global certificate (.crt) file that you exported to the Downloads folder.
◦ To create and copy the thingworx.cer file to the input folder, do the following:
a. In the <ThingWorx Installation Folder>/ThingworxPlatform folder, create the ssoSecurityConfig folder.
b. Create a KeyStore of type JKS, name it as sso-keystore.jks, and save it in the ssoSecurityConfig folder as follows:
▪ Generate a key pair.
▪ Specify the common name of the certificate as ThingWorx.
c. Export the Certificate Chain to the ssoSecurityConfig folder.
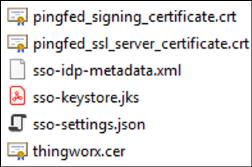
You should have the following files in the ssoSecurityConfig folder:
▪ sso-keystore.jks
▪ thingworx.cer
d. Copy the thingworx.cer file to the sso-config-pingfed-X.Y/input folder.
You must have the following files in the input folder:
▪ <Exported_SSL_Certificate-From_PingFederate>.crt
▪ thingworx.cer
Step 3: Update the user.properties file
Set user properties according to your configuration setup.
Step 4: Update the default.properties file
Update default properties according to your configuration setup.
Part C: Run the Automation Scripts
1. Ensure that PingFederate is running.
For the configuration in this example, choose 1. PingFederate as IdP – LDAP while running the scripts.
Part D: Use the Generated Artifacts
Step 1: Copy artifacts to the ssoSecurityConfig folder
1. Copy the following files from the output folder of the PingFederate automatic configuration available under sso-config-pingfed-X.Y to the /ThingworxPlatform/ssoSecurityConfig folder:
▪ pingfed_idp_metadata.xml
▪ pingfed_signing_certificate.crt
▪ pingfed_ssl_server_certificate.crt
2. Rename pingfed_idp_metadata.xml to sso-idp-metadata.xml.
For more information, see Use the generated artifacts
Step 2: Import the application layer signing certificate into the ThingWorx KeyStore
Import the pingfed_signing_certificate.crt file into the sso-keystore.jks file in the /ThingworxPlatform/ssoSecurityConfig folder. For more information, see the pingfed_signing_certificate.crt section in Use the generated artifacts.
Step 3: Import the transport layer certificates
ThingWorx SSL certificate
1. Import the ThingWorx SSL certificate to the Java cacerts file of the PingFederate machine.
2. Restart PingFederate.
PingFederate SSL certificate
Import pingfed_ssl_server_certificate.crt (the PingFederate SSL certificate file) to the Java cacerts file of the ThingWorx machine.
For more information, see the pingfed_ssl_server_certificate.crt section in Use the generated artifacts.
Part E (Optional): Configure Group Mapping
Ensure that you have defined static groups in Windchill DS before you proceed. |
Perform the following steps in PingFederate:
1. Go to > and select your Instance Name.
2. On the page that opens, select the Extended Contract tab.
3. In the Extend the Contract field, add isMemberOf and click Add.
4. Click Next to see the Summary page.
5. On the Summary page that opens, review your changes, and click Save.
6. Go to > and select your Instance Name.
7. On the page that opens, select the Extended Contract tab.
8. In the Extend the Contract field, add isMemberOf and click Add.
9. Click Next to see the Adapter Attributes page. You do not need to make any updates on this page.
10. Click Next to move to the Adapter Contract Mapping page and select Configure Adapter Contract.
11. On the Attribute Sources & User Lookup page, click Add Attribute Source.
a. On the Data Store page, perform the following steps:
i. For ATTRIBUTE SOURCE ID, add isMemberOf.
ii. For ATTRIBUTE SOURCE DESCRIPTION, add isMemberOf.
iii. For ACTIVE DATA STORE, select your Windchill Data Store.
iv. For DATA STORE, LDAP is prepopulated.
v. Click Next.
b. On the LDAP Directory Search page, perform the following steps:
i. For BASE DN, add o=ptc.
ii. For SEARCH SCOPE, Subtree is prepopulated.
iii. For Attributes to return from search, select the following:
i. For ROOT OBJECT CLASS, select <Show All Attributes>.
ii. For ATTRIBUTE, select isMemberOf and click Add Attribute.
iii. Click Next.
c. On the LDAP Filter page, perform the following steps:
i. For Filter, add isMemberOf=${isMemberOf}.
ii. Click Next.
d. On the Summary page that opens, review your changes, and click Save.
12. Open > and select your Connection Name.
13. On the page that opens, select Attribute Contract to open the Attribute Contract page and perform the following steps:
a. For Extend the Contract, add group.
b. For Attribute Name Format, select the option with unspecified.
c. Click Add.
d. Click Next.
14. On the Authentication Source Mapping page that opens, select your Adapter Instance Name.
15. On the Attribute Contract Fulfilment page that opens, perform the following steps for the group attribute contract that you created in step 12.
a. For Source, select Adapter.
b. For Value, select isMemberOf.
c. Click Save.
Take note of the mapping name (in this example, group) as you will need it in the ThingWorx SSO Authenticator. For more information, see the Single Sign-on Authentication topic in the ThingWorx Help Center. |
Part F: Configure ThingWorx for Single Sign-on
1. Make sure that the ThingWorx server is stopped.
2. To configure ThingWorx for single sign-on, do the following:
2. Your ssoSecurityConfig must contain the following files:
3. Start the ThingWorx server.