Editing Loss Events
|
|
All users are able to edit manually entered and automated loss events for the first 24 hours after they are entered. After 24 hours, only users who have been granted permission can edit manually entered and automated loss events.
For more information, see Granting User Permissions for Editing and Deleting Loss Events.
|
You can edit a manual or an automated loss event from the collapsed and expanded event log views. To edit a loss event, complete the following steps:
1. Select the loss event in the collapsed or expanded event log.
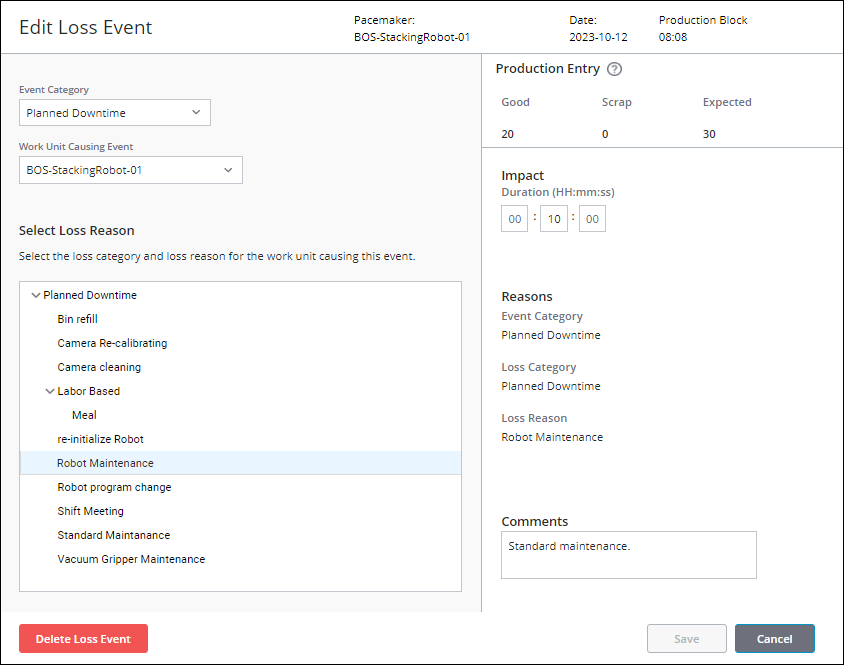
The Edit Loss Event window opens, identifying the pacemaker, the date, and the start time for the production block where the loss event occurred. The Production (materials) pane at the top right displays the current count of good material produced and the count of scrapped material for the production block. The expected production count for the production block is also displayed, which is calculated as the length of the current production block divided by the ideal cycle time for the material.

2. Modify the loss event as needed. You can change the following:
◦ Event Category—Change the selected event category to another event category.
▪ For a manual event with a down event category (Planned Downtime, Unplanned Downtime, Changeover) or performance loss event category (Small Stops, Speed Loss), you can change the event category to another down or performance loss event category.
▪ For an automated event with a down event category (Planned Downtime, Unplanned Downtime, Changeover), you can change the event category to another down event category.
▪ You cannot change the event category from Scrap to another event category or from another event category to Scrap.
If a manually entered loss event has the wrong event category, and you cannot choose the correct event category while editing the event, you can delete the loss event and add a new loss event with the correct event category. |
◦ Work Unit Causing Event—The work unit that caused the event.
◦ Select Loss Reason—The loss category and loss reason for the event. The loss reasons listed are valid for the selected work unit. If the pacemaker is selected as the Work Unit Causing Event, you can only select reasons from the loss category matching the selected Event Category. If a work unit other than the pacemaker is selected as the Work Unit Causing Event, you can select any loss reason that is valid for the selected work unit, from any loss category. An alert shows below the Select Loss Reason field if the selected loss reason is not at the lowest level of the reason tree. With this alert present, you can save the loss event, but your data will not be complete for the Pareto and trend charts in Performance Analysis. If you save the event with this alert present, an alert icon ( ) displays for the event in the Loss Event pane.
Disabled loss reasons are not displayed for a reason category. If the event is logged for a disabled loss reason, the disabled loss reason is displayed in the Loss Event pane only and is not available for selection in the Select Loss Reason list. |
◦ Impact—The Impact value (Duration (HH:mm:ss) or Quantity) for manually entered loss events. The maximum Duration (HH:mm:ss) value is 23:59:59. The Quantity value can have a maximum of 11 digits before the decimal point and 5 decimal places. For example, 12345678901.12345.
The Impact field is disabled for an automated event. However, you can split the automated event into multiple events. An ongoing automated event cannot be edited.
◦ Comments—The optional comments for the event. Enter or edit the comments as needed.
3. Under Reasons, the Event Category, Loss Category, and Loss Reason fields are populated based on the selections made in step 2. If the event is logged for a disabled loss reason, the disabled loss reason is displayed under Loss Reason until a new loss reason is selected. The disabled loss reason is not available for selection in the Select Loss Reason list. An alert shows below the Loss Reason field if the selected loss reason is not at the lowest level of the reason tree. With this alert present, you can save the loss event, but your data will not be complete for the Pareto and trend charts in Performance Analysis.
4. Click Save to save the changes to the loss event.
From the Edit Loss Event window, you can also delete manually entered loss events or split the automated event into multiple events.