To Divide Surfaces using Chains
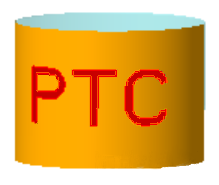
As an example in the procedure, start with a cylinder with text wrapped around it with a Wrap feature. You could also project the text onto the cylinder with a Project feature. The Divide Surface feature divides the text from the rest of the surface.

1. Click > >  Divide Surface. The Divide Surface tab opens.
Divide Surface. The Divide Surface tab opens.2. To use chains to divide the surface, under Divide By, click  Chain.
Chain.3. To select the surfaces to divide, make sure the Surfaces to divide collector is active, and select surfaces to divide. All the surfaces must belong to the same quilt or body.
You can also click the References tab, and under Surfaces to divide, click Details to open the Surface Sets dialog box.
In the example, the front surface of the cylinder is selected.
4. To select chains with which to divide the surfaces, click the Chains collector, and select chains that partially or fully rest on the selected surfaces to use as a dividing tool. Hold down the CTRL key to select multiple chains.
You can also click the References tab, and under Chains, click Details to open the Chain dialog box.
In the example, four chains are selected: a chain that forms the outside of the letter P, a chain that forms the inside of the letter P, a chain that forms the T, and a chain that forms the C.

5. If needed, to change the side of the chains that is the original surface and the side that is the new surface, click Flip Divided Side.

6. Click  OK. A Divide Surface feature is created.
OK. A Divide Surface feature is created.The new feature contains one or more new surfaces, one new surface for each surface that was divided. The new surfaces belong to the same quilt or body as the original surfaces.