Milling Parameters
The following parameters are specific to milling NC sequences. They are listed under a heading corresponding to the name of the branch when you set up the parameters.
For description of the common manufacturing parameters, available for all the NC sequence types, see the topic Common NC Sequence Parameters. For description of parameters specific to Roughing and Reroughing NC sequences, see the topic Milling Parameters Specific to Roughing and Reroughing. Follow the appropriate link under See Also to access these topics.
|
|
• You must specify a value for all parameters that have a default of 1 (this means that the default value is not set by Creo NC).
• Length units for the NC sequence parameters (where applicable) are the same as the units of the workpiece.
|
Search by category
Cutting Motions
|
SCAN_TYPE
|
||
|
Applicable for Volume, Surface, Face, Pocket, and Plunge milling.
For Volume milling, refers to the way a milling tool scans the horizontal cross-section of a milling volume and avoids islands. The options are:
• TYPE_1—The tool continuously machines the volume, retracts upon encountering islands.
• TYPE_2—The tool continuously machines the volume without retract, moving around the islands upon encountering them.
• TYPE_3—The tool removes material from continuous zones defined by the island geometry, machining them in turn and moving around the islands. Upon completing one zone, the tool may retract to mill the remaining zones. It is recommended that ROUGH_OPTION for TYPE_3 is set to ROUGH_&_PROF.
• TYPE_SPIRAL—Generates a spiral cutter path.
• TYPE_ONE_DIR—The tool cuts in one direction only. At the end of each cutting pass it retracts and returns to the opposite side of the workpiece, to start the next cut in the same direction. Avoiding islands is the same as in TYPE_1.
• TYPE_1_CONNECT—The tool cuts in one direction only. At the end of each cutting pass it retracts, rapids back to the start point of the current pass, plunges, and then moves to the start of the next pass. If there is an adjacent wall at the start of the cutting passes, the connection motion follows the profile of the wall to avoid gouging.
• CONSTANT_LOAD—Perform high speed roughing (with ROUGH_OPTION set to ROUGH_ONLY) or profiling (with ROUGH_OPTION set to PROF_ONLY).
• SPIRAL_MAINTAIN_CUT_TYPE—Generates a spiral cutter path with reverse arc connections between cuts. When a cut is finished, the tool arcs into the next cut, reversing cutting direction to maintain the cut type with respect to remaining material (CLIMB or CONVENTIONAL). This is a high speed machining option, which minimizes retracts.
• SPIRAL_MAINTAIN_CUT_DIRECTION—Generates a spiral cutter path with S-shape connections between cuts. When a cut is finished, the tool S-connects into the next cut, maintaining cutting direction, which results in the cut type with respect to remaining material changing between cuts (from CLIMB to CONVENTIONAL and back). This is a high speed machining option, which minimizes retracts.
• FOLLOW_HARDWALLS—The shape of each cut follows the shape of the walls of the volume, maintaining fixed offset between the respective points of two successive cuts. If the cuts are closed, there are S-shape connections between the cuts.
The following illustration shows the scan types for Volume milling. 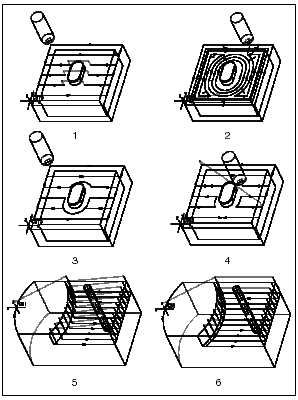 1. TYPE_1 2. TYPE_SPIRAL 3. TYPE_2 4. TYPE_3 5. TYPE_ONE_DIR 6. TYPE_1_CONNECT |
||
|
SCAN_TYPE: Conventional Milling
• TYPE_1—The tool continuously machines the selected surfaces, retracts upon encountering islands.
• TYPE_3—If selected surfaces are divided into zones, the tool will completely machine one zone before moving to the next.
|
||
|
SCAN_TYPE: Isolines Surface milling
• TYPE_1—The tool continuously machines the selected surfaces, retracts upon encountering islands.
• TYPE_2—The tool continuously machines the selected surfaces, moving around the islands upon encountering them.
• TYPE_3—If selected surfaces are divided into zones, the tool will completely machine one zone before moving to the next.
• TYPE_ONE_DIR—The tool cuts in one direction only. At the end of each cutting pass it will retract and return to the opposite side of the workpiece, to start the next cut in the same direction.
|
||
|
SCAN_TYPE: Cut Line Milling
• TYPE_1—The tool moves back and forth along the generated cut lines.
• TYPE_3—If selected surfaces are divided into zones, the tool will completely machine one zone before moving to the next.
• TYPE_SPIRAL—The tool makes the first cutting pass halfway between the start and end cutlines. The following passes will be made alternately to the right and to the left of the first pass.
• TYPE_ONE_DIR—The tool cuts in one direction only. At the end of each cutting pass it retracts and returns to the opposite side of the workpiece, to start the next cut in the same direction.
• TYPE_HELICAL—(Available only if the CUTLINE_TYPE parameter is set to FLOWLINES.) The tool moves along a helix. Valid for Closed Cut Line machining only. The resulting tool path is shown in the following illustration. 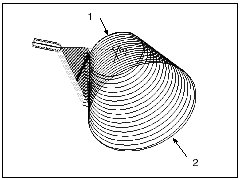 1. Start cutline (the top surface boundary) 2. End cutline (the bottom surface boundary) For Projected Cuts Surface milling, the scan types are the same as for Volume milling (with the exception of TYPE_1_CONNECT and CONSTANT_LOAD). They refer to the way the flat pattern of the tool path is created. |
||
|
SCAN_TYPE: Swarf Milling
• TYPE_1—The tool moves back and forth across the surfaces being machined.
• TYPE_ONE_DIR—The tool cuts in one direction only. At the end of each cutting pass it retracts and returns to the opposite side of the workpiece, to start the next cut in the same direction.
• TYPE_HELICAL—The tool moves along a helix. Valid for a closed loop of surfaces only.
|
||
|
SCAN_TYPE: Face Milling
• TYPE_1—The tool makes parallel cutting passes, moving back and forth along the selected face. If the selected face consists of multiple zones, the tool ignores them and moves across the whole length of the workpiece.
• TYPE_3—If the selected face consists of multiple zones, the tool machines one zone, moving back and forth in parallel cutting passes, then retracts and moves to the next zone.
• TYPE_SPIRAL—The tool makes the first cutting pass in the middle of the surface. The following passes will be made alternately to the right and to the left of the first pass.
• TYPE_ONE_DIR—The tool cuts in one direction only. At the end of each cutting pass it retracts and returns to the opposite side of the workpiece, to start the next cut in the same direction. 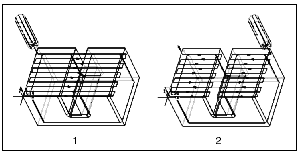 1. TYPE_1 2. TYPE_3 |
||
|
SCAN_TYPE: Pocketing
The scan types are the same as for Volume milling (with the exception of TYPE_1_CONNECT and CONSTANT_LOAD). They refer to the way the tool scans the bottom of the pocket.
|
||
|
SCAN_TYPE: Plunge Rough
You can not change the scan type when the tool has Insert_Width smaller than Cutter_Diam/2. For a regular flat tool the following scan types are available:
• TYPE_3—Completely machines one region before moving to the next.
• TYPE_SPIRAL—Generates a spiral cutting path.
• TYPE_ONE_DIR—Cuts in one direction only. At the end of each cutting pass the tool returns to the opposite side of the region, to start the next cut in the same direction.
|
||
|
ROUGH_OPTION
|
||
|
Controls whether a profiling pass occurs during a Volume milling NC sequence. The options are:
• ROUGH_ONLY—Creates an NC sequence with no profiling.
• ROUGH_&_PROF—Creates an NC sequence that rough cuts the milling volume, then profiles the volume surfaces.
• PROF_&_ROUGH—Profiles the volume surfaces first, then rough cuts the volume.
• PROF_ONLY—Only profiling is done. With the SCAN_TYPE option set to CONSTANT_LOAD this option creates an S-connection between two slices with respect to the PROFILE_CONNECT_ANGLE, which you can control.
• ROUGH_&_CLEAN_UP—Cleans up the walls of the volume without creating a profiling pass. If SCAN_TYPE is set to TYPE_3, the horizontal connect moves within each slice will follow the walls of the volume. If SCAN_TYPE is set to TYPE_ONE_DIR, the tool will follow the walls of the volume vertically, when plunging and retracting. For TYPE_ONE_DIR, the tool retracts to the level of the previous slice; however, it will not move sideways by more than (STEP_DEPTH + CUTTER_DIAM/2), with respect to the current slice.
• POCKETING—Profiles the walls of the volume and finish mills all the planar surfaces inside the volume that are parallel to the retract plane (island tops and bottom of the volume). The open edges of the planar faces are milled according to the value of the POCKET_EXTEND parameter.
• FACES_ONLY—Finish mills only the planar surfaces inside the volume that are parallel to the retract plane (island tops and bottom of the volume). The open edges of the planar faces are milled according to the value of the POCKET_EXTEND parameter.
The following illustration shows the cutter path depending on the ROUGH_OPTION. 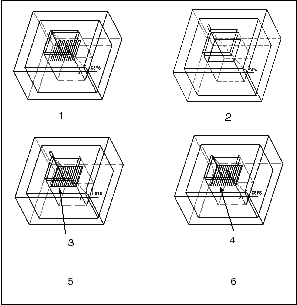 1. ROUGH_ONLY 2. PROF_ONLY 3. Profiling after rough cut 4. Profiling first 5. ROUGH_&_PROF 6. PROF_&_ROUGH 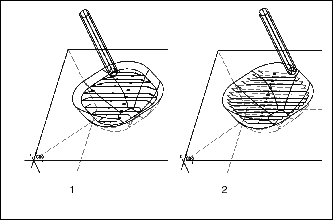 1. ROUGH_&_CLEAN_UP with TYPE_3 2. ROUGH_&_CLEAN_UP with TYPE_ONE_DIR The following illustration shows the tool path for ROUGH_&_CLEAN_UP with TYPE_ONE_DIR. 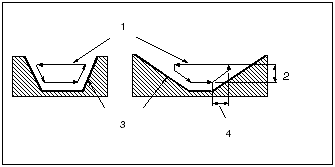 1. Tool path 2. STEP_DEPTH 3. Mill volume walls (side view) 4. STEP_DEPTH + CUTTER_DIAM/2 |
||
|
POCKET_EXTEND
|
||
|
Defines the positioning of the tool when machining the open edges of the planar faces inside a volume (for example, island tops). The values are:
• TOOL_ON (default)—The tool stops when its center touches the boundary of the face.
• TOOL_TO—The tool stops when its leading edge touches the boundary of the face.
• TOOL_PAST—The tool stops when its heel touches the boundary of the face.
This parameter is used when ROUGH_OPTION is set to POCKETING or FACES_ONLY.
|
||
|
TRIM_TO_WORKPIECE
|
||
|
In Volume milling, if set to FULL_TRIM, confines the milling volume to that inside the workpiece boundaries, in order to avoid air machining. If set to TRIM_TO_TOP (default), trimming is done only in the Z direction.
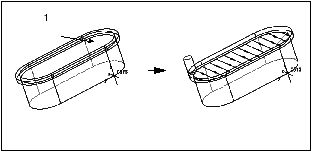 1. Milling volume (with offset) In 3-Axis Conventional and Face milling, if set to YES (the default is NO), makes the tool machine one zone of the workpiece before going to the next. The actual tool path depends on the SCAN_TYPE parameter value. The following illustration shows Face milling with SCAN_TYPE set to TYPE_ONE_DIR. 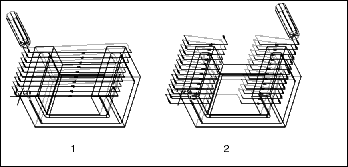 1. TRIM_TO_WORKPIECE NO 2. TRIM_TO_WORKPIECE YES |
||
|
CUT_DIRECTION
|
||
|
For Volume milling, allows you to reverse direction of tool motion within a slice. The values are STANDARD and REVERSE.
For Profile milling, STANDARD (the default) machines selected surfaces from top to bottom, that is, starting with the top slice; REVERSE machines from bottom to top, that is, starting with the lowest slice.
|
||
|
STEPOVER_ADJUST
|
||
|
If set to YES (the default), adjusts the step-over distance (defined by the STEP_OVER and NUMBER_PASSES parameters) to make both the beginning and the end of the cutter path for one pass close to the edges. The adjusted step-over distance does not exceed the original one. If set to NO, the step-over distance will be exactly as defined by the combination of the STEP_OVER and NUMBER_PASSES parameters. 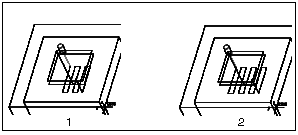 1. STEPOVER_ADJUST NO 2. STEPOVER_ADJUST YES |
||
|
CUT_TYPE
|
||
|
Combined with SPINDLE_SENSE, controls where material is relative to the tool when it is removing material during profiling NC sequences or slices; bottom slices, such as in pocket milling, are not affected by this parameter. The options are CLIMB, UPCUT, and ZIG_ZAG. The possible combinations and the resulting tool path are:
• CLIMB and CWCutter to the left (default).
UPCUT and CWCutter to the right.
• UPCUT and CCWCutter to the left.
CLIMB and CCWCutter to the right.
• ZIG_ZAGCut direction changes on every slice.
|
||
|
CUT_TYPE: Local Milling
There is an additional option NONE, which makes the tool move back and forth when cleaning up material.
|
||
|
CUT_TYPE: Profile Milling
The ZIG_ZAG option can be used when profiling open contours. It provides lace-type connection between slices, while CLIMB and UPCUT make the tool retract and rapidly traverse to the beginning of the next slice. 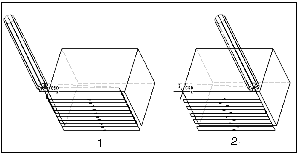 1. CUT_TYPE CLIMB 2. CUT_TYPE ZIG_ZAG |
||
|
CUT_TYPE: Conventional Milling
For 3-Axis Conventional milling, CUT_TYPE, combined with SPINDLE_SENSE and CUT_DIRECTION, controls the start point and direction of machining the surface. The LACE_OPTION parameter must be set to NO.
|
||
|
PLUNGE_PREVIOUS
|
||
|
For Volume milling with SCAN_TYPE TYPE_3, determines where the tool plunges when starting to machine a new zone:
• YES—The tool plunges within a previously machined zone and then moves to the new zone.
• NO (default)—The tool plunges within the new zone.
|
||
|
FIX_SKIPPED_SLICES
|
||
|
By default (NO), if Creo NC cannot create a slice at a certain Z depth when milling a volume (for example, because of geometry problems), this slice will be skipped and the tool will go to the next slice. If this parameter is set to YES, then, whenever a slice cannot be created, Creo NC will generate the next slice and repeat it at the level of the skipped slice. In other words, if a slice can not be created, the next slice will be repeated twice: at the Z level of the skipped slice and at its own Z level. The system will issue a warning every time a slice cannot be generated.
|
||
|
LACE_OPTION
|
||
|
For Finishing, Conventional milling, Face, and for Cut Line machining, controls whether the tool retracts at the end of a cutting pass (as shown in the following illustration). If set to NO (which is the default for Conventional milling), the tool retracts after each cut, so that all cuts are in the same direction. Other values cause the tool to cut back and forth, and specify the shape of connection between the endpoints of neighboring cuts:
• If set to LINE_CONNECT, the neighboring endpoints are connected by straight line segments. LINE_CONNECT is the default for Finishing and Cut Line machining.
• The CURVE_CONNECT option, available for Conventional milling only, uses a more complex (and slower-working) algorithm, which takes into account the reference part geometry. If LACE_OPTION is set to CURVE_CONNECT, the tool will follow geometry of the obstacles that would otherwise interrupt the cutting pass. Use CURVE_CONNECT only if LINE_CONNECT causes gouging.
• The ARC_CONNECT option is available for 3-Axis Conventional milling and Face milling. This provides a smooth, arc-like connections between the neighboring cutting passes. The cutting passes are shortened, as necessary, to accommodate the connecting motions, so that the tool stays within surface boundaries. The connections are automatically degouged. Use this option for high-speed machining.
• If set to LOOP_CONNECT, the neighboring endpoints are connected by vertical loops, with the tool leaving and entering material tangent to the surface being machined.
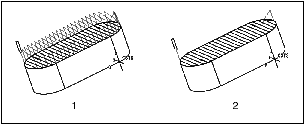 1. LACE_OPTION\ \ NO 2. LACE_OPTION\ \ LINE_CONNECT |
||
|
ALLOW_NEG_Z_MOVES
|
||
|
If set to NO, eliminates negative Z moves for 3-Axis Conventional milling NC sequences. The default is YES. If you set ALLOW_NEG_Z_MOVES to NO, you have to also set SCAN_TYPE to TYPE_1 and LACE_OPTION to NO. The following illustration shows an example of a tool path with ALLOW_NEG_Z_MOVES set to NO. 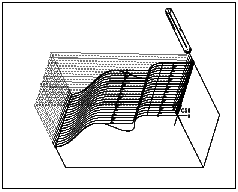 |
||
|
RETRACT_OPTION
|
||
|
Controls the number and level of retracts in Volume milling, Roughing and Reroughing.
In Volume milling, the values are:
• OPTIMIZE (default)—Minimizes the number of retracts without minimizing the height. The tool retracts to the level of the Traverse plane, if specified for the NC sequence, otherwise to the Retract plane level.
• NOT_OPTIMIZE—The cutter retracts between two slices if the second slice does not start directly below the cutters current location. It also retracts between the rough and the profile pass within a slice if ROUGH_OPTION is ROUGH_&_PROF or PROF_&_ROUGH. Specify NOT_OPTIMIZE if OPTIMIZE causes gouging. The tool retracts to the level of Traverse or Retract plane.
• SMART—Minimizes the number and the height of retracts. For each intermediate retract within the NC sequence, the system calculates a safe level for the tool to traverse to the new position. This safe level is determined as the level of the lowest slice with no obstructions on the way of the tool, plus the PULLOUT_DIST value, if specified.
In Roughing and Reroughing, the values are:
• SMART (default)—Minimizes the number and the height of retracts. For each intermediate retract within the NC sequence, the system calculates a safe level for the tool to traverse to the new position. This safe level is determined as the level of the lowest slice with no obstructions on the way of the tool, plus the PULLOUT_DIST value, if specified.
• ALWAYS—The tool retracts to the retract plane after each slice.
|
||
|
GOUGE_AVOID_OPTION
|
||
|
In Surface, Swarf, and Cutline milling, specifies whether the tool will retract to avoid gouging:
• RETRACT_TOOL—The tool may retract between cuts.
• LIFT_TOOL—Number of retracts between cuts will be minimized.
• PROJECT_TOOL—The tool path is projected onto the surfaces or geometry. This option is used for 3-Axis Helical milling where the surface geometry has quick changes in topology and 5-Axis milling where a pivot point or axis controls the tool axis.
This is the default option in Cutline milling. A tool path without gouges is created.
• NONE—Use this option in Cutline milling if you require a normal tool path with gouges.
|
||
|
GOUGE_AVOID_TYPE
|
||
|
For 3-Axis Profiling: TIP_&_SIDES (the default) will make the system detect undercuts when degouging the tool path. If you want to be able to machine an undercut, set GOUGE_AVOID_TYPE to TIP_ONLY. For 5-Axis Profiling: if set to TIP_&_SIDES, the system degouges with respect to the whole tool (as defined by the tool parameters). The tool will retract if an undercut is detected. The default is TIP_ONLY, in which case the system does not detect undercuts.
|
||
|
REMAINDER_SURFACE
|
||
|
Applicable for Conventional milling and 3-Axis Isolines and Cut Line Surface milling NC sequences. If it is set to YES (the default is NO), the system will generate a surface representing the leftover material (to be removed by a subsequent Local Mill NC sequence). This surface will belong to the current NC sequence, and will be regenerated upon regenerating the tool path.
|
||
|
AUTO_SYNCHRONIZE
|
||
|
Applicable for Cut Line Surface milling only. If set to YES (the default), the system will attempt to use edges crossing all the selected cut lines as synch lines. If this is not satisfactory, set AUTO_SYNCHRONIZE to NO and specify the synch lines or synch points manually.
|
||
|
AUTO_INNER_CUTLINE
|
||
|
Applicable for Cut Line Surface milling only. If set to YES, the system will attempt to use edges crossing all the specified synch lines as inner cut lines. The default is NO.
|
||
|
CUTLINE_TYPE
|
||
|
Applicable for Cut Line Surface milling only. Allows you to select which algorithm the system uses when it calculates cut line distribution. The values are:
• BLEND—The system uses a surface boundary blend to generate cut lines.
• FLOWLINES (default)—The system uses a Finite Element Analysis method to process the surfaces selected for milling and generate cut lines.
|
||
|
CUTLINE_EXT_TYPE
|
||
|
Applicable for Cut Line Surface milling only. Specifies how the system handles the case when a cut line does not extend the whole length of the surface selected for machining. The values are:
• BOUNDARY (default)—The system will attempt to extend the cut lines up to the boundary of the surface.
• NONE—Machining will be limited to the length of the specified cut lines. 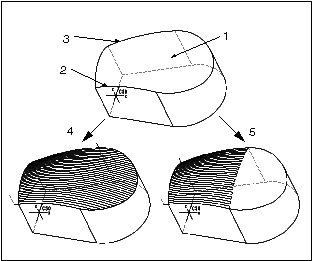 1. Surface selected for machining 2. Start cut line 3. End cut line 4. CUTLINE_EXT_TYPE\ \ BOUNDARY 5. CUTLINE_EXT_TYPE\ \ NONE |
||
|
AXIS_DEF_CONTROL
|
||
|
Applicable for 5-Axis Cut Line Surface and Trajectory milling, and for Swarf milling.
For 5-Axis Cut Line Surface milling and Swarf milling, the values are:
• USE_SURF_NORMS (the default)—The surface normal is used in determining the tool axis orientation, that is, any user-specified axis definition provides a localized lead and tilt angle that is applied to the normal of the surface being machined.
• IGNORE_SURF_NORMS—The surface normal is disregarded, and the tool axis orientation is a strict interpolation of the user-specified axis definitions. Not available for Swarf milling From Surface Isolines.
For 5-Axis Trajectory milling, this parameter is used for Automatic Cut motions created using the Surfaces command. Another way to specify axis definitons is to use the Axis Control command in the CUTMOTION SETUP menu. The AXIS_DEF_CONTROL parameter specifies the approximation type between the explicit axes definitions. The values are:
• RELATIVE_TO_DRIVE_SURFACE (default)—Preserves the lead and tilt of the tool axis relative to the surface normal for each explicit axis defined at locations on the surface. As the tool moves between explicit axis definitions, the system computes an average lead/tilt angle by linearly interpolating between the last explicit axis definition and the next explicit axis definition. This average is then applied relative to the surface normal at the current location. This method can be used to generate variable lead / tilt tool paths when precise axis control is necessary. An example would be to apply this control to make sure the tool and holder can pass through a narrow channel of part geometry.
• PROJECT_ON_DRIVE_SURFACE—Preserves the lead angle of the tool axis relative to the surface normal for each explicit axis defined at locations on the surface. As the tool moves between explicit axis definitions, the system computes an average lead angle by linearly interpolating between the last explicit axis definition and the next explicit axis definition. This average is then applied at the current location and the tool axis is projected onto the surface making the tilt component 0. This method can be used to generate tool paths that have a variable user-controlled lead angle, but maintain cutting with the side of the tool.
• FROM_AXES_AND_DRIVE_SURFACE—This method is appropriate when a set of surfaces have some surfaces that are nondevelopable. In these nondevelopable areas, the tool path can be unpredictable, so you may want to override the system defaults by specifying explicit axis definitions. The system will derive all other tool vectors from the surface boundary. Tool axes will be interpolated using the same rule as for RELATIVE_TO_DRIVE_SURFACE.
• AXIS_LINEAR_APPROXIMATION—The tool orientation is a linear approximation of explicit axis definitions.
• AXIS_LEAD_ANGLE_APPROXIMATION—The tool orientation is an interpolation of lead angles along the trajectory.
• PROJECT_FROM_AXES—This method works as a combination of FROM_AXES_AND_DRIVE_SURFACE and PROJECT_ON_DRIVE_SURFACE. You can specify explicit axis definitions, and the system will derive the intermediate tool vectors from the surface boundary. It will then project all the axis definitions onto the drive surface.
|
||
|
LEADING_EDGE_MACHINING
|
||
|
If set to YES (the default is NO), ensures that the tool always cuts with the leading edge, even in areas with high curvature, while maintaining contact with the drive surface. Applicable for 5-axis Trajectory milling using Surfaces. Particularly useful in turbine blade machining.
|
||
|
USE_VARIABLE_TILT
|
||
|
If set to YES (the default is NO), the tool will tilt to avoid gouging. Available for Swarf milling only.
|
||
|
IGNORE_RULINGS
|
||
|
If set to NO (the default), the tool will be parallel to the ruling lines when machining ruled surfaces. If set to YES, the tool will ignore the ruling lines of the ruled surfaces. Available for Swarf milling only.
|
||
|
4X_LEAD_RANGE_OPT
|
||
|
If set to YES (the default is NO), the system will attempt to use variable lead angle to avoid gouging. That is, if gouging occurs with the specified 4X_LEAD_ANGLE, the system will try to use another angle in the range between 4X_MIN_LEAD_ANGLE and 4X_MAX_LEAD_ANGLE. Applicable for 4-axis milling only.
|
||
|
FOLLOW_TOP_EDGE_3AX
|
||
|
In 3-axis Trajectory milling, allows you to machine the top edge of a boss or hole with a tapered tool (SIDE_ANGLE > 0). If set to YES (the default is NO), the system will automatically calculate the necessary offset in the XY plane for the tool (1) to follow the top edge of the boss (2) or hole with its side, as shown in the following schematic. 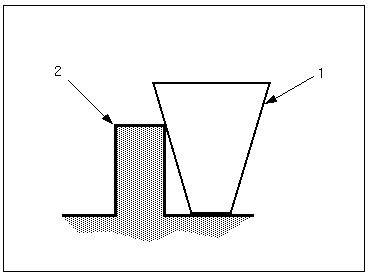 |
||
|
CUSTOMIZE_AUTO_RETRACT
|
||
|
If set to NO (the default is YES), the tool will not perform the automatic retract when following the default tool path.
|
||
|
SLICE_PATH_SCAN
|
||
|
Defines the order of machining multiple passes within multiple step depths (slices). The values are:
• PASS_BY_PASS—After completing the first pass for the first slice, go to the first pass for the second slice, and so on. After completing the first pass for the last slice, go to the second pass for the first slice; proceed until completing the last pass for the last slice.
• SLICE_BY_SLICE—Complete all the passes within a slice before going to the next slice.
|
||
|
CONNECTION_TYPE
|
||
|
Controls the intermediate tool retracts for multi-step and multi-pass 3-axis and 2-axis trajectory milling. The values are:
• RETRACT (default)—At the end of an intermediate cut, the tool retracts, moves along the retract plane, and plunges to the start of the next cut.
• Z_LAST—At the end of an intermediate cut, the tool moves first in the XY-plane and then along the Z-axis to the start of the next cut.
• Z_FIRST—At the end of an intermediate cut, the tool moves first along the Z-axis and then in the XY-plane to the start of the next cut.
• SIMULTANEOUS—The tool moves directly from the end of the previous cut to the start of the next cut.
• AUTO_CONNECT—At the end of an intermediate cut, the tool retracts along Z_FIRST or Z_LAST based on whether the start point is below or above the previous end point.
|
||
|
MACHINING_ORDER
|
||
|
For Local milling by previous tool, specifies the order of removing the leftover material in the corners and on the surfaces. The values are:
• CORNERS_FIRST (default)—Remove the leftover material in the corners, then proceed to cleaning up surfaces.
• SURFACES_FIRST—Clean up the surfaces, them remove the leftover material in the corners.
• CORNERS_ONLY—Remove the leftover material in the corners and do not machine the surfaces.
• SURFACES_ONLY—Clean up the surfaces and do not machine the corners.
|
||
|
SURFACE_CLEANUP
|
||
|
For Local milling by previous tool, specifies whether cleaning up the surfaces is done in a single pass or in step depth increments. The values are:
• SINGLE_DEPTH (default)—The tool makes one cutting pass at the bottom of the surface.
• MULTI_DEPTH—The tool makes multiple cutting passes, removing material in step depth increments. You have to specify a value for the STEP_DEPTH parameter.
|
||
|
CORNER_CLEANUP
|
||
|
For Local milling by previous tool, specifies how the corners are machined. The values are:
• Z_PLANE_CUTS (default)—Remove the material in the corners using 2.5-axis machining.
• CONTOUR—Remove the material in the corners using a series of vertical cuts.
|
||
|
RETRACT_TRANSITION
|
||
|
For high-speed Volume milling, as well as for Roughing and Reroughing, specifies how the tool transitions between a vertical retract move and a traverse move (a horizontal move at the retract plane or intermediate traverse plane level), and then between the traverse move and a vertical plunge move. The values are:
• CORNER_TRANSITION (default)—The vertical and horizontal moves are at an angle to each other.
• ARC_TRANSITION—The vertical and horizontal moves are connected by a tangent arc. This way, the tool does not have to slow down or stop when it changes direction in high-speed machining. The radius of the transition arc is defined by the RETRACT_RADIUS parameter value. The arc starts above the level of the safe traverse plane, therefore, the horizontal traverse moves will be at RETRACT_RADIUS above the retract plane or the intermediate traverse plane level.
|
||
|
RETRACT_RADIUS
|
||
|
Specifies the radius of the transition arc (if the RETRACT_TRANSITION parameter is set to ARC_TRANSITION). The default is a dash (-). If you set RETRACT_TRANSITION to ARC_TRANSITION, you have to specify a RETRACT_RADIUS value.
|
||
|
TRIM_TOOLPATH_ON_HOLDER
|
||
|
In roughing, re-roughing, and finishing, if set to YES, and if HOLDER_DIAMETER and HOLDER_LENGTH are set, divides tool path into colliding and non-colliding zones. 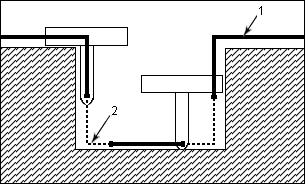 1. Non-Colliding Zone 2. Colliding Zone In the colliding zone, the tool holder collides with the reference part whereas in the non-colliding zone, there is no collision. The resultant tool path is the combination of all non-colliding zones.
If set to NO, the tool path is not divided based on collision, that is, the tool passes through the entire tool path ignoring the collision between the tool holder and the work piece. The default value is NO. |
||
|
CALCULATE_MIN_TOOL_LENGTH
|
||
|
In roughing, re-roughing, and finishing, if set to YES, and if you have specified HOLDER_DIAMETER and HOLDER_LENGTH, calculates minimum length of the tool required to prevent any collision. After tool path calculation, this minimum length is displayed in the message window.
If set to NO, minimum tool length is not calculated. The default value is NO.
|
||
|
HOLDER_CLEARANCE
|
||
|
Along with any stock clearance defined, specifies the minimum allowable distance between the tool holder and the machined surface if HOLDER_DIAMETER and HOLDER_LENGTH are set. Should be greater than the accuracy of the tool path. The default value is 0. 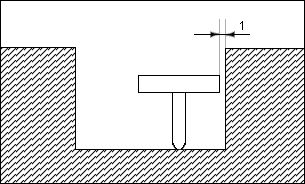 1. HOLDER_CLEARANCE The parameters HELICAL_RAMP_ANGLE , HELCIAL_PITCH, HELCIAL_BOUNDS, and ADJUST_PITCH are used in helical toolpath generation. |
||
|
HELICAL_RAMP_ANGLE and HELICAL_PITCH
|
||
|
Specifies the number of coils to be created between the start height and the height of the helical cut. You can specify the Start Height and Height using the Curve Cut dialog box. If you provide values for both parameters, the HELCIAL_RAMP_ANGLE value overwrites the HELICAL_PITCH value. If you do not specify values for these parameters, only one helical coil is created between the two heights.
|
||
|
HELICAL_BOUNDS
|
||
|
Specifies whether additional first and last slices are created at the start height and height of the helical cut. This parameter has the following values:
• NO_BOUNDS—No slices are created.
• START_BOUND—A single start slice is created.
• END_BOUND—An end slice is created.
• BOTH_BOUNDS—Both the start and end slice are created.
|
||
|
ADJUST_PITCH
|
||
|
A value YES controls the helical ramp angle and the helical pitch such that the number of coils that fit between the Start Height and Height are integer in number.
|
||
|
USE_DEGOUGE_ADDONS
|
||
|
The default value is NO. Set to YES if you notice any unexpected gouges in the toolpath. Additional degouging can be achieved in certain cases by setting it to YES.
|
Cut Depth and Allowances
|
MAX_DISCRETIZ_ANGLE
|
||
|
Specifies the maximum change in the tool axis orientation between two points in the tool path. If the angle between the two points is greater than the value of MAX_DISCRETIZ_ANGLE, one or more points are added between the two points. There is no default.
|
||
|
MIN_DISCRETIZE_ANGLE
|
||
|
Specifies the minimum change in the tool axis orientation between two points in the tool path. If the angle between the two points is smaller than the value of MIN_DISCRETIZE_ANGLE, then the tool axis maintains the same orientation. There is no default.
|
||
|
SKIP_PATH
|
||
|
Specifies removal of the first, last, or both passes from a set of machined surfaces in 3-, 4-, and 5-axis surface milling. The options are:
• NO_SKIP (default)—Tool path passes are not removed.
• FIRST—Only the first pass is removed.
• LAST—Only the last pass is removed.
• BOTH—Both first and last passes are removed.
|
||
|
STEP_DEPTH
|
||
|
The incremental depth of each pass during rough cut NC sequences. The STEP_DEPTH must be greater than zero. The default is not set (displayed as "1").
For Engraving, the default is a dash (-), that is, not used. If you set STEP_DEPTH to a value smaller than the GROOVE_DEPTH, Engraving will be performed in multiple step increments.
|
||
|
MIN_STEP_DEPTH
|
||
|
For Volume and Profile milling, specifies the minimum acceptable distance between slices. By default, all planar surfaces that are normal to the Z-axis of the NC Sequence coordinate system produce additional slices. A slice along such a planar surface will be skipped if the distance between it and the previous slice is less than the value of MIN_STEP_DEPTH.
|
||
|
STEPDEPTH_ADJUST
|
||
|
Specifies that the height of the Z slices are created at an equal distance when you generate toolpaths to finish vertical walls. This parameter is applicable for Roughing, Reroughing, and Finishing.
|
||
|
NUMBER_CUTS
|
||
|
For Face milling, gives you additional control over the number of cuts to depth (also controlled by the STEP_DEPTH parameter). The system will compute number of cuts using the STEP_DEPTH parameter value, compare it with the NUMBER_CUTS value, and use the greater one. The default is a dash (-), that is, not used.
For Cutline machining, allows you to perform milling in step depth increments. This has to be used together with the next parameter OFFSET_INCREMENT. The default is a dash (-), that is, not used.
For Engraving, lets you limit the number of cuts when the STEP_DEPTH parameter is also specified. The default is a dash (-), that is, not used. If you specify a number, for example, 3, the tool will make three cutting passes at STEP_DEPTH increments, with the last pass defined by the GROOVE_DEPTH value.
|
||
|
OFFSET_INCREMENT
|
||
|
Together with NUMBER_CUTS, allows you to perform Cut Line machining in step depth increments. The tool will make the first slice at (OFFSET_INCREMENT * (NUMBER_CUTS1) + PROF_STOCK_ALLOW) above the selected surfaces and perform NUMBER_CUTS slices at OFFSET_INCREMENT distance from each other, so that the last slice is at PROF_STOCK_ALLOW above the selected surfaces. If SCALLOP_HGT is specified, it will affect the last slice only. At the end of each slice, the tool will retract, move to the beginning of the next slice, and plunge. If LACE_OPTION is set to NO, the tool will additionally retract after each cutting pass across the surface(s) being machined. The default is a dash (-), that is, not used.
|
||
|
ROUGH_STEP_DEPTH
|
||
|
Available for 3-Axis Conventional milling only. The default is a dash (-). If you specify a value other than the default, the system performs surface milling in depth increments, defined by the appropriate horizontal slices. This allows you to create Volume-like tool paths without actually defining a Mill Volume, which is especially helpful when machining imported (nonsolid) surfaces. The NC sequence removes the same material and has the same automatic degouging capabilities as the regular 3-Axis Conventional milling sequences.
The following illustration shows 3-Axis Conventional milling in depth increments. 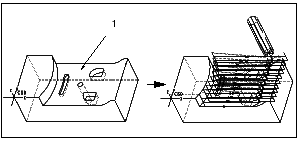 1. Select this surface. |
||
|
MIN_RETRACT_DISTANCE
|
||
|
Applicable for Pencil Tracing, Rest Finishing, Roughing, Reroughing, and Volume Milling.
When moving between the end of one pass and the beginning of another, the cutter is either on the surface or it is in retraction, depending on the distance it has to travel. The parameter here controls the point where the decision between the two states is made. If the distance between the end point of one pass and the start point of another is less than this value, the cutter stays on the surface. If the distance is greater, the cutter clears to the retract plane. See the topic, Example: Cutter Placement During Pencil Tracing.For Roughing, Reroughing, and Volume Milling this parameter works with CONSTANT_LOAD, MAINTAIN_CUT_TYPE, MAINTAIN_CUT_DIRECTION, FOLLOW_HARDWALLS, and, FOLLOW_CONTOUR scan type values.
|
||
|
LIFT_TOOL_CLEARANCE
|
||
|
The tool lifts to clear above the machining surface to make the next connection. This parameter works together with MIN_RETRACT_DISTANCE. The default is -.
|
||
|
WALL_SCALLOP_HGT
|
||
|
Controls the step depth for Volume milling. The WALL_SCALLOP_HGT (wsh) must be less than or equal to the cutter radius, that is, wsh <= d/2. The default is 0.
|
||
|
BOTTOM_SCALLOP_HGT
|
||
|
Similarly used to control step-over distance for Volume milling.
|
||
|
SCALLOP_HGT
|
||
|
Similarly used to control step-over distance for Surface milling and Local milling By Previous Tool.
The STEP_DEPTH and the WALL_SCALLOP_HGT parameters are illustrated in the following graphic. Creo NC handles these parameters as follows:
1. If you specify WALL_SCALLOP_HGT as zero (wsh= 0), a scallop height is calculated using STEP_DEPTH.
2. If you specify wsh as 0, a step depth is calculated using wsh. This calculated value is compared to the STEP_DEPTH you defined. Creo NC uses the lesser of the two.
The same is true for STEP_OVER and BOTTOM_SCALLOP_HGT (for Volume milling) or SCALLOP_HGT (for Surface milling).
The following graphic illustrates STEP_DEPTH and WALL_SCALLOP_HGT. 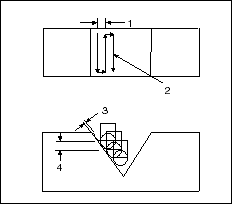 1. STEP_OVER 2. Tool path 3. WALL_SCALLOP_HGT 4. STEP_DEPTH |
||
|
ROUGH_STOCK_ALLOW
PROF_STOCK_ALLOW
|
||
|
The amount of stock left after the rough cut for the finish cut. Both parameters are used in Volume milling NC sequences and Trajectory milling NC sequences, and signify different stock allowances for roughing and profiling cuts. PROF_STOCK_ALLOW must be set to a value less than or equal to ROUGH_STOCK_ALLOW. When geometry is displayed after Automatic material removal, Creo NC uses PROF_STOCK_ALLOW. 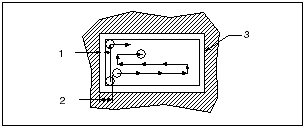 1. PROF_STOCK_ALLOW 2. ROUGH_STOCK_ALLOW 3. Pocket In Roughing and Reroughing NC sequences, only ROUGH_STOCK_ALLOW is used to specify the amount of stock left after the cut. |
||
|
BOTTOM_STOCK_ALLOW
|
||
|
For Volume milling or Trajectory milling, the amount of stock left after a rough NC sequence on planar surfaces parallel to the retract plane. The default is a dash (-), in which case the BOTTOM_STOCK_ALLOW parameter is ignored and PROF_STOCK_ALLOW is used instead.
For Face milling, specifies the amount of stock left on the selected face. The default, a dash (-), sets the stock allowance to 0.
|
||
|
WALL_TOLERANCE
|
||
|
Lets you specify the amount of material that can be left along the walls after the previous NC sequence, without the Local Mill NC sequence cleaning it up. The default is 0. Applicable for Local milling NC sequences referencing a previous Volume NC sequence.
|
||
|
STEP_OVER
|
||
|
Controls the lateral depth of cut of either type of endmill. The STEP_OVER must be a positive value less than or equal to the cutter diameter. The default is not set (displayed as "1").
|
||
|
TOOL_OVERLAP
|
||
|
An alternative to STEP_OVER. Indicates the amount that the tool should overlap the region machined during the previous pass. If TOOL_OVERLAP is specified and STEP_OVER is not, STEP_OVER will be calculated as (CUTTER_DIAM TOOL_OVERLAP).
|
||
|
PLUNGE_STEP
|
||
|
Controls the distance between successive plunges of the tool. The default is a dash (-), in which case:
• If you are using a Plunge Mill tool, this distance is equal to the tool parameter Insert_Cut_Width.
• If you are using a regular milling tool, the system calculates the maximum plunge step, based on the Cutter_Diam of the tool, that results in removing all the material between the plunges.
Applicable for Plunge milling only.
|
||
|
CORNER_ROUND_RADIUS
|
||
|
Specifies the minimum radius allowed for concave corners in high speed machining. Available for Volume milling, Roughing and Reroughing. The default is 0.
|
||
|
NUMBER_PASSES
|
||
|
Gives you additional control over the number of tool passes per slice (also controlled by the STEP_OVER parameter). The system will compute step-over distance using the NUMBER_PASSES parameter value (if other than 0), compare it with the STEP_OVER value, and use the one that is smaller. Applicable for Volume milling and Facing. For Facing, if NUMBER_PASSES is set to 1, it will override the STEP_OVER value, so that only one pass per slice will be made.
|
||
|
ONE_PASS_OFFSET
|
||
|
Allows you to offset the tool path for a one-pass Face milling NC sequence (that is, when NUMBER_PASSES is 1). The positive value offsets the pass to the left with respect to the cut direction, the negative to the right. The default is 0.
|
||
|
INITIAL_EDGE_OFFSET
|
||
|
Allows you to offset the first pass for Face milling with respect to the edge of the surface being milled. The default is 0, in which case the tip trajectory at first pass will coincide with the surface edge; the positive value offsets the first pass into the surface, the negative off the surface. Cannot be greater than the STEP_OVER value.
|
||
|
FINAL_EDGE_OFFSET
|
||
|
Allows you to offset the last pass for Face milling with respect to the edge of the surface being milled. The default is 0, in which case the tip trajectory at last pass will coincide with the surface edge; the positive value offsets the last pass into the surface, the negative off the surface. Cannot be greater than the STEP_OVER value.
|
||
|
CUT_ANGLE
|
||
|
The angle between the cut direction and the X-axis of the NC Sequence coordinate system. The default CUT_ANGLE is 0, which is parallel to the X axis. Valid for Volume and Plunge milling, Pocketing, Facing, Conventional milling, and Projected Cuts Surface milling. CUT_ANGLE will be ignored for Volume and Plunge milling, Pocketing, and Projected Cuts Surface milling if SCAN_TYPE is TYPE_SPIRAL. 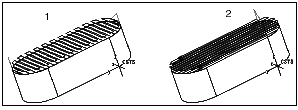 1. CUT_ANGLE 0 2. CUT_ANGLE 90 |
||
|
LEAD_ANGLE
|
||
|
Together with TILT_ANGLE, defines the tool orientation with respect to the surface normal for 5-Axis Surface milling NC sequences. LEAD_ANGLE is specified in degrees from the surface normal with respect to the tool travel direction: positive value tilts the tool forward, negative backward.
|
||
|
TILT_ANGLE
|
||
|
Together with LEAD_ANGLE, defines the tool orientation with respect to the surface normal for 5-Axis Surface milling NC sequences. TILT_ANGLE is specified in degrees from the surface normal with respect to the tool travel direction: positive value tilts the tool to the right, negative to the left.
|
||
|
PROFILE_CONNECT_ANGLE
|
||
|
The angle at which the tool creates an S-connection between two slices during profiling in Volume milling.
|
||
|
AXIS_SHIFT
|
||
|
Allows you to shift the CL data along the tool axis. If set to a positive value, will shift all CL data down along the tool axis; a negative value will shift the CL data up. The default is 0.
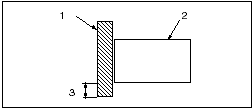 1. Tool 2. Model 3. AXIS_SHIFT |
||
|
NUM_PROF_PASSES
|
||
|
Together with PROF_INCREMENT, allows you to create multiple profiling or trajectory passes horizontally offset from each other. NUM_PROF_PASSES specifies the amount of passes that will be generated (the default is 1). Applicable for Volume milling when ROUGH_OPTION is set to PROF_ONLY, for Profiling, and for Trajectory milling. If another value of the ROUGH_OPTION parameter is specified for Volume milling, NUM_PROF_PASSES will be ignored.
|
||
|
PROF_INCREMENT
|
||
|
Specifies the horizontal distance between the passes generated according to NUM_PROF_PASSES, which means that the first pass will be offset from the final pass by:
(NUM_PROF_PASSES1)*PROF_INCREMENT.
The default is 0. Applicable for Volume milling when ROUGH_OPTION is set to PROF_ONLY, for Profiling, and for Trajectory milling. If another value of the ROUGH_OPTION parameter is specified for Volume milling, NUM_PROF_PASSES will be ignored.
The following graphic illustrates NUM_PROF_PASSES and PROF_INCREMENT. 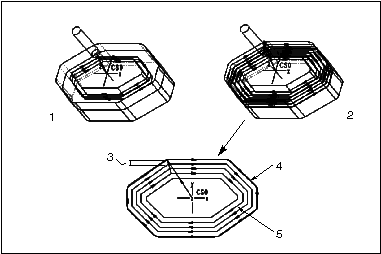 1. NUM_PROF_PASSES = 1 2. NUM_PROF_PASSES = 4 3. PROF_INCREMENT 4. First pass 5. Final pass |
||
|
CORNER_OFFSET
|
||
|
Specifies the amount of material to be removed by a Local Mill NC sequence using Corner Edges. The default is 0.
|
||
|
SLOPE_ANGLE
|
||
|
In Local Milling and Finishing, the angular value with respect to the XY plane that divides the material to be removed into steep (near vertical) and shallow (near horizontal) regions. For example in Local Milling, if you are removing material left over in a pocket with slanted walls, specifying the value of the SLOPE_ANGLE less than the wall slope will make the tool machine the bottom edges of the pocket first, and then remove the material in the corners between the walls. The default SLOPE_ANGLE for newly created Local Milling NC sequences is 30 degrees. For NC sequences created prior to Release 2000i2, the default value is 90 degrees. The default SLOPE_ANGLE for Finishing NC sequences is 45 degrees.
|
||
|
START_OVERTRAVEL
|
||
|
Specifies the distance from the tool to the surface outline for all passes except the first one for each slice (see also APPROACH_DISTANCE). The default is 0. Applicable for Facing only.
|
||
|
END_OVERTRAVEL
|
||
|
Specifies the distance that the tool overtravels past the surface outline on all passes except the last one for each slice (see also EXIT_DISTANCE). The default is 0. Applicable for Facing only.
|
||
|
GROOVE_DEPTH
|
||
|
The depth of the groove. The default is not set (displayed as "1"). Applicable for Engraving only.
|
||
|
4X_TILT_ANGLE
|
||
|
Specifies the angle (in degrees) between the tool axis and the 4\ Axis\ Plane. Normally, the tool axis is parallel to this plane (the default 4X_TILT_ANGLE is 0). Applicable for 4-axis milling only.
|
||
|
4X_LEAD_ANGLE
|
||
|
Specifies the angle (in degrees) between the tool axis and the projection of the surface normal on the 4 Axis Plane (the default is 0). Applicable for 4-axis milling only.
|
||
|
4X_MAX_LEAD_ANGLE
|
||
|
Specifies the maximum lead angle allowed when trying to avoid gouging. The default is a dash (-), but you have to specify a value if 4X_LEAD_RANGE_OPT is set to YES. Applicable for 4-axis milling only.
|
||
|
4X_MIN_LEAD_ANGLE
|
||
|
Specifies the minimum lead angle allowed when trying to avoid gouging. The default is a dash (-), but you have to specify a value if 4X_LEAD_RANGE_OPT is set to YES. Applicable for 4-axis milling only.
|
||
|
CHK_SRF_STOCK_ALLOW
|
||
|
Allows you to specify stock allowance to be used with check surfaces. The default is a dash (-), that is, ignore. This parameter is available for Milling NC sequences that utilize the Check Surfs functionality (that is, Surface, Trajectory, Profile milling, and for Local Milling referencing a Surface milling NC sequence).
|
||
|
TOOLPATH_CREATION_TYPE
|
||
|
In Surface milling, allows you to specify how the tool path is created. The values are:
• BY_TOOL_CONTACT—The tool is always tangential to the cut lines created on the surface.
• BY_TOOL_CENTER—The tool center can always be projected on to the defined cut on the machined surfaces, alternate surfaces, or the retract plane.
• AUTOMATICALLY—The system automatically decides how the tool path is created.
|
Feeds and Speeds
|
ARC_FEED
|
|
Allows you to control the cut feed around arcs. The default is a dash (-), in which case the CUT_FEED will be used. If set to 0, the RAPID statement will be output before the CIRCLE statement.
|
|
ARC_FEED_CONTROL
|
|
Determines how the value for cut feed around arcs is calculated. The options are:
• TOOL_CENTER (default)—The feed rate that is output for CIRCLE statements is always equal to the value specified for ARC_FEED.
• TOOL_PERIMETER—The feed rate that is output for CIRCLE statements is adjusted to insure that the contact point between the tool and the material moves with a speed equal to the value specified for ARC_FEED. This means the value for ARC_FEED will have to be calculated for each CIRCLE statement according to the following rules:
For internal radii:
feed = ARC_FEED * (circle radius / (circle radius + CUTTER_DIAM/2))
For external radii:
feed = ARC_FEED * (circle radius / (circle radius - CUTTER_DIAM/2))
• BY_ARC_RADIUS—The feed value that determines the output for CIRCLE statements for ARC_FEED_RADIUS.
|
|
ARC_FEED_RADIUS
|
|
When you set the value of ARC_FEED_CONTROL to BY_ARC_RADIUS, the feed rate that is output for CIRCLE statements is as follows:
• If the radius of the circle statements in the CL file is greater than the value of ARC_FEED_RADIUS, the CUT_FEED value is output.
• If the radius of the circle statements in the CL file is lesser than the value of ARC_FEED_RADIUS, the ARC_FEED value is output.
|
|
MAX_ARC_FEED
|
|
Allows you to set the maximum feed rate when the tool moves along the arc in milling sequences such as Profile Milling, Trajectory milling, or Pencil Tracing. This is particularly useful in cases where the arc feed in CL output is greater than arc feed specified in step parameters when the ARC_FEED_CONTROL parameter is set to TOOL_PERIMETER.
|
|
TRAVERSE_FEED
|
|
Allows you to set a feed rate for all traverse tool motions. The default is a dash (-), in which case the RAPID command will be output to the CL file.
|
|
WALL_PROFILE_CUT_FEED
|
|
For certain types of high-speed Volume milling (when SCAN_TYPE is set to SPIRAL_MAINTAIN_CUT_TYPE or SPIRAL_MAINTAIN_CUT_DIRECTION), allows you to set a lower feed rate for the first cut, when the tool is cutting the material on both sides. The default is a dash (-), in which case the CUT_FEED value will be used.
|
|
INVERSE_FEED
|
|
Enables you to specify the inverse time feed rate, or the rate of rotation, for machines with rotary axes. Available for 4- and 5-Axis NC sequences only. If you set INVERSE_FEED to YES (the default is NO), the system outputs the following line in the CL data file before the first cutting feed statement:
FEDRAT / INVERS, AUTO
At the end of the CL data file, the system outputs the following line:
FEDRAT / INVERS, OFF
RAMP_FEED
See Entry/Exit parameters.
APPROACH_FEED
See Entry/Exit parameters.
|
|
THREAD_FEED
|
|
Defines the thread pitch. Applicable for Thread milling only.
|
|
THREAD_FEED_UNITS
|
|
TPI (default), MMPR, IPR. Applicable for Thread milling only.
|
|
EXIT_FEED
|
|
See Entry/Exit parameters.
|
Machine Settings
|
SPINDLE_SPEED
|
||||||||||||||||
|
The rate at which the machine spindle rotates (RPM). The default is 1.
|
||||||||||||||||
|
WALL_PROFILE_SPINDLE_SPEED
|
||||||||||||||||
|
For certain types of high-speed Volume milling (when SCAN_TYPE is set to SPIRAL_MAINTAIN_CUT_TYPE or SPIRAL_MAINTAIN_CUT_DIRECTION), allows you to set a lower spindle speed for the first cut, when the tool is cutting the material on both sides. The default is a dash (-), in which case the SPINDLE_SPEED value will be used.
|
||||||||||||||||
|
SPINDLE_SENSE
|
||||||||||||||||
|
The direction of spindle rotation. CW (clockwisedefault), CCW (counterclockwise).
|
||||||||||||||||
|
SPINDLE_RANGE
|
||||||||||||||||
|
NO_RANGE (default), LOW, MEDIUM, HIGH, NUMBER. If a value other than NO_RANGE is set, range will be included in the SPINDL command in the CL file (for example, "RANGE, LOW"). If set to NUMBER, the RANGE_NUMBER parameter value will be used in the SPINDL command (for example, "RANGE, 4", where 4 is the RANGE_NUMBER parameter value).
|
||||||||||||||||
|
RANGE_NUMBER
|
||||||||||||||||
|
Will be output in the SPINDL command if SPINDLE_RANGE is set to NUMBER. The default is 0.
|
||||||||||||||||
|
MAX_SPINDLE_RPM
|
||||||||||||||||
|
If set to a value other than a dash (-) (which is the default), the MAXRPM attribute will be added to the SPINDL command.
|
||||||||||||||||
|
SPEED_CONTROL
|
||||||||||||||||
|
The default SPEED_CONTROL is CONST_RPM (constant revolutions per minute). CONST_SFM (constant surface feet per minute) and CONST_SMM (constant surface meters per minute) allow you to apply feed rate control to the contact surface between the tool and the workpiece, to create good surface finish.
|
||||||||||||||||
|
CUTCOM
|
||||||||||||||||
|
Controls tool compensation. The options are:
• ON—Turns on the cutter compensation in the CL file. The compensation is Right or Left, depending on CUT_TYPE and SPINDLE_SENSE.
• OFF (the default)—No tool compensation provided.
CUTCOM statements are not output for cut motions.
|
||||||||||||||||
|
CUTCOM_REGISTER
|
||||||||||||||||
|
Specifies the number of the register of the machine controller that holds the tool compensation data. The default is 0.
|
||||||||||||||||
|
NUMBER_CUTCOM_PTS
|
||||||||||||||||
|
Specifies if colinear points in approach and exit motions should be stripped or added. The values are:
• 0—Strip colinear points.
• 1—Do not strip colinear points, to allow proper implementation of Cutcom.
• n (where n is an integer)—The Approach, Exit, or Cutcom move will be divided into n equal segments by adding extra GOTO points.
The following illustration shows the number and location of GOTO points for the following NUMBER_CUTCOM_PTS values:
• NUMBER_CUTCOM_PTS 0 (colinear points stripped)—schematic on the left
• NUMBER_CUTCOM_PTS 1—schematic in the middle
• NUMBER_CUTCOM_PTS 2—schematic on the right 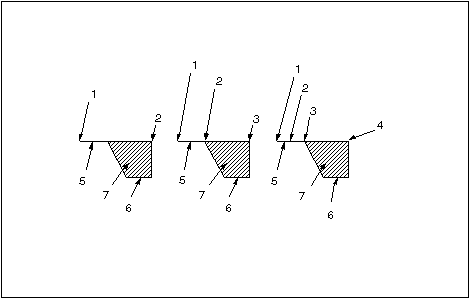 1. 1st GOTO point 2. 2nd GOTO point 3. 3rd GOTO point 4. 4th GOTO point 5. Approach move 6. Cut motion 7. Part |
||||||||||||||||
|
CUTCOM_LOC_APPR
|
||||||||||||||||
|
Specifies location of CUTCOM statement on the approach motion if multiple cutcom points are specified. Cutcom points are numbered from 0 to n, where n is the value of NUMBER_CUTCOM_PTS. The default is 1.
|
||||||||||||||||
|
CUTCOM_LOC_EXIT
|
||||||||||||||||
|
Specifies location of CUTCOM statement on the exit motion if multiple cutcom points are specified. Cutcom points are numbered from 0 to n, where n is the value of NUMBER_CUTCOM_PTS. The default is 0.
The following illustrations shows the locations and numbering of cutcom points for approach and exit motions if NUMBER_CUTCOM_PTS is 2. 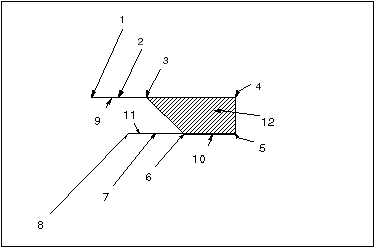 1. 1st GOTO point (cutcom point 0) 2. 2nd GOTO point (cutcom point 1) 3. 3rd GOTO point (cutcom point 2) 4. 4th GOTO point 5. 5th GOTO point 6. 6th GOTO point (cutcom point 0) 7. 7th GOTO point (cutcom point 1) 8. 8th GOTO point (cutcom point 2) 9. Approach move 10. Cut motion 11. Exit move 12. Part |
||||||||||||||||
|
HOLDER_DIAMETER
|
||||||||||||||||
|
Along with HOLDER_LENGTH, allows you to use holder dimensions for automatic gouge avoidance. The default is a dash (-). If specified, will also be reflected when displaying CL data and when the tool is displayed in the Preview window of the Tool Setup dialog box. Applicable for Trajectory, Conventional milling, Isolines Surface milling, rouging, re-roughing, finishing, and corner machining.
|
||||||||||||||||
|
HOLDER_LENGTH
|
||||||||||||||||
|
Along with HOLDER_DIAMETER, allows you to use holder dimensions for automatic gouge avoidance. The default is a dash (-). If specified, will also be reflected when displaying CL data and when the tool is displayed in the Preview window of the Tool Setup dialog box. Applicable for Trajectory, Conventional milling, Isolines Surface milling, rouging, re-roughing, finishing, and corner machining.
|
||||||||||||||||
|
TIP_CONTROL_POINT
|
||||||||||||||||
|
If you are using a multi-tip tool for the NC sequence, lets you specify which tip is to be used as control point for computing the tool path. The values available from the drop-down list correspond to the number of tips in the tool currently selected for the NC sequence.
|
||||||||||||||||
|
TLCHG_TIP_NUMBER
|
||||||||||||||||
|
For a multi-tip tool, lets you specify which tip is to be used as control point to go to Start and End point, if they are defined in the NC Sequence. The values are:
• INITIAL—Tip 1.
• CURRENT—Tip selected as TIP_CONTROL_POINT for the NC sequence.
|
||||||||||||||||
|
SMOOTH_RADIUS
|
||||||||||||||||
|
Specifies the radius for filleting or smooth corner machining. The minimum value must be 10% of the tool diameter if the SMOOTH_SHARP_CORNERS parameter is defined and not set to CONSTANT_RADIUS. The maximum allowable value is 50% of the step-over distance. Corner rounding is available for line-line, line-arc, and arc-arc (if they are not tangent) connections. Available for Volume milling, Roughing, Reroughing, and Local milling (Prev NC Seq only).
|
||||||||||||||||
|
SMOOTH_SHARP_CORNERS
|
||||||||||||||||
|
Specifies the way sharp tool path corners are rounded while machining. Available for Volume milling, Roughing, Reroughing, and Local milling (Prev NC Seq only).
• NO—A rounding radius is not used while machining sharp tool path corners. This is the default.
• CONSTANT_RADIUS—Rounds sharp corners using a rounding radius having a value equal to that of the SMOOTH_RADIUS parameter.
• RADIUS_BY_ANGLE—Rounds sharp corners using a rounding radius having a value based on the angle of the sharp corner and the SMOOTH_RADIUS value as follows.
• MAX_RADIUS—Rounds sharp corners using the largest possible radius between 10% and 100% of the SMOOTH_RADIUS value.
|
||||||||||||||||
|
CORNER_SLOWDOWN
|
||||||||||||||||
|
Specifies the use of a progressive slowdown in the feed rate before a corner followed by an acceleration to the cut feed rate after the corner. The default is NO. Available for Volume milling, Roughing, Reroughing, and Local milling (Prev NC Seq only).
|
||||||||||||||||
|
SLOWDOWN_LENGTH
|
||||||||||||||||
|
Specifies the length of the move for the slowdown. The same length is used for the acceleration after the corner. The length is measured from the sharp edge or the beginning of the rounding fillet, if any. If one of the edges is an arc, the distance is taken along the arc. Available for Volume milling, Roughing, Reroughing, and Local milling (Prev NC Seq only).
|
||||||||||||||||
|
SLOWDOWN_PERCENT
|
||||||||||||||||
|
Specifies the feed rate at the end of the slowdown. For example, if the cut feed rate is 30 inches per minute and the value of the SLOWDOWN_PERCENT is 10, then the feed rate at the end of the slowdown is 3 inches per minute. Available for Volume milling, Roughing, Reroughing, and Local milling (Prev NC Seq only).
|
||||||||||||||||
|
NUMBER_SLOWDOWN_STEPS
|
||||||||||||||||
|
Specifies the number of steps in which the slowdown takes place. A larger number of steps results in a smoother slowdown. At each step, the feed rate is reduced by (100-SLOWDOWN_PERCENT)/NUMBER_SLOWDOWN_STEPS. Available for Volume milling, Roughing, Reroughing, and Local milling (Prev NC Seq only).
During acceleration after the corner, the number of steps is halved.
|
Entry/Exit Motions
|
RAMP_ANGLE
|
|
The angle at which the tool enters the workpiece during a plunge cut. The default RAMP_ANGLE is 90, which enters the workpiece parallel to the Z-axis. Not applicable for Facing or Trajectory NC sequences.
|
|
RAMP_FEED
|
|
The rate at which the tool moves upon entering the workpiece during a plunge cut. The default is a dash (-), in which case the CUT_FEED will be used. Not applicable for Facing or Trajectory NC sequences.
|
|
CLEAR_DIST
|
|
The clearance distance above the surface to be milled (for example, the previous slice level) at which the rapid motion ends and the PLUNGE_FEED begins. The default is not set (displayed as "1").
|
|
PULLOUT_DIST
|
|
Specifies the height above the level of the cut (for example, the slice just milled) up to which the tip of the tool will retract at CUT_FEED and then change to RETRACT_FEED. The default is a dash (-), that is, 0.
|
|
INTER_RET_HEIGHT
|
|
Specifies the distance that the cutter will retract above the level of the cut to perform intermediate rapid motions. The default is a dash (-), in which case the cutter will retract all the way to the retract surface. Applicable for Face milling.
|
|
LEAD_IN
|
|
If set to YES, makes the tool enter the workpiece along a tangent circular path when profiling. The arc radius is set by LEAD_RADIUS, the arc angle by ENTRY_ANGLE. You can also specify the length of the adjacent straight portion of Lead In trajectory using TANGENT_LEAD_STEP, and the length of a straight segment normal to it using NORMAL_LEAD_STEP.
For closed contours, if start point is not set, the tool will enter at a location determined by the system. If not satisfied with this location, specify your own Start Point axis. The tool will enter at the point along the profile which is closest to the start point axis.
The following graphic illustrates LEAD_IN and LEAD_OUT.  1. ENTRY_ANGLE 2. LEAD_RADIUS 3. LEAD_IN 4. LEAD_OUT 5. NORMAL_LEAD_STEP 6. TANGENT_LEAD_STEP 7. EXIT_ANGLE 8. LEAD_IN 9. Start point 10. LEAD_OUT 11. Open profile 12. Closed profile If a closed contour contains multiple loops, LEAD_IN and LEAD_OUT will be applied to each loop. 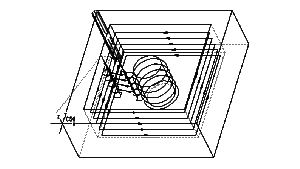 If LEAD_IN is set to YES with a zero radius, the tool will go directly to the point closest to the Start Point specified and start cutting. When LEAD_IN is set to NO, cutting will begin at the default point of the contour determined by the system. In the following illustration, the graphic on the left shows the tool path for LEAD_IN set to NO, while the graphic on the right shows the tool path for LEAD_IN set to YES and LEAD_RADIUS set to 0. 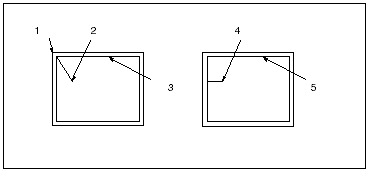 1. Default start of the contour 2. Start Point axis 3. Tool path 4. Start point axis 5. Tool path |
|
LEAD_OUT
|
|
Makes the tool exit the workpiece along a tangent circular path when profiling. Works similarly to LEAD_IN. If the end point is specified it will be used for LEAD_OUT, otherwise the default 90 arc (and the default exit point for closed contours) will be used.
|
|
LEAD_RADIUS
|
|
The radius of the tangential circular movement of the tool when leading in or out. The default is 0.
|
|
TANGENT_LEAD_STEP
|
|
The length of the linear movement that is tangent to the circular lead-in or lead-out motion. The default is 0.
|
|
NORMAL_LEAD_STEP
|
|
The length of the linear movement that is normal to the tangent portion of the lead-in or lead-out motion. The default is 0.
|
|
HELICAL_DIAMETER
|
|
Allows you to replace the plunge motion between the slices for Rough Volume milling with a helical entry motion. The helical diameter will be formed by the outside of the tool as it approaches the beginning of a Rough slice; the angle of descent is defined by the RAMP_ANGLE parameter value. If a Start Point axis is specified, the helix center will be at the axis location; if the helical motion violates the Mill Volume, the system will issue a warning and stop machining. If a Start Point axis is not specified,the helix will be created as close to the start point of the lower slice as possible. To move from the end of the previous slice, the tool will lift off the surface by PULLOUT_DIST and horizontally move at RETRACT_FEED to the start of the helical entry into the lower slice. If you have specified Approach Walls for the NC sequence, the helical motion will not be created when the tool moves down outside the Approach Walls; however, if the tool moves down inside the Mill Volume, the system will use the helical entry. The default HELICAL_DIAMETER is a dash (-), in which case the helical motion will not be performed.
|
|
APPR_EXIT_EXT
|
|
Applicable for Volume milling only. Defines the maximum distance between the periphery of the tool and the Approach Wall of the mill volume for approach and exit motions within a slice.
|
|
APPR_EXIT_PATH
|
|
Applicable for Profiling and for the profiling pass of Volume milling NC sequences. Allows you to trim the sketched approach or exit path by the outline of the profiling tool motion. For approach path, only the first portion (from the start point up to the first intersection with the profiling outline) will be kept. For exit path, only the last portion (from the last intersection with the profiling outline to the end point) will be kept. If the approach/exit path is set to not be trimmed, the tool will follow the whole path as sketched. The values are:
• TRIM_BOTH (default)—Both the approach and exit path will be trimmed.
• TRIM_APPROACH—Trim only the approach path.
• TRIM_EXIT—Trim only the exit path.
• TRIM_NONE—Do not trim. 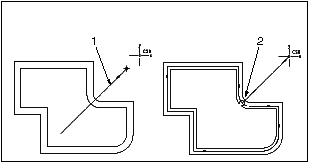 1. Approach path 2. Approach path (trimmed) |
|
APPR_EXIT_HEIGHT
|
|
Applicable for Volume, Local, Profile milling, and Engraving. Allows you to control the depth of the approach and exit path specified during Build Slice. The options are:
• DEPTH_OF_CUT (the default)—The approach/exit path for each pass (including the first/last) will be at the depth of the start/end point of the pass.
• RETRACT_PLANE—Approach/exit movements will be at the level of the retract plane.
|
|
OVERTRAVEL_DISTANCE
|
|
For 3-Axis Conventional milling, specifies the distance that the tool travels past the surface outline, both at the beginning and end of each cutting pass.
|
|
APPROACH_DISTANCE
|
|
Specifies the length of approach motions. For Facing, also specifies the additional (with respect to START_OVERTRAVEL) distance from the tool to the surface outline for the first pass in each slice. The default is a dash (-), that is, 0.
|
|
EXIT_DISTANCE
|
|
Specifies the length of exit motions. For Facing, also specifies the additional (with respect to END_OVERTRAVEL) distance that the tool overtravels past the surface outline for the last pass in each slice. The default is a dash (-), that is, 0.
|
|
APPROACH_FEED
|
|
The rate at which the tool approaches the surface during a Facing or Trajectory milling NC sequence. The default is a dash (-), in which case CUT_FEED is used.
The APPROACH_FEED parameter for 2-axis trajectory milling works only if the value for the LEAD_IN parameter is set to Yes.
|
|
EXIT_FEED
|
|
The rate at which the tool overtravels past the surface edge during a Facing or Trajectory milling NC sequence. The default is a dash (-), in which case CUT_FEED is used.
The EXIT_FEED parameter for 2-axis trajectory milling works only if the value for the LEAD_OUT parameter is set to Yes.
|
|
CLEARANCE_EDGE
|
|
Specifies which point of the tool is to be used for measuring the exit motions and the overtravel motions when the tool leaves the material:
• HEEL (default)—The heel of the tool.
• CENTER—The center of the tool.
• LEADING_EDGE—The leading edge of the tool.
Applicable for Facing only.
|
|
ENTRY_EDGE
|
|
Specifies which point of the tool is to be used for measuring the approach motions and the overtravel motions when the tool approaches the material:
• LEADING_EDGE (default)—The leading edge of the tool.
• CENTER—The center of the tool.
• HEEL—The heel of the tool.
Applicable for Facing only.
|
|
APPROACH_TYPE
|
|
Allows you to automatically create an approach motion in Thread milling.
In Thread milling, the values are:
• RADIAL—The approach motion will be a straight line normal to the cut motion, controlled by the APPROACH_DISTANCE parameter.
• HELICAL—The tool will approach the start of the cut motion in a helical motion controlled by the ENTRY_ANGLE and the APPROACH_DISTANCE parameters.
• NONE—No approach motion will be generated.
|
|
EXIT_TYPE
|
|
Allows you to automatically create an exit motion in Thread milling.
In Thread milling, the values are:
• RADIAL—The exit motion will be a straight line normal to the cut motion, controlled by the EXIT_DISTANCE parameter.
• HELICAL—The tool will exit the cut motion in a helical motion controlled by the EXIT_ANGLE and the EXIT_DISTANCE parameters.
• NONE—No exit motion will be generated.
|
|
ENTRY_ANGLE
|
|
The angle of the arc created by the circular movement of the tool when leading in. Used when creating Lead In motions. The default is 90.
In Thread milling, defines the angle of the helical approach motion. If the angle is 0, the helical motion will still be created, but it will only contain one point. However, you will be able to modify the motion parameters in order to change this.
|
|
EXIT_ANGLE
|
|
The angle of the arc created by the circular movement of the tool when leading out. Used when creating Lead Out motions. The default is 90.
In Thread milling, defines the angle of the helical exit motion. If the angle is 0, the helical motion will still be created, but it will only contain one point. However, you will be able to modify the motion parameters in order to change this.
|
|
CUT_ENTRY_EXT
|
|
For Surface and Swarf milling, specifies the default entry move type for intermediate cuts. The values correspond to the Each Cut entry move types available in the Entry/Exit Move dialog box.
|
|
CUT_EXIT_EXT
|
|
For Surface and Swarf milling, specifies the default exit move type for intermediate cuts. The values correspond to the Each Cut exit move types available in the Entry/Exit Move dialog box.
|
|
INITIAL_ENTRY_EXT
|
|
For Surface and Swarf milling, specifies the default entry move type for the first cut. The values correspond to the First Cut entry move types available in the Entry/Exit Move dialog box.
|
|
FINAL_EXIT_EXT
|
|
For Surface and Swarf milling, specifies the default exit move type for the last cut. The values correspond to the Last Cut exit move types available in the Entry/Exit Move dialog box.
|
|
CUT_ENTRY_EXT_FLIP
|
|
Flips the cut direction of the following entry motions defined using the CUT_ENTRY_EXT parameter in a Trajectory milling sequence:
• LEAD_IN
• LEAD_OUT
• NORMAL
• HELICAL
|
|
CUT_EXIT_EXT_FLIP
|
|
Flips the cut direction of the following exit motions defined using the CUT_EXIT_EXT parameter in a Trajectory milling sequence:
• LEAD_IN
• LEAD_OUT
• NORMAL
• HELICAL
|