1. Click Modeling and then, in the Model group, click the arrow next to Pull.
2. Click Pull Angular. The Pull dialog box opens.
By default, Profiles is selected in the Pull dialog box.
3. Select from the following options:
◦ Part: Specifies the name for the part to be created or machined. You can also use the browser (Browser) to specify the part. The default is the active part. To add material to an existing part, click Part and specify the part. Type the name of the part in the text field, beginning with a slash (/) or other path name.
◦ Workplane: Specifies the workplane and profile to use. You can also use the browser (Browser) to specify the workplane. The default is the active workplane (if it contains a valid profile).
◦ Selected: Specifies the areas of the profile on the workplane to be pulled.
The default option in the Operation box is Automatic. Creo Elements/Direct Modeling automatically selects the most likely operation based on the other options in the Pull dialog box. You can also choose Add Material or Remove Material in the Operation box if the system suggested operation is not the wanted operation.
◦ Axis: Specifies the axis of rotation for the angular pull operation. You use the Axis 3D tool to specify the axis.
◦ Angle: Specifies the pull angle around the axis (in the active angular units).
◦ Keep WP: Specifies whether or not to keep the workplane after the angular pull operation. The default is to keep the workplane.
◦ Keep Prof: Specifies whether or not to keep the profile after the angular pull operation. If you choose not to keep the workplane, it is not possible to keep the profile in that workplane.
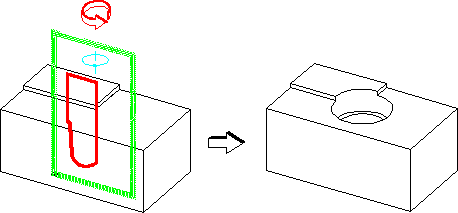
1. Click Modeling and then, in the Modify 3D group, click the arrow next to Modify.
2. Click Pull. The Pull dialog box opens.
By default, Faces is selected in the Pull dialog box.
3. Select a face of a part in Viewport.
The default option in the Operation box is Automatic. Creo Elements/Direct Modeling automatically selects the most likely operation based on the other options in the Pull dialog box. You can also choose Add Material or Remove Material in the Operation box if the system suggested operation is not the wanted operation.
4. Click Angular to switch the method to Angular.
5. Select from the following options:
◦ Type: Specifies either Axis or Dimension.
• If you choose Axis in the Type box, you can use Next to pull a face in multiple stages. The most recently pulled faces remain selected and you do not need to restart the selection. You can also use Back to go back one level of the angular pull operation.
• If you choose Dimension in the Type box, select the dimension in the Viewport to pull the face. The axis is set according to the selected angular dimension. The initial angle is taken from the dimension.
◦ Axis: Specifies the axis of rotation for the angular pull operation. You use the Axis 3D tool to specify the axis.
◦ Angle: Specifies the pull angle around the axis (in the active angular units).
• You can click Chk & Fix if you suspect a part is corrupt. Chk & Fix checks for self-intersections, knife edges, and void shells and attempts to fix them. If a part fails the check and fix, it is not modified and remains in its original state.
 ) allows you to:
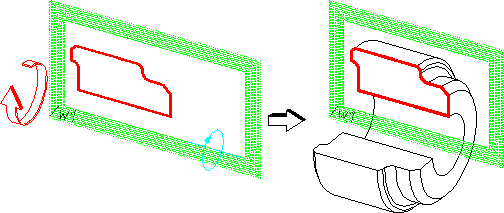
 Pull.
Pull. Pull Angular. The Pull dialog box opens.
 to complete the operation.
 Modify.
 Pull. The Pull dialog box opens.