Extending consolidated BOM calculations lab
|
Time Estimates for Completion
|
||
|---|---|---|
|
In this lesson you will extend the consolidated BOM to include calculating the total cost for each item in the BOM and a total cost for the whole BOM.
|
Description:
|
1 minute
|
|
Lab exercise:
|
1 hour
|
|
Description
By now, you should have completed the Basic customization and deployment lab and XML customization lab labs. This lab does not require any Java programming and can be completed with any text editor.
In this lab you will create a simple Bill of Materials (BOM). You will then extend the schema to include a unit cost for each item in the BOM and configure a new pseudo attribute that will calculate the total cost of each item in the BOM. The Consolidated BOM tab will then automatically sum the new values of the total costs to give a total cost of the whole BOM. The same techniques can be used to perform other useful calculations such as weight, volume or any other calculations based on consolidated BOM calculations.
Try the lab exercise below to learn how to extend consolidated BOM calculations.
Lab Exercise
You will need to know whether your database uses the Data Management schema or Desktop Schema.
Determine your database schema:
1. Click Home and then, in the Search group, click the arrow next to Advanced.
2. Select from the available options.
◦ If you select MODEL_3D, the database uses the Data Management schema.
3. If you select me_model, the database uses the Desktop schema.
The high-level steps for this lab are:
Create a test BOM
Create a simple BOM for use in the rest of the lab.
1. Start Creo Elements/Direct Model Manager Standalone and log in as an Administrator.
2. Select the Recent List tab.
3. Select > > . In the New Masterdata dialog, type a unique Name for the Masterdata and click OK. This will be the root Masterdata for the test BOM.
4. Select your new Masterdata.
5. Click Structure and then, in the BOM group, click BOM Editor. The BOM Editor dialog box opens.
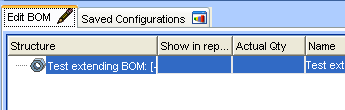
6. Set up the BOM Editor.
a. If the Show in report column is not visible, right-click in the open area and select > . Check Show in report.
b. Move (drag) the Actual Qty column as shown.
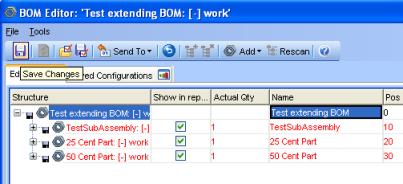
7. Create the BOM.
a. First, add three new Masterdata entries to the root Masterdata.
▪ Click > .
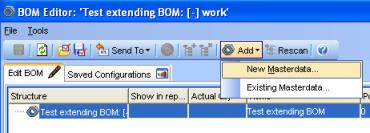
▪ Type a unique name in the Name column and press Enter.
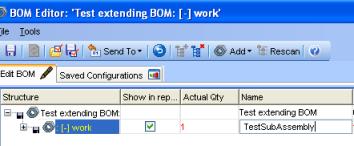
▪ Repeat two more times. Your final structure should look like this:
▪ Click > .
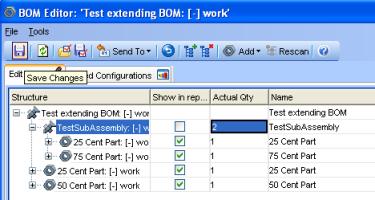
b. Next, create a share of the 25 Cent Part in the TestSubAssembly by dragging and dropping the 25 Cent Part onto the TestSubAssembly.
If the Copy with BOM attributes dialog displays, click OK.

c. Finally, add 75 Cent Part to TestSubAssembly. Uncheck Show in report on the TestSubAssembly and change the Actual Qty to 2.
Why uncheck Show in report?
The Show in report flag controls whether a part or assembly should display in the Consolidated BOM report. For this lab, we do not want to display the subassembly, but we do want to display the parts in the subassembly.
8. Save your changes, and close the BOM Editor.
Extend the Masterdata schema
Now modify the Masterdata schema to include a new attribute named UNIT_COST. This attribute will contain the cost for each part in the BOM and will be used to calculate the total cost of the BOM.
1. In Creo Elements/Direct Model Manager Standalone (as an Administrator), go to the Admin tab.
2. In the What do you want to manage? pane, click Attributes and Classes.
3. Open the Masterdata folder and select MASTERDATA if you have a Data Management schema or me_part if you have a Desktop schema.
4. Right-click MASTERDATA and in the shortcut menu, click Add New Attribute. Type values as follows:
◦ Name: UNIT_COST
◦ Display Name: Unit Cost
◦ Data Type: Float (from the pulldown list)

Click OK.
5. In the What do you want to manage? pane, click Deploy Now. Follow the instructions to deploy the change.
6. Stop and restart Creo Elements/Direct Model Manager Standalone.
7. In the Recent List tab, select your test BOM and click Bom Editor.
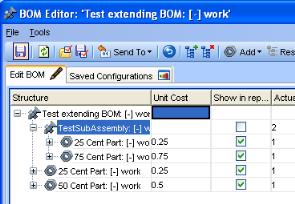
8. In the Bom Editor, add the new Unit Cost attribute to the layout.
Right-click in the open area and select > . Check Unit Cost and click OK.

9. Edit the Unit Cost for the parts to be .25 for the 25 Cent Part, .50 for the 50 Cent Part, and .75 for the 75 Cent Part. Click Save Changes.
Add a pseudo attribute to Masterdata
Now you need to create a new pseudo attribute to calculate the total cost of each item in the BOM. The pseudo attribute will use the ExpressionAttribute business object, which allows a mathematical expression to be configured using attributes of the class as variables. The result of the expression becomes the value of the attribute.
1. Navigate to the install config directory. This is usually:
C:\Program Files\PTC\Creo Elements\Direct Manager Server 20.8\config
2. Copy the custom.xml file and name it total_cost.xml.
3. Add the following definition to the Masterdata class:
Data Management schema:
<ClassDefs>
  <Class extends="DMMasterdata, DMReleaseProcess">
     <Name>MASTERDATA</Name>
     <Attribute>
       UNIT_COST
       <Visible>true</Visible>
       <DisplayName>Unit Cost</DisplayName>
       <RollingNumberGeneratorName />
       <BusinessObjectClass>-</BusinessObjectClass>
       <AttributeEditorClass />
       <CustomAttribute>true</CustomAttribute>
       <IncludeInLayoutManager>true</IncludeInLayoutManager>
     </Attribute>
     <Attribute>
       TOTAL_COST
       <Visible>true</Visible>
       <DisplayName>Total Cost</DisplayName>
       <BusinessObjectClass>com.osm.datamgmt.biz.ExpressionAttribute
       </BusinessObjectClass>
       <Expression>%TOTAL_QTY% * %UNIT_COST%</Expression>
       <CustomAttribute>true</CustomAttribute>
       <IncludeInLayoutManager>true</IncludeInLayoutManager>
       <Aggregate>true</Aggregate>
       <Protect>true</Protect>
       <IsLinkAttribute>true</IsLinkAttribute>
     </Attribute>
  </Class>
</ClassDefs>
Desktop schema:
<ClassDefs>
   <Class extends="DTDefaultMasterdata, DTReleaseProcess">
     <Name>MASTERDATA</Name>
     <Attribute>
       UNIT_COST
       <Visible>true</Visible>
       <DisplayName>Unit Cost</DisplayName>
       <RollingNumberGeneratorName />
       <BusinessObjectClass>-</BusinessObjectClass>
       <AttributeEditorClass />
       <CustomAttribute>true</CustomAttribute>
       <IncludeInLayoutManager>true</IncludeInLayoutManager>
     </Attribute>
     <Attribute>
       TOTAL_COST
       <Visible>true</Visible>
       <DisplayName>Total Cost</DisplayName>
       <BusinessObjectClass>com.osm.datamgmt.biz.ExpressionAttribute
       </BusinessObjectClass>
       <Expression>%TOTAL_QTY% * %UNIT_COST%</Expression>
       <CustomAttribute>true</CustomAttribute>
       <IncludeInLayoutManager>true</IncludeInLayoutManager>
       <Aggregate>true</Aggregate>
       <Protect>true</Protect>
       <IsLinkAttribute>true</IsLinkAttribute>
     </Attribute>
  </Class>
</ClassDefs>
Note the <Expression> tag configuration:
<Expression>%TOTAL_QTY% * %UNIT_COST%</Expression>
The %TOTAL_QTY% variable contains the total quantity for a part in a BOM as calculated by Creo Elements/Direct Model Manager's Consolidated BOM. %UNIT_COST% is the variable for the new UNIT_COST attribute.
Only link attributes can be aggregated. In order to have the TOTAL_COST aggregated it must be configured as a link attribute and aggregation must be enabled:
<Aggregate>true</Aggregate>
<IsLinkAttribute>true</IsLinkAttribute>
Test the calculation
1. Stop and restart Creo Elements/Direct Model Manager Standalone.
2. In the Recent List tab, select the root Masterdata for the test BOM and click BOM Editor in the Masterdata Tasks pane.
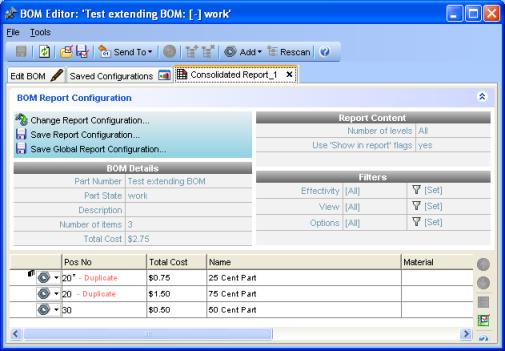
3. Click Generate Reports in the BOM Tasks pane. Click Finish in the wizard. If you see a duplicate position number warning dialog, click OK.
Add the Total Cost column to the report using the Layout Manager.

The Total Cost column contains the total for each item in the BOM. The Total Cost in the BOM Details panel contains the sum of the Total Cost column.
4. To format the costs, add the following tag to both the TOTAL_COST and UNIT_COST attributes:
<DisplayFormat>$%.2f</DisplayFormat>
This rounds the costs to 2 decimal places and adds a $ in front of the value.
Stop and restart Creo Elements/Direct Model Manager Standalone and regenerate the Consolidated BOM report on the test BOM. The report should look like this: