XML customization lab
|
Time Estimates for Completion
|
||
|---|---|---|
|
You can customize Creo Elements/Direct Model Manager classes and version strings to meet your company's naming conventions.
In this lesson you'll learn how to customize Model Manager's XML files.
|
Description:
|
5 minutes
|
|
Lab exercise:
|
20 minutes
|
|
Description
Creo Elements/Direct Model Manager reads two XML files when it starts - wmconf.xml and another XML file. The default other XML file is custom.xml, which contains information about servers. You can modify custom.xml or create a new XML file. Never modify wmconf.xml. Creo Elements/Direct Model Manager overwrites wmconf.xml and your changes will be lost.
Creo Elements/Direct Model Manager reads wmconf.xml first, followed by the other XML file, allowing customizations in the other XML file to overwrite the default definitions in wmconf.xml.
Extends clause
To customize a class in earlier versions of Creo Elements/Direct Model Manager you had to copy the whole class definition to your XML file and then modify it. Since some of the class definitions are quite long, this process was tedious and prone to error. And since the customized definition overwrote the whole default definition, you had to change the customization to incorporate additions to the class definition.
The extends clause (added to CoCreate Model Manager 2005) makes XML customization much easier. The wmconf.xml file contains definitions for base classes. Leaf classes extend the base classes and have names that match the database class names. The definition for each base class has one line containing the name of the class. So now, to extend a class, you just need to copy the definition of the base class to your XML file and customize the attributes you want to modify.
You can use this approach with your own classes.
Attribute order
Attributes are listed in alphabetic order in some parts of the Creo Elements/Direct Model Manager user interface. In earlier releases attributes were listed in the order they were configured in the XML file. The change was necessary because the extends clause allows the attributes for a class to be split into two XML files.
The index tag allows you to change the order that attributes are displayed in the Attributes tab of the DB Properties dialog box and the Attributes panel in the Workspace Search tab. The index tag accepts a float for more precision. Attributes with indices will be listed first, followed by the remaining attributes in alphabetic order.
Version strings
The version string displayed in Creo Elements/Direct Model Manager and Creo Elements/Direct Drawing Manager is formed by concatenating the MAJOR_REV and MINOR_REV pseudo attributes, separated by a period. You can customize the initial and second values of MAJOR_REV and MINOR_REV to implement your company’s version naming conventions.
MAJOR_REV and MINOR_REV are defined in the wmconf.xml file. You can customize them by extending classes in your custom xml file.
Try the lab exercise below to learn how to customize Creo Elements/Direct Model Manager with XML.
Lab Exercise
In this lab you will learn how to use the extends clause to customize Creo Elements/Direct Model Manager classes and how to customize major version strings.
This lab assumes you have completed the Basic customization and deployment lab.
You need to know whether your database uses the Data Management schema or Desktop schema. To determine your database schema,
1. Click the Search tab. In the What do you want to search for? pane, click Advanced.
2. Click the pulldown arrow under Search through and scroll through the list.
◦ If one of the choices is MODEL_3D, the database uses the Data Management schema.
◦ If one of the choices is me_model, the database uses the Desktop schema.
The high-level steps for this lab are:
Create a model
Create a simple model for use in the rest of the lab.
1. In Creo Elements/Direct Modeling, create a cube or other simple part.
2. Rename the part (e.g. xxx_cube).
3. If Creo Elements/Direct Model Manager is not already running, enable it from Creo Elements/Direct Modeling's > menu.
4. Select your part in the Structure Browser, right-click and choose > . The Save dialog appears.
5. Expose the Major Rev options. Notice that Creo Elements/Direct Model Manager ships with options for users to choose between an initial Major Rev of 1, 01 or A.

6. Select 1 and click Save.
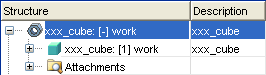
7. In Creo Elements/Direct Model Manager note the format of the model name.
8. Close Creo Elements/Direct Model Manager.
Change the class name format
Use the extends clause to change the way class names are displayed in the Workspace.
1. Open NetBeans and the project that you created in the Basic customization and deployment lab lab.
2. Open the acme.xml file in the NetBeans editor.
3. Add the following code to the acme.xml file between the </WMServerInfo> and </WMConfig> tags:
Data Management schema:
<ClassDefs>
   <Class extends="DMModel, DMReleaseProcess">
      <Name catalog="awm_stda" msg_num="258">MODEL_3D</Name>
      <NameFormat>%DB_UNIQUE_ID_STRING%</NameFormat>
   </Class>
</ClassDefs>
Desktop schema:
<ClassDefs>
   <Class extends="DTModel, DTReleaseProcess">
      <Name catalog="awm_stda" msg_num="10">me_model</Name>
      <NameFormat>%DB_UNIQUE_ID_STRING%</NameFormat>
   </Class>
</ClassDefs>
This code will display the unique identifier attribute from the database for the classes in Creo Elements/Direct Model Manager.
The message catalog information is added to the Name tag so it will work with English and non-English databases. If you only use English databases you may omit these attributes. You can find the catalog and msg_num information for different tags in the wmconf.xml file.
You can use any database attribute by enclosing it in % signs. Adding "DB_" to the front of the attribute name causes the attribute to be localized, but this might not work for custom attributes.
Save your changes to acme.xml.
4. Build the project (click Build Main Project).
5. Start Creo Elements/Direct Model Manager from Creo Elements/Direct Modeling. If asked to "Select Configuration", choose acme.
6. In Creo Elements/Direct Model Manager, compare the format of the class name string in the Structure column with the original format.
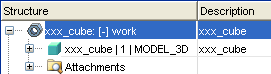
(If the format hasn't changed, you either mistyped the code, perhaps with different capitalization, or your database is using a different schema.)
7. Close Creo Elements/Direct Model Manager.
Customize the Major Rev and Minor Rev
1. Replace the name format customization code in the acme.xml file with the following:
Data Management schema:
<ClassDefs>
<Class extends="DMModel, DMReleaseProcess">
   <Name catalog="awm_stda" msg_num="258">MODEL_3D</Name>
   <Attribute>
      MAJOR_REV
      <DisplayName>Major Rev</DisplayName>
      <AttributeEditorClass>com.osm.datamgmt.editor.MajorRevAttributeEditor</AttributeEditorClass>
      <Visible>true</Visible>
      <IncludeInLayoutManager>true</IncludeInLayoutManager>
      <Searchable>false</Searchable>
      <InitialRev>A</InitialRev>
      <SecondRev>B</SecondRev>
   </Attribute>
   <Attribute>
      MINOR_REV
      <DisplayName>Minor Rev</DisplayName>
      <AttributeEditorClass>com.osm.datamgmt.editor.MinorRevAttributeEditor</AttributeEditorClass>
      <Visible>true</Visible>
      <IncludeInLayoutManager>true</IncludeInLayoutManager>
      <Searchable>false</Searchable>
      <InitialRev>0</InitialRev>
      <SecondRev>1</SecondRev>
      <NumericOnly>true</NumericOnly>
   </Attribute>
</Class>
</ClassDefs>
Desktop schema:
<ClassDefs>
<Class extends="DTModel, DTReleaseProcess">
   <Name catalog="awm_stda" msg_num="10">me_model</Name>
   <Attribute>
      MAJOR_REV
      <DisplayName>Major Rev</DisplayName>
      <AttributeEditorClass>com.osm.datamgmt.editor.MajorRevAttributeEditor</AttributeEditorClass>
      <Visible>true</Visible>
      <IncludeInLayoutManager>true</IncludeInLayoutManager>
      <Searchable>false</Searchable>
      <InitialRev>A</InitialRev>
      <SecondRev>B</SecondRev>
   </Attribute>
   <Attribute>
      MINOR_REV
      <DisplayName>Minor Rev</DisplayName>
      <AttributeEditorClass>com.osm.datamgmt.editor.MinorRevAttributeEditor</AttributeEditorClass>
      <Visible>true</Visible>
      <IncludeInLayoutManager>true</IncludeInLayoutManager>
      <Searchable>false</Searchable>
      <InitialRev>0</InitialRev>
      <SecondRev>1</SecondRev>
      <NumericOnly>true</NumericOnly>
   </Attribute>
</Class>
</ClassDefs>
With this code, Major Rev will start with "A" and go through each of the capital letters, and the Minor Rev will start with "0" and go through integers only.
Save your changes to acme.xml.
2. You will need to deploy this version to test the change, so make sure sds.host (in dev.properties) is set to the qualified hostname for your machine. Execute the Build and Package Project script.
Re-start Creo Elements/Direct Model Manager
Re-start Creo Elements/Direct Model Manager so it reads the new configuration.
1. De-select Model Manager from Creo Elements/Direct Modeling's > dialog.
2. Wait for the icons in the Creo Elements/Direct Model Manager task bar to lose their colors. You might need to close the Modules dialog to get the icons to lose their colors.
3. Select Model Manager from Creo Elements/Direct Modeling's > dialog. You should be asked to upgrade. If asked to "Select Configuration", choose acme.
◦ If you weren't asked or required to upgrade Creo Elements/Direct Model Manager, try re-starting Creo Elements/Direct Modeling and then enabling Model Manager.
◦ If you get a multibyte error, you might have introduced extra non-printable characters into the xml file by cutting the code fragment from this tutorial and pasting it into NetBeans. Try typing in the XML code by hand.
Verify customized version string options
Create a simple model and save it to see the customized version string.
1. In Creo Elements/Direct Modeling, create a simple model, such as a cylinder.
2. Click the Save icon on the Creo Elements/Direct Model Manager task bar and select the cylinder. The Save dialog appears.
3. Expose the Major Rev options. Notice that you may only choose "A" for the Major Rev and "0" for the Minor Rev.
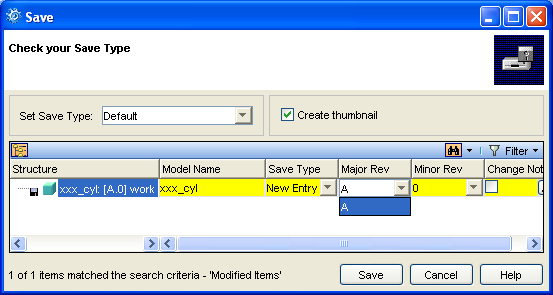
4. Click Save.
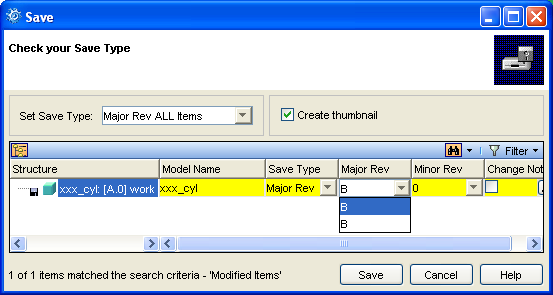
5. Modify the model in Creo Elements/Direct Modeling and save it again to see the effect of the <SecondRev> customizations.
6. Change the Save Type to Major Rev ALL Items. Notice that the only allowed value for Major Rev is "B".
7. Change the Set Save Type to Minor Rev MODIFIED Items. Notice that the Major Rev is "A" and the Minor Rev has been incremented to "1".
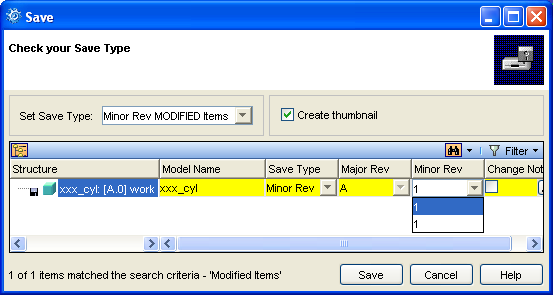
8. Click Save.
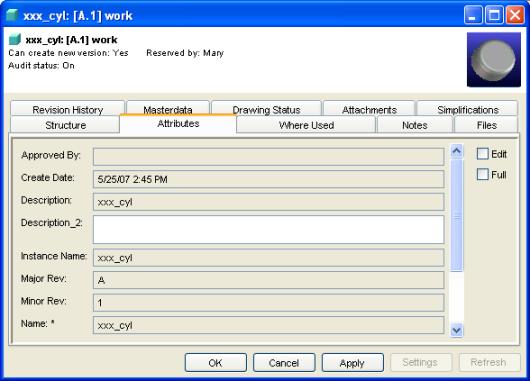
9. In Creo Elements/Direct Model Manager, select the model you just saved from Recent List.
10. Click Home and then, in the Edit group, click Table Edit.
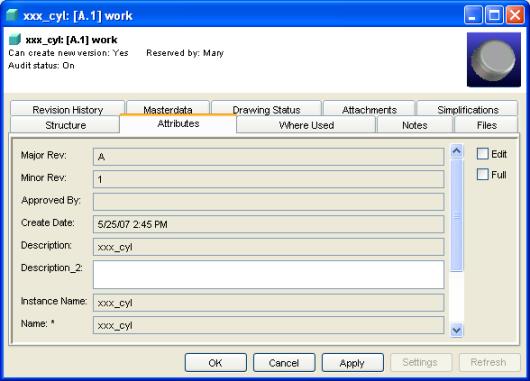
11. Add Major Rev and Minor Rev to your layout. Notice that you cannot change the values.
12. Close the Table Editor.
Add index tags
Now let's see how index tags can be used to change the order attributes are displayed in parts of the Creo Elements/Direct Model Manager user interface.
1. Select your cylinder in your Workspace. Right-click and choose > . The attributes should be ordered alphabetically, something like this:
2. Add index tags for Major Rev and Minor Rev in your acme.xml file as follows:
Data Management schema:
<ClassDefs>
<Class extends="DMModel, DMReleaseProcess">
   <Name catalog="awm_stda" msg_num="258">MODEL_3D</Name>
   <Attribute>
      MAJOR_REV
      <DisplayName>Major Rev</DisplayName>
      <Index>1</Index>
      <AttributeEditorClass>com.osm.datamgmt.editor.MajorRevAttributeEditor</AttributeEditorClass>
      <Visible>true</Visible>
      <IncludeInLayoutManager>true</IncludeInLayoutManager>
      <Searchable>false</Searchable>
      <InitialRev>A</InitialRev>
      <SecondRev>B</SecondRev>
   </Attribute>
   <Attribute>
      MINOR_REV
      <DisplayName>Minor Rev</DisplayName>
      <Index>1.1</Index>
      <AttributeEditorClass>com.osm.datamgmt.editor.MinorRevAttributeEditor
      </AttributeEditorClass>
      <Visible>true</Visible>
      <IncludeInLayoutManager>true</IncludeInLayoutManager>
      <Searchable>false</Searchable>
      <InitialRev>0</InitialRev>
      <SecondRev>1</SecondRev>
      <NumericOnly>true</NumericOnly>
   </Attribute>
</Class>
</ClassDefs>
Desktop schema:
<ClassDefs>
<Class extends="DTModel, DTReleaseProcess">
   <Name catalog="awm_stda" msg_num="10">me_model</Name>
   <Attribute>
      MAJOR_REV
      <DisplayName>Major Rev</DisplayName>
      <Index>1</Index>
      <AttributeEditorClass>com.osm.datamgmt.editor.MajorRevAttributeEditor</AttributeEditorClass>
      <Visible>true</Visible>
      <IncludeInLayoutManager>true</IncludeInLayoutManager>
      <Searchable>false</Searchable>
      <InitialRev>A</InitialRev>
      <SecondRev>B</SecondRev>
   </Attribute>
   <Attribute>
      MINOR_REV
      <DisplayName>Minor Rev</DisplayName>
      <Index>1.1</Index>
      <AttributeEditorClass>com.osm.datamgmt.editor.MinorRevAttributeEditor</AttributeEditorClass>
      <Visible>true</Visible>
      <IncludeInLayoutManager>true</IncludeInLayoutManager>
      <Searchable>false</Searchable>
      <InitialRev>0</InitialRev>
      <SecondRev>1</SecondRev>
      <NumericOnly>true</NumericOnly>
   </Attribute>
</Class>
</ClassDefs>
3. Save the modified acme.xml file and build the project.
4. Re-start Creo Elements/Direct Model Manager.
5. Display the > for your model. This time Major Rev and Minor Rev should be at the top of the list:
6. Look around at the different Workspace tabs and dialogs to see which ones are affected by the Index tag and which are not.
Deploy the custom XML file
You can deploy a custom xml file using the build tools in the NetBeans environment.
1. Ensure that your custom xml file (e.g. acme.xml) is at the top of your working directory (e.g. C:\users\custom).
2. In dev.properties:
◦ set sds.host to your fully qualified machine name (e.g. mypc.acme.com)
3. Execute the Build and Package Project script. This will build and install the package on the local machine.
4. Start Creo Elements/Direct Model Manager from the Windows Start menu. Creo Elements/Direct Model Manager will check for updates. Download the updated version. If you are prompted for a configuration, select the one with your customization (e.g. acme).