Load rule customization lab
|
Time Estimates for Completion
|
||
|---|---|---|
|
You can create custom load rules for Creo Elements/Direct Model Manager.
In this lesson you'll learn how to create a custom load rule for Creo Elements/Direct Model Manager.
|
Description:
|
1 minute
|
|
Lab exercise:
|
15 minutes
|
|
Description
Load rules are a form of business logic that controls which versions of models to load. Creo Elements/Direct Model Manager supports common load rules, including load as stored and load highest version. You may create custom load rules to implement your business processes.
|
|
To use a custom load rule which was created in CoCreate Model Manager 16.0 or earlier, you must do the following:
• For CoCreate Model Manager 13.0 or CoCreate Model Manager 13.1, add the string loadRule and int level parameters to the getMeByLoadRule() method.
• For releases between and including CoCreate Model Manager 14.0 and CoCreate Model Manager 16.0, add the int level parameter to the getMeByLoadRule() method.
|
This lab assumes that you have completed the Business logic extension lab.
The custom load you will create will load a "Special" description. If there is not an item with the word Special in the description, it will load the highest version. The high-level steps for creating a custom load rule are:
Extend Java code
Program the custom load rule as an extension of the model class.
The getMeByLoadRule method contains the custom load rule. If the user requested the "Acme Special Load Rule", the modification will check for the word Special in the Description and return that version. If no version with Special in the Description is found, it will return the highest version. If the user requested a different load rule, the code passes the request onto the super class.
1. In NetBeans, insert the following method into the Acme model class you created in the Business logic extension lab: (The same Java code works for both schemas.)
public Versionable getMeByLoadRule(WMElement parent, String loadRule, int level) throws WMException {
if (loadRule.equals("Acme Special Load Rule")) {
List list = getVersionUtils().getVersionables(this, true);
for (int i = 0; i < list.size(); i++) {
Versionable v = (Versionable)list.get(i);
String desc = (String) v.getValue("Description");
if (desc.toUpperCase().indexOf("SPECIAL") > -1) {
return v;
}
}
return (Versionable)list.get(0);
} else {
return super.getMeByLoadRule(parent, loadRule, level);
}
}
Right-click and choose Fix imports to add missing import statements.
2. Execute the Build Main Project to compile the code.
Add the Load Rule to the XML file
Ensure that the Acme model class is in the XML file.
1. In NetBeans, open your acme.xml file.
2. Add the following <AvailableLoadRules> section: (The same code works for both schemas.)
<AvailableLoadRules>
<IsDefaultConfigurableByUser>false</IsDefaultConfigurableByUser>
<LoadRule>Acme Special Load Rule
<Index>.5</Index>
</LoadRule>
</AvailableLoadRules>
<IsDefaultConfigurableByUser>false</IsDefaultConfigurableByUser>
<LoadRule>Acme Special Load Rule
<Index>.5</Index>
</LoadRule>
</AvailableLoadRules>
3. Verify that the following lines are in the <ClassDefs> section (from the Business Logic Extension Lab).
Data Management schema:
<Class extends="DMModel, DMReleaseProcess">
<Name catalog="awm_stda" msg_num="258">MODEL_3D</Name>
<BusinessObjectClass>com.acme.dm.biz.AcmeModel3D</BusinessObjectClass>
</Class>
<Name catalog="awm_stda" msg_num="258">MODEL_3D</Name>
<BusinessObjectClass>com.acme.dm.biz.AcmeModel3D</BusinessObjectClass>
</Class>
Desktop schema:
<Class extends="DTModel, DTReleaseProcess">
<Name catalog="awm_stda" msg_num="10">me_model</Name>
<BusinessObjectClass>com.acme.dt.biz.AcmeDTModel</BusinessObjectClass>
</Class>
<Name catalog="awm_stda" msg_num="10">me_model</Name>
<BusinessObjectClass>com.acme.dt.biz.AcmeDTModel</BusinessObjectClass>
</Class>
4. Remove the <LoadTableColumnModel> customization if you have it.
Test the code
You can run the code from NetBeans, without having to install it.
1. In NetBeans, display the dev.properties file and ensure that run.mode is still set to OSDM.
2. Execute the Run Main Project script. Creo Elements/Direct Modeling starts.
3. Create a simple part and change its name. In this lab, cube.
4. Enable Creo Elements/Direct Model Manager from Creo Elements/Direct Modeling's > menu.
In order to apply your new load rule to a root item (your cube), you need to set Creo Elements/Direct Model Manager's Load root item using default load rule preference.
How?
a. Click > .
b. In the Advanced tab, check Load root item using default load rule (in the Load section) and click OK.
5. Save the part to the database.
6. Modify the part.
7. Save the part with a Save Type of Major Rev ALL Items.
8. In the Creo Elements/Direct Model Manager Workspace, select the second revision of the part and then click DB Properties in the Model Tasks panel. The DB Properties dialog will open.
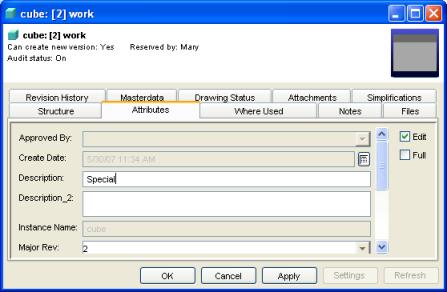
9. In the DB Properties dialog, select the Attributes tab and click Edit.
10. Change the Description to Special and click OK.
11. In Creo Elements/Direct Modeling, modify the part and save it again
◦ Set Save Type to Major Rev ALL Items.
◦ Change the Description to cube. (If you don't see the Description field in the Save dialog, right-click and choose > , then check Description.)
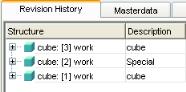
12. You should now have three versions of your part in Creo Elements/Direct Model Manager. You can see the Revision History in the DB Properties. Only the second should have the word Special in its Description.
13. In Creo Elements/Direct Modeling, start a new session with > .
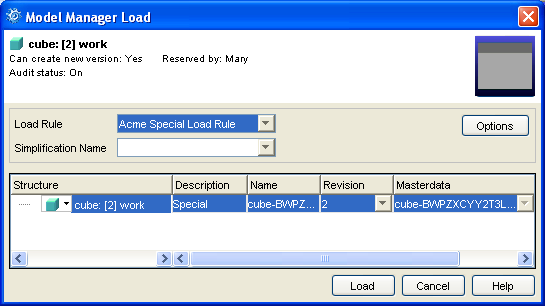
14. In your Creo Elements/Direct Model Manager DB Properties window, right-click the first version of your part from the Revision History tab and choose Load. The Load dialog will appear. If you don't see the Description field in the Load dialog, right-click in the white area of the dialog and choose > , then check Description.
15. Select Acme Special Load Rule as the Load Rule. Creo Elements/Direct Model Manager will switch to the second version, which has the word Special in its Description.
16. Click Load and see the Special version of the part in Creo Elements/Direct Modeling (with a status of Newer Version Exists).