Action menu extension lab
|
Time Estimates for Completion
|
||
|---|---|---|
|
You can add items to the Creo Elements/Direct Model Manager action menus.
In this lesson you'll learn how to create action menus for Creo Elements/Direct Model Manager.
|
Description:
|
5 minutes
|
|
Lab exercise:
|
15 minutes
|
|
Description
Action menus are used to perform actions on the different items in the Creo Elements/Direct Model Manager Workspace. When an item is selected, its action menu is available both from the main menu bar and with a right-click.
The default action menu model consists of a set of sections. Each section contains actions that are separated by a menu operator. The default sections are:
|
Section
|
#
|
Example Actions
|
|---|---|---|
|
Actions
|
1.0
|
Load, Scan BOM, Export File
|
|
Properties
|
2.0
|
DB Properties, Table Edit, Change State
|
|
Edit
|
3.0
|
Cut, Copy, Paste
|
|
Permissions
|
4.0
|
Reserve, Unreserve
|
|
Add Related
|
5.0
|
Add New (Part, Thumbnail, Change Note)
|
|
Default
|
6.0
|
Compare, Subscribe
|
You may either add your actions to the default sections by referencing the number for that section, or create your own section by referencing a different number. New sections will be placed in numeric order relative to the existing sections. For example, section 1.8743 will be placed between Actions (section 1.0) and Properties (section 2.0).
Action menus created for CoCreate Model Manager 12.0 will work with CoCreate Model Manager 2005 and above. The new model is preferred for new customizations because you will be able to pick up Creo Elements/Direct changes in future releases.
The ability to define the menus in the XML configuration file was new in the 13.20A release. Action menus from earlier 13.X releases will still work.
Try the lab below to learn how to add actions to the Creo Elements/Direct Model Manager menus.
Lab
In this lab you will add a new action to an existing section of an Action menu and add a new section of actions to an Action menu.
This lab assumes that you have completed the Business logic extension lab.
The major steps for extending the Action menus are:
Create the actions
Create the actions that will be called when the menu items are clicked.
1. Create a package called com.acme.action in your com directory.
2. Add a class called AcmeAction in com.acme.action.
3. Extend com.osm.action.WMAbstractAction to implement your action. There are two methods you need to overwrite: (The same Java code works for both schemas.)
◦ isEnabled() – This method is called frequently, so avoid making any queries in this method. Delaying any permission checks not only improves performance but allows you to give the user a valid reason why the action cannot be performed, rather than just disabling it.
◦ actionPerformed (ActionEvent e) – This is called when the user clicks the action.
package com.acme.action;
import java.awt.*;
import java.awt.event.*;
import javax.swing.*;
import com.osm.action.*;
import com.osm.datamgmt.ui.*;
public class AcmeAction extends WMAbstractAction {
/** Creates a new instance of AcmeAction */
public AcmeAction() {
super ("Acme Action");
}
public boolean isEnabled() {
return true;
}
public void actionPerformed(ActionEvent e) {
// Display a dialog that says hello world
String msg = "Hello World";
Component parentComp = WindowManager.getInstance().getActiveWindow();
JOptionPane.showMessageDialog(parentComp, msg);
}
}
4. Save your AcmeAction class file.
5. Copy and paste the AcmeAction class file to create the AcmeAction_1 and AcmeAction_2 classes.
6. Change "Acme Action" in the constructors to "Acme Action 1" and "Acme Action 2", respectively.
7. Change "Hello World" in actionPerformed(ActionEvent e) to "Acme Action 1" and "Acme Action 2", respectively.
8. Save the added class files.
Add the extension to the XML file
Add this extension to the AcmeModel3D class in the XML file.
1. In NetBeans, open your acme.xml file.
2. Add the <ActionMenuSection> and <Action> tags to your model class.
The value after the <ActionMenuSection> is the section the actions should be put in. The existing sections are numbered 1.0, 2.0, etc., as shown in the table at the top of the page. If you specify one of the existing sections, the action will be added to the section. If you specify another value, a new section will be created, with all of the sections placed in numerical order.
Data Management schema:
<Class extends="DMModel, DMReleaseProcess">
<Name catalog="awm_stda" msg_num="258">MODEL_3D</Name>
<ActionMenuSection>1.0
<Action>com.acme.action.AcmeAction</Action>
</ActionMenuSection>
<ActionMenuSection>1.5
<Action>com.acme.action.AcmeAction_1</Action>
<Action>com.acme.action.AcmeAction_2</Action>
</ActionMenuSection>
</Class>
<Name catalog="awm_stda" msg_num="258">MODEL_3D</Name>
<ActionMenuSection>1.0
<Action>com.acme.action.AcmeAction</Action>
</ActionMenuSection>
<ActionMenuSection>1.5
<Action>com.acme.action.AcmeAction_1</Action>
<Action>com.acme.action.AcmeAction_2</Action>
</ActionMenuSection>
</Class>
Desktop schema:
<Class extends="DTModel, DTReleaseProcess">
<Name catalog="awm_stda" msg_num="10">me_model</Name>
<ActionMenuSection>1.0
<Action>com.acme.action.AcmeAction</Action>
</ActionMenuSection>
<ActionMenuSection>1.5
<Action>com.acme.action.AcmeAction_1</Action>
<Action>com.acme.action.AcmeAction_2</Action>
</ActionMenuSection>
</Class>
<Name catalog="awm_stda" msg_num="10">me_model</Name>
<ActionMenuSection>1.0
<Action>com.acme.action.AcmeAction</Action>
</ActionMenuSection>
<ActionMenuSection>1.5
<Action>com.acme.action.AcmeAction_1</Action>
<Action>com.acme.action.AcmeAction_2</Action>
</ActionMenuSection>
</Class>
3. Save the changes to your acme.xml file.
Test the code
You can run the code from NetBeans, without having to install it.
1. In NetBeans, display the dev.properties file and set run.mode to Standalone.
2. Execute the Build Main Project script.
3. Execute the Run Main Project script.
4. Select a model or assembly from anywhere in your Workspace.
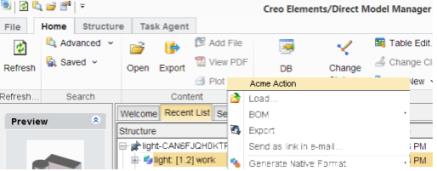
5. Right-click. You should see Acme Action at the top of the menu and the Acme Action section between the Actions and Properties sections.
6. When you choose Acme Action, your "Hello World" dialog appears.
7. When you choose Acme Action 1, your "Acme Action 1" dialog appears.