Creating new calculated attribute extension lab
|
Time Estimates for Completion
|
||
|---|---|---|
|
Customize Creo Elements/Direct Model Manager's classes to add a new attribute.
In this lesson you will extend a Creo Elements/Direct Model Manager class to include a new attribute which is calculated in the java business logic.
|
Description:
|
1 minutes
|
|
Lab exercise:
|
20 minutes
|
|
Description
By now, you should have completed the Basic customization and deployment lab and XML customization lab labs. This lab is based on Netbeans 11.0. If you are using a different Java development environment, you will need to translate the instructions for your IDE.
The customization of class business logic provides a mechanism to customize the functionality of the object for a class. It is most common that you need to add 1 or 2 new attributes. If these attribute are stored into the database then the attribute appears without needing any code changes.
If you want the attribute to be calculated based on some java code and not have a value in the database then you need to create a attribute business object.
Try the lab exercise below to learn how to extend Creo Elements/Direct Model Manager's attribute business logic.
Lab Exercise
In this lab you will add a custom attribute business class that will return the current time in milliseconds.
This lab assumes that you have completed the Basic customization and deployment lab and the XML customization lab.
The major steps for extending Creo Elements/Direct Model Manager's business logic are:
Extend the Java code
Begin by creating a class that extends the base class, then adding the code for your business logic.
Create the attribute class
1. Using Windows Explorer, create a biz directory for the Java file (com\acme\biz).
|
|
Java doesn't care how you name your directories, but Creo Elements/Direct engineers have found that maintaining a consistent directory structure makes it easier to find code later. The convention is to create the directory structure starting with "com" followed by the company name followed by the directory for the type of class. The class you will extend for this lab comes from the dm\biz directory, which holds business logic.
|
2. In NetBeans, create the AcmeTimeAttribute class.
3. Edit AcmeTimeAttribute to look like the following:
package com.acme.biz;
import com.osm.biz.*;
import com.osm.exception.*;
public class AcmeTimeAttribute extends DefaultAttribute {
public AcmeTimeAttribute(Object value, WMAttribute att, WMObject wmObject)
throws WMException {
super(value, att, wmObject);
}
public AcmeTimeAttribute(WMAttribute att, WMObject wmObject)
throws WMException {
super(att, wmObject);
}
@Override
public Object getValue() throws WMException {
return System.currentTimeMillis();
}
@Override
public void setValue(Object obj) throws WMException {
// don’t support set.
}
}
4. Compile the new class code with F9.
Add the extension to the XML file
Creo Elements/Direct Model Manager uses XML files to control how database data is treated. The <BusinessObjectClass> tag is used to define the name of the Java class that will control an attribute.
2. Add a class to the <ClassDefs> section with the following code, being very careful of capitalization:
Data Management schema:
<Class extends="DMModel, DMReleaseProcess">
<Name catalog="awm_stda" msg_num="258">MODEL_3D</Name>
<Attribute>SimpleAttribute
<DisplayName>Simple Attribute</DisplayName>
<BusinessObjectClass>com.acme.biz.AcmeTimeAttribute</BusinessObjectClass>
<Visible>true</Visible>
</Attribute>
</Class>
<Name catalog="awm_stda" msg_num="258">MODEL_3D</Name>
<Attribute>SimpleAttribute
<DisplayName>Simple Attribute</DisplayName>
<BusinessObjectClass>com.acme.biz.AcmeTimeAttribute</BusinessObjectClass>
<Visible>true</Visible>
</Attribute>
</Class>
Desktop schema:
<Class extends="DTModel, DTReleaseProcess">
<Name catalog="awm_stda" msg_num="10">me_model</Name>
<Attribute>Attribute
<DisplayName>Simple Attribute</DisplayName>
<BusinessObjectClass>com.acme.biz.AcmeTimeAttribute</BusinessObjectClass>
<Visible>true</Visible>
</Attribute>
</Class>
<Name catalog="awm_stda" msg_num="10">me_model</Name>
<Attribute>Attribute
<DisplayName>Simple Attribute</DisplayName>
<BusinessObjectClass>com.acme.biz.AcmeTimeAttribute</BusinessObjectClass>
<Visible>true</Visible>
</Attribute>
</Class>
Test the extension
You can run the code from NetBeans, without having to install it. If you want to debug your Java code, see How to start the NetBeans debugger for instructions on attaching the NetBeans debugger to Creo Elements/Direct Model Manager.
1. In NetBeans, display the dev.properties file, and modify run.mode to Standalone.
2. Execute the Run Main Project script. Creo Elements/Direct Model Manager standalone starts.
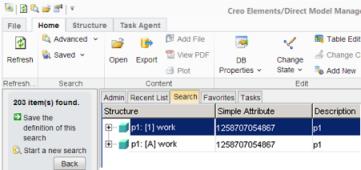
3. Click Search and search for models.
4. Right click in the white space of Creo Elements/Direct Model Manager workspace and select > . The Model_3D attributes dialog box opens.
5. Click the new Simple Attribute. The column now appears in the Creo Elements/Direct Model Manager workspace. Note that the value of Simple Attribute is different for each update of the user interface.
Create the attribute editor
Creating just an attribute business object is not enough for all the places where this attribute can appear. You must write an attribute editor class so that this attribute can be viewed in all the user interfaces.
1. Using Windows Explorer, create an editor directory for the Java file (com\acme\editor).
2. Edit AcmeTimeAttributeEditor to look like the following:
package com.acme.editor;import com.osm.biz.*;
import com.osm.exception.*;
import com.osm.editor.WMAttEditorTextField;.
public class AcmeTimeAttributeEditor extends WMAttEditorTextField {
public AcmeTimeAttributeEditor(WMAttribute wmAttribute)
throws WMException {
super(wmAttribute);
}
public AcmeTimeAttributeEditor(WMAttribute wmAttribute, boolean enabled)
throws WMException {
super(wmAttribute, enabled);
}
@Override
public void setAttributeVal(Object val) {
if (val instanceof AcmeTimeAttribute) {
AcmeTimeAttribute att = (AcmeTimeAttribute) val;
try {
setText(String.valueOf(att.getValue()));
} catch (WMException ex) {
ex.printStackTrace();
}
}
}
@Override
public Object getAttributeVal() {
return getText();
}
}
3. Compile the new class code with F9.
Registering the editor in the XML file
To register the attribute editor you should add the AttributeEditorClass tag to the xml file as follows:
Data Management schema:
<Class extends="DMModel, DMReleaseProcess">
<Name catalog="awm_stda" msg_num="258">MODEL_3D</Name>
<Attribute>SimpleAttribute
<DisplayName>Simple Attribute</DisplayName>
<BusinessObjectClass>com.acme.biz.AcmeTimeAttribute</BusinessObjectClass>
<AttributeEditorClass>com.osm.datamgmt.editor.AcmeTimeAttributeEditor</AttributeEditorClass>
<Visible>true</Visible>
</Attribute>
</Class>
Desktop schema:
<Class extends="DTModel, DTReleaseProcess">
<Name catalog="awm_stda" msg_num="10">me_model</Name>
<Attribute>SimpleAttribute
<DisplayName>Simple Attribute</DisplayName>
<BusinessObjectClass>com.acme.biz.AcmeTimeAttribute</BusinessObjectClass>
<AttributeEditorClass>com.osm.datamgmt.editor.AcmeTimeAttributeEditor</AttributeEditorClass>
<Visible>true</Visible>
</Attribute>
</Class>
Test the extension
To test, see Test the extension. Note that now the correct value of the new attribute appears in the DB Properties attribute panel and all other user interfaces.
Deploy the extension
Package and test on your local Software Distribution Server. Prepare a package for deployment on the final Software Distribution Server.
1. In NetBeans, edit dev.properties, ensuring that mm.force.update is true, and that sds.host is the fully qualified name of your local machine.
2. Execute the Build and Package Project script. This will build and install the package on the local machine.
3. Test the extension by checking if the attribute is visible in the Model class of the Standalone client.
4. Edit dev.properties and set sds.host to the fully qualified name of the final Software Distribution Server. This produces a zip file in your working directory.
5. Move the zip file to the SD Server and unzip it at the top of the install directory. When you start Creo Elements/Direct Model Manager, you will be forced to install the new version of Creo Elements/Direct Model Manager with your extension.
Additional Note
We now have an attribute which is fairly independent of the class it is attached to. We can create a base Class to define the new attribute as follows:
<Class>
<Name>SIMPLE_ATT_DEF</Name>
<Attribute>SimpleAttribute
<DisplayName>Simple Attribute</DisplayName>
<AttributeEditorClass>com.osm.datamgmt.biz.SimpleAttributeEditor</AttributeEditorClass>
<BusinessObjectClass>com.osm.datamgmt.biz.SimpleAttribute</BusinessObjectClass>
<Visible>true</Visible>
<SendPseudoAttributeTextReferencesToCad>true</SendPseudoAttributeTextReferencesToCad>
</Attribute>
</Class>
This now defines a SIMPLE_ATT_DEF definition. We can then use this attribute in many classes by using the extends clause as:
<Class extends="DMModel, DMReleaseProcess, SIMPLE_ATT_DEF">
<Name catalog="awm_stda" msg_num="258">MODEL_3D</Name>
</Class>
<Class extends="DMMasterdata, DMReleaseProcess, SIMPLE_ATT_DEF">
<Name catalog="awm_stda" msg_num="251">MASTERDATA</Name>
</Class>
<Class extends="DMDrawing, DMReleaseProcess, SIMPLE_ATT_DEF">
<Name catalog="awm_stda" msg_num="254">DRAWING_2D</Name>
</Class>
<Class extends="BASE_CHANGENOTE_2D, SIMPLE_ATT_DEF">
<Name catalog="awm_stda" msg_num="255">CHANGENOTE_2D</Name>
</Class>
By using this mechanism is it very easy to add new attributes to an existing class which can have any calculated value.
Using this, you can also create a new attribute in the Drawing class which can then be sent to drafting by using the SendPseudoAttributeTextReferencesToCad xml tag. This allows new text references to be transferred to Drafting/Annotation with very little java code.