Lab 3: Running jobs with other applications
A standard installation of the Task Agent handles Creo Elements/Direct Modeling and Creo Elements/Direct Drafting jobs. The Job Server then automatically detects and uses the installed Creo Elements/Direct Modeling or Creo Elements/Direct Drafting application. In addition, you can run "generic" jobs using other applications on selected Job Servers.
Set up a generic job
An example for a simple generic job can be found in the taskagent\samples directory. To run these examples, copy the files from the samples directories to the corresponding locations in the taskagent directory (for example, copy taskagent\samples\jobconfig\GenericJobExample.xml to taskagent\jobconfig\GenericJobExample.xml).
Step 1: Provide a script or executable to run the application
Typically this would be Windows batch script or executable that runs on the selected Job Server. For an example see taskagent\samples\generic\generic_job_example.bat.
Step 2: Define the new job type
Define a new job type by creating a configuration file as described in Lab 2. For an example see taskagent\samples\jobconfig\GenericJobExample.xml. The element specifies the script/executable to be run on the Job Server.
Step 3: Implement the Job Data Exporter and and Job Result Handler
Implement the exporter and result handler as described in Lab 2. In particular, the exporter needs to copy the script/executable from Step 1 into the job archive. The default implementation
com.osm.automation.GenericJobExporter copies the entire content of the taskagent\generic directory into the archive. The result handler is only needed if the application returns some data.
Step 4: Deploy the new job type
Step 5: Configure a Job Server to accept the new job type
Enabling generic jobs on selected Job Servers requires the following steps:
• Make sure that the script/executable actually runs on the selected machine
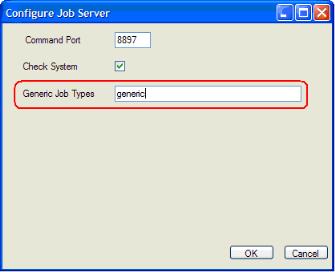
• Configure the Job Server to accept the job type specified in Step 2. Run the configuration tool <Job Server Installation>\ConfigureJobServer.exe and add the job type. The Generic Job Types dialog accepts a comma-separated list of new types.
Process generic jobs
Step 1: Pass parameters to the application
The Job Server sets a number of environment variables to pass parameters to the application. The following environment variables are always set:
Variable | Description |
|---|---|
JOB_ID | Unique ID of the job. |
JOB_INPUT_DIRECTORY | Directory containing the job's input data. |
JOB_OUTPUT_DIRECTORY | Directory where the job server will collect the output data. |
JOB_SEMAPHORE_FILE | Used to inform the job server that the job has completed. |
JOB_SUCCESS_FILE | Used to inform the job server that the job has succeeded. |
JOB_ERROR_FILE | Used to inform the job server that the job has failed. |
JOB_LOG_FILE | Used for debugging purposes. If available, the log file will be sent to the job spooler after job completion. |
In addition, all job parameters defined in the <Options> section of the configuration file are available as environment variables, e.g. the ReturnMessage variable in GenericJobExample.xml.
Step 2: Interaction between Job Server and application
• The Job Server creates the %JOB_SEMAPHORE_FILE% before starting the script/application. The application needs to remove the file to inform the server that the execution has completed.
• The application should also write either the %JOB_SUCCESS_FILE% or the %JOB_ERROR_FILE% to pass information about job success to the server.
• If a %JOB_ERROR_FILE% exists, the first line of this file is passed back to the TaskAgent as the error description.
Step 3: Return data from the application
If the job's configuration sets the attribute has_result_data=true, the Job Server will collect all files in %JOB_OUTPUT_DIRECTORY% and send them back.