Lab 1: Modifying an existing Job Type
|
Time Estimates for Completion
|
||
|---|---|---|
|
Modify the Drafting Conversion job to store the generated viewable on the server's file system, with a customized naming format.
|
Description:
|
5 minutes
|
|
Lab exercise:
|
15 minutes
|
|
Description
Modify the existing Drafting Conversion job to store the generated viewable on the server's file system rather than storing it to the database. Also, the filename of the generated viewable must be of the form <part name>_<drawing name>.
Lab Exercise
In this lab you will modify an existing function to customize the filename, then modify the <ResultHandler> to store the generated viewable in a directory on the server.
The high-level steps for this lab are:
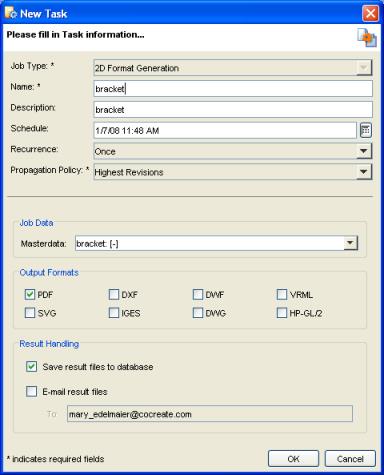
Before you start, look at the 2D Format Generation schedule dialog. Note that it contains a Result Handling section.
Close the New Task dialog and exit Creo Elements/Direct Model Manager.
Customize the filename generation
For some typical customizations (filenames, plot transformations, etc.), the macros already provide appropriate customization hooks.
The Creo Elements/Direct Drafting macro js_customize_viewables.m provides the Js_get_viewable_filename function for easy customization of the file name. Modify this function as follows:
DEFINE Js_get_viewable_filename
PARAMETER Part_name
PARAMETER Drawing_name
LET Dms_return_val (Part_name + "_" + Drawing_name)
END_DEFINE
PARAMETER Part_name
PARAMETER Drawing_name
LET Dms_return_val (Part_name + "_" + Drawing_name)
END_DEFINE
Store the viewable in a directory on the server
Next, modify the ResultHandler section in the DraftingConversion.xml file to store the generated viewable in the server's C:\docs directory:
<?xml version="1.0" encoding="UTF-8"?>
<Job type="drafting.conversion" has_result_data="true">
...
<ResultHandler java_class="com.osm.automation.SaveToFileSystemJobResultHandler">
<TargetDirectory>C:\docs</TargetDirectory>
</ResultHandler>
...
</Job>
<Job type="drafting.conversion" has_result_data="true">
...
<ResultHandler java_class="com.osm.automation.SaveToFileSystemJobResultHandler">
<TargetDirectory>C:\docs</TargetDirectory>
</ResultHandler>
...
</Job>
Rebuild Creo Elements/Direct Model Manager
Rebuild Creo Elements/Direct Model Manager to deploy the change to the local system. You also need to stop and start the Web Services Server.
1. Run mmbuild.bat (C:\Program Files\PTC\Creo Elements\Direct Manager Server 20.6\clntwin). This creates a new ModelManagerSetup.exe file.
2. When mmbuild.bat finishes, stop and restart the Web Services Server.
Test your customization
1. Stop and restart Creo Elements/Direct Model Manager.
2. Select a drawing in the Creo Elements/Direct Model Manager Workspace.
3. Right-click and choose > .
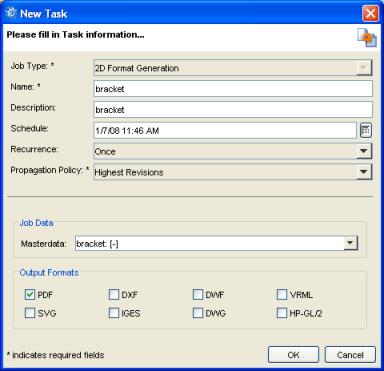
Notice that the New Task dialog no longer contains a Result Handling section.
4. Click OK and allow the job to run. When it finishes, navigate to the C:\docs directory. You should see your generated pdf file, with the filename of the form <part name>_<drawing name>.pdf.
Lab 2.4: Implementing a Job Result Handler contains more about job result handlers and advanced configurations combining job result handlers. |