Creating and Styling a Custom Table
There are two ways in which to create a custom table object in your stylesheet:
• Create a new custom table object
Use the > menu option in Arbortext Styler to create a completely new custom table object in the Custom Tables list.
You must then configure every element that should take a role in the table, starting with the table element itself. In this instance, only elements that have the style Unstyled are available for selection when defining the table's elements and their roles.
• Style a non-table object as a custom table
Apply the Custom Table style to the element that should form the basis of your table. Arbortext Styler will automatically create a new Custom Table object in the Custom Tables list, with the styled element specified as performing the role of table.
You must then configure the rest of the elements that should form the custom table. With this method you can use any element that exists in the stylesheet to perform a role in your table, regardless of its assigned style, provided it is permitted as a child of the element that performs the immediate parent role. An element's role in a custom table in specific contexts supersedes the element's assigned style.
When you style a custom table, note the following points:
• The table and row elements must be specified, otherwise the table is invalid. When a custom table is not valid, an error message is displayed at the bottom of the Elements tab for the table. The error message can be one of the error messages pertaining to custom tables when validating the stylesheet, or a message of the format The “Row" element must be specified. Additionally, the entry for an invalid custom table in the Custom Tables list will be displayed in red text with a red line through the icon, as shown below:
• You can optionally specify cell elements. If they are not specified, the content model of the row element is used to identify valid cells.
• You can also identify elements as the table title or header row, although this is optional.
• You can generate cells for the table via XPath.
• You can assign multiple elements to the table, cell, or header cell role. The other custom table roles can only be assigned to one element for each custom table.
• You may specify an order for columns that differs from the order in which the cell elements appear in the document.
Example: Creating a New Custom Table Object
This example is detailed using the standard DocBook doctype as a basis.
1. In Arbortext Editor, open the transport.xml document located at Arbortext-path/samples/styler.
The next three steps describe the insertion of an authorgroup element in the sample document. If an authorgroup is already in place, proceed to step 5.
2. Place the cursor after the abstract element at the beginning of the document.
3. Insert the markup necessary to create an authorgroup with a child author. Add the children firstname and surname to the author element.
4. Type some content in the firstname and surname elements. Notice that the authorgroup is simply shown as tags and text.
5. Choose > to create a new stylesheet. Accept the default properties in the Stylesheet Properties dialog box that opens, and click OK to create the new stylesheet.
6. Choose the > menu option. The
Custom Tables list

opens, if it is not already active, with a new custom table object
CustomTable highlighted in the list. The object is crossed through in red since it currently contains errors - the required table and row elements have not yet defined. Rename the new object as required.
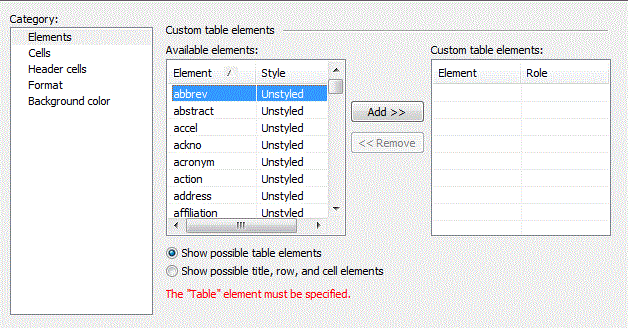
7. Refer to the Elements category in the bottom half of the Arbortext Styler window. The Show possible table elements option is checked. The window advises you that you have not yet specified the element that forms the basis of the table. The elements that are permitted to perform the role of table are listed in the Available Elements list - you can see that the list contains every element that currently has the style Unstyled.
8. Select the element that should form the basis of the table from the Available Elements list, in this case the authorgroup element.
9. Click Add to add the element to the Custom table elements list. Arbortext Styler automatically assigns the role of Table to this element.
Note that the advice window at the bottom of the window now tells you that you need to specify the required Row element for this custom table.
Navigate to the
Elements list

and locate the
authorgroup element. You will see that the element has been assigned the style Custom Table.
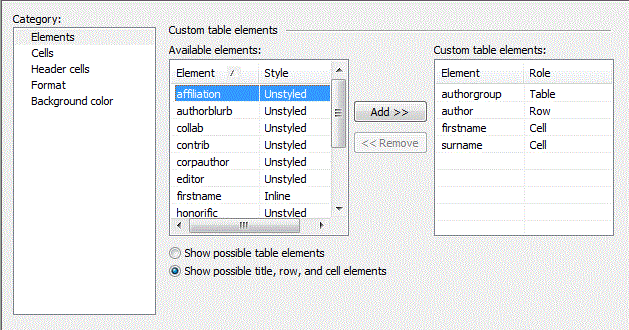
10. Navigate back to the Custom Tables list and refer to the Available Elements list for your custom table. It now contains a list of those elements in the stylesheet that are permitted as children of the authorgroup element. Choose author and click Add to add it to the Custom table elements list. In the Custom table elements list, click on the Role dropdown list and select Row.
Navigate to the
Elements list
and locate the
author element. You will see that a new context
author in authorgroup has been created, with the style
Row in custom table.
11. Back in the Custom Tables list, refer to the Available Elements list for your custom table object. It now contains a list of those elements in the stylesheet that are permitted as children of the author element. Choose firstname and click Add to add it to the Custom table elements list. In the Custom table elements list, click on the Role dropdown list and select Cell.
A new context firstname anywhere in authorgroup has been created in the Elements list, and the context has been assigned the style Cell in custom table.
12. Choose surname from the list and click Add to add it to the Custom table elements list. In the Custom table elements list, click on the Role dropdown list and select Cell.
A new context surname anywhere in authorgroup has been created in the Elements list, and the context has been assigned the style Cell in custom table.
The definition of roles within your table is now complete. Note that the message area at the bottom of the Elements tab is blank, indicating that there are no further steps to be completed to create a valid table.
13. If required, you can also use the other property categories in the Custom Tables list to format your custom table:
◦ Cells category — generate cells via XPath and confirm cell order.
◦ Format category — control the column widths of the custom table and how the table rules are displayed.
You can configure the default column widths and table rules in the stylesheet and also designate attributes on the element to which you assigned the Table role to control the column widths or table rules. If you designate attributes to control the column widths or table rules, you can use those attributes as needed to override the default configuration for column widths and table rules.
◦ Background Color category — configure the background color for the rows of the custom table. You may use a single color or set repeating patterns.
14. Choose > . You will see that the original authorgroup is now displayed as a table.
You can now edit the table in Arbortext Editor. Inserting a new row will automatically insert a new author containing a firstname and surname. You can see how the authorgroup element forms the basis of the table by choosing > > .
Example: Styling an Existing Non Table Element as a Custom Table
This example is detailed using the standard DocBook doctype as a basis. The steps described in the example show how to change a glosslist element from its default format to a custom table.
1. In Arbortext Editor, open the transport.xml document located at Arbortext-path/samples/styler.
The next three steps describe the insertion of a sample glosslist element in the sample document so if your glosslist is already in place, proceed to step 5.
2. Place the cursor inside a para element.
3. Insert the markup necessary to create a glosslist with a glossentry that contains a glossterm and a glossdef.
4. Type some content in the glossterm and glossdef elements.
5. Choose > to open the associated stylesheet for edit. This is a read only stylesheet so you will need to save a local copy if you want to make amendments.
6. Select the glosslist element and give it the Custom Table style.
The Custom Tables list opens, with a new Custom Table object glosslist highlighted in the list. The object is crossed through in red since it currently contains errors - a required row element has not yet defined for the table. In the bottom area of the window, the glosslist object is assigned the Table role in the Custom Table Elements list.
7. Select glossentry from the Available Elements list in the Elements category and click Add to add it to the Custom table elements list. Click on the Role dropdown list and select Row.
The Available Elements list is populated with elements that can be used for cells in the new row.
8. Click back to the Elements list and locate the glossentry element. You will see that a new context glossentry in glosslist has been created, and that the context has been assigned the style Row in custom table.
9. Back in the Custom Tables list, select glossterm from the Available Elements list and click Add to add it to the Custom table elements list. Click on the Role dropdown list and select Cell.
10. Click back to the Elements list and locate the glossterm element. You will see that a new context glossterm anywhere in glosslist has been created, and that the context has been assigned the style Cell in custom table.
11. Back in the Custom Tables list, select glossdef from the Available Elements list and click Add to add it to the Custom table elements list. Click on the Role dropdown list and select Cell.
12. Click back to the Elements list and locate the glossdef element. You will see that a new context glossdef anywhere in glosslist has been created, and that context has been assigned the style Cell in custom table.
13. Note that, if required, you can also use the other property categories in the Custom Tables list to format your custom table:
◦ Format category: control the column widths of the custom table and how the table rules are displayed.
You can configure the default column widths and table rules in the stylesheet and also designate attributes on the element to which you assigned the Table role to control the column widths or table rules. If you designate attributes to control the column widths or table rules, you can use those attributes as needed to override the default configuration for column widths and table rules.
◦ Background Color tab: configure the background color for the rows of the custom table. You may use a single color or set repeating patterns.
14. Choose > . You will see that the original glosslist is now displayed as a table.
You can now edit the table in Arbortext Editor. Inserting a new row will automatically insert a new glossentry containing a glossterm and glossdef. You can view the table markup by choosing > > .