 |
|
|
Automatic Reference Plane Selection
By default, the system will select an appropriate reference plane and direction based on the current model orientation. Orienting your model into approximate position before selecting a sketching plane will quickly capture design intent by allowing the system to automatically configure the reference plane and direction. |
|
| Task 2-26. Create a Revolved Cut, experimenting with the reference plane. |
- Select on the background, and then press CTRL + D to orient to the standard orientation.
- Start the Sketch Tool
 from the feature toolbar, and select datum plane RIGHT from the model. from the feature toolbar, and select datum plane RIGHT from the model.
- Notice that datum plane TOP is automatically selected as the Reference plane, facing the Left.
- Click Cancel > Yes.
- Orient the model approximately as shown in the following figure.
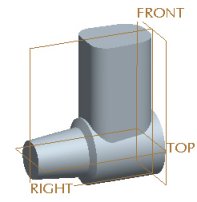
Orienting the Model |
- Start the Sketch Tool from the feature toolbar, and select datum plane RIGHT from the model.
- Notice that datum plane TOP is again selected as the Reference plane, but now faces the Top.
- Click Sketch from the Sketch dialog box.
- Sketch as shown in the following figure:
- Click Datum Planes
 from the main toolbar to disable their display. from the main toolbar to disable their display.
- Click No Hidden
 from the main toolbar. from the main toolbar.
- Select the left vertical surface as an additional reference.
- Click Close from the References dialog box.
- Right-click and select Centerline. Sketch horizontal centerline.
- Right-click and select Line. Sketch 6 lines approximately as shown, ignoring the dimension values.
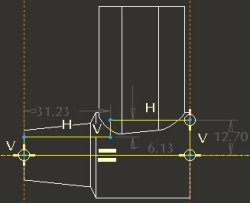
Creating a Sketch |
- Click Complete Sketch
 from the sketcher toolbar. from the sketcher toolbar. |

