完成 Vuforia Studio 體驗
建立完繫結之後,建立持續購物車的最後一個步驟是使用在選取零件時顯示的快顯視窗來呼叫
addToCart 服務。零件最終會經由呼叫
addToCart 服務被新增至
ThingWorx 中的購物車。在本節中,您也會回顧
3D-導件服務指示 101 中您將電池與 PCB 合併到
electronics 零件中的部份。此外,您會刪除不再需要的編碼,以盡可能保持編碼整齊。
|
|
可於 GitHub 的 附錄 1 中找到此部份的完整編碼。 |
1. 開啟 Home.js。
2. 從編碼中刪除 priceInfo 應用程式參數。您會在 ThingWorx 中計算購物車的總數,因此不再需要它了。
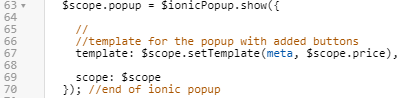
3. 從編碼中移除 priceInfo 後必須將 price 變數變更為 $scope.price,才可以透過編碼存取它。此外,也可以從條件語句中移除 $,因為稍後會在快顯本身的文字中及標籤篩選器中新增它。
a. 在快顯的範本中,將 setTemplate 的 price 輸入變更為 $scope.price,以用於新範圍。
//
// call the setTemplate function to popuplate the template
template: $scope.setTemplate(meta, $scope.price),
b. 導覽至 setTemplate 函數。在 addTo 變數中,新增一個 $ 到變數,以在零件可用的情況下,於價格前顯示貨幣符號。
//
// if price != unavailable, define an add to cart button and have the price displayed in the popup, if it is unavailable, just display price
var addTo = price != 'UNAVAILABLE' ? '$' + price + ' </div><div class="btnadd" ng-click="hiliteOff();popup.close();addToCart();">Add to Cart</div>'
: price ;
4. 向上捲動至 addToCart 函數。
a. addToCart 服務的函數與 addToCart 函數相同,因此,請移除函數的整個內文,使其看起來就像下面的編碼。
//
// function for adding a selected part to the cart
$scope.addToCart = function () {
} //end of addToCart function
b. 使用 triggerDataService 函數從 ThingWorx 呼叫 addToCart 服務。針對 pid、qty 和 price 輸入使用以下變數。
//
// call addToCart service from ThingWorx
twx.app.fn.triggerDataService('cartThing', 'addToCart', {pid: $scope.meta.partNumber, qty: 1, price: $scope.price});
5. 移除整個 clearCart 函數,因為其已在 ThingWorx 中被轉換為服務。
6. 移除用來建立 cartLabel 應用程式參數和 cart 物件的編碼,因為已不再需要他們了。
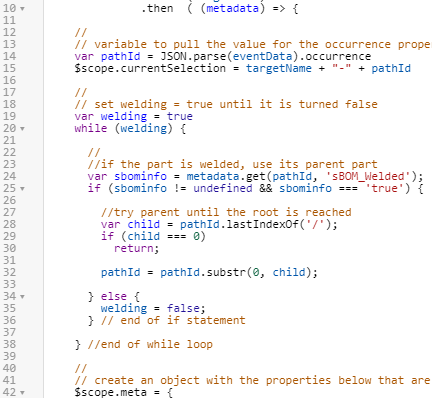
7. 為存取 electronics 組合零件的定價資料,您必須新增邏輯以於結構中將出現位置資料提高一個層級。這可讓您在按一下「PCB」或「電池」時,在快顯視窗中顯示有關 electronics 零件的資料。
a. 在 $scope.meta 上方直接新增下列程式碼:
//
// variable to pull the value for the occurrence property in the eventData JSON object from the model. Create variable for the currently selected part
var pathId = JSON.parse(eventData).occurrence
$scope.currentSelection = targetName + "-" + pathId
//
// set welding = true until it is turned false
var welding = true
while (welding) {
//
//if the part is welded, use its parent part
var sbominfo = metadata.get(pathId, 'sBOM_Welded');
if (sbominfo != undefined && sbominfo === 'true') {
//try parent until the root is reached
var child = pathId.lastIndexOf('/');
if (child === 0)
return;
pathId = pathId.substr(0, child);
} else {
welding = false;
} // end of if statement
} //end of while loop
上述編碼的運作方式如下:
▪ 會建立名 welding 為的變數,而它會觸發 while 迴圈。
▪ 在 while 迴圈內,會建立名為 sbominfo 的變數。sbominfo 變數設定為 sBOM_Welded 屬性。如果 sbominfo 中含有資訊且 sBOM_Welded 屬性含有 true 的值,則出現位置的索引會將層級復原一級,回到所選零件的父項零件。
▪ 換句話說,由於 electronics 被視為 PCB 與電池的父零件,每當選取 PCB 或電池時,出現位置路徑 (pathId) 就會變成 electronics 零件的路徑。如果所選零件沒有 sBOM_Welded 屬性,則 welding 會被設定為 false,且 while 迴圈會結束。
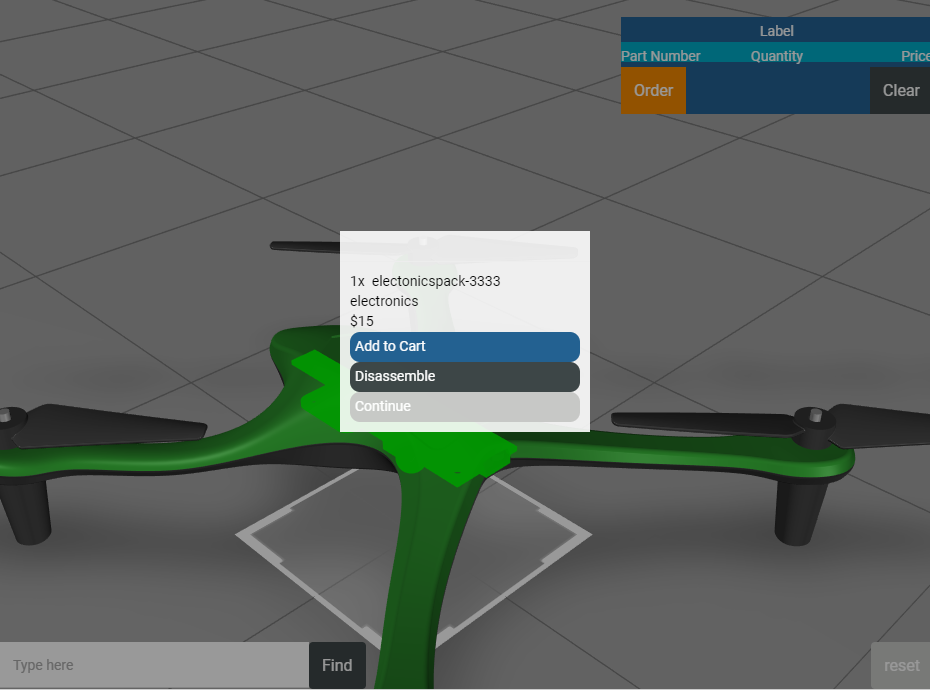
b. 欲查看其運作方式,請按一下「預覽」。按一下 PCB 的結尾。您會注意到快顯視窗現在有電子組合零件的零件名稱、顯示名稱與價格。在之前,並不會顯示任何價格,且快顯視窗中顯示的是 PCB 的資訊。