從模型中將屬性新增至快顯視窗
成功建立 Ionic 快顯視窗之後,您可以在此專案的
3D-導件服務指示 101 部份的 Creo Illustrate 中,新增針對模型建立的屬性中繼資料。這可透過 PTC 使用 8.5.13 中繼資料 API 來達成,此 API 現已包含在
Vuforia Studio 的版本及更高版本中。
|
|
如果您要比較您的進度與此部份的完整編碼,您可以在 GitHub 中的 附錄 5 中找到它。 |
1. 使用 PTC 中繼資料 API 為模型從 JSON 資料呼叫屬性。此版本的 API 使用一種 .then 的方法,在模型有中繼資料時,此方法可使用回呼函示來擷取資料。
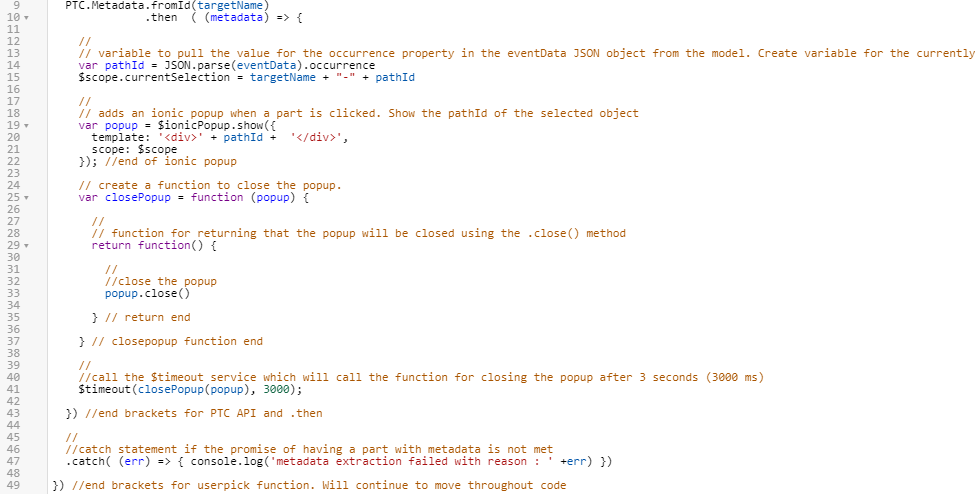
a. 導覽至 Home.js,並在 userpick 函數下方直接新增下列編碼:
//
//Look at model and see if it has metadata. If it does, then execute the below code and create an object called metadata
PTC.Metadata.fromId(targetName)
.then ( (metadata) => {
b. 選取 12-41 行,然後按一下縮排按鈕來使它們縮排。這些行會被放在上述 PTC API 內,因為它們取決於 Promise 的成功與否。
c. 將下列編碼新增至第 43 行,以在 PTC API 函數上新增支架。這可確保沒有錯誤或未完成的行。
}) //end brackets for PTC API and .then
//
//catch statement if the promise of having a part with metadata is not met
.catch( (err) => { console.log('metadata extraction failed with reason : ' +err) })
2. 從中繼資料屬性中發現資料需要 PTC 中繼資料 API 的
get 函數。呼叫
metadata.get 會擷取模型的所有中繼資料,在此情況下,會由在 Creo Illustrate 中新增之零件的屬性所組成。使用
pathID 變數 (包含零件的出現位置資料) 會導致
metadata.get 函數為所選零件編制索引資料。如需中繼資料 API 函數的完整清單,請參閱
將 CAD 中繼資料整合至體驗中。此函數可用來取得下列變數的值:
◦ 零件的顯示名稱
◦ 指示名稱
◦ 零件編號
在 $scope.currentSelection 變數下方新增下列編碼:
//
// create variables based on attribute names from Creo Illustrate for this model. use metadata.get to obtain the data from the JSON properties for this occurrence.
var partName = metadata.get(pathId, 'Display Name');
var instructionName = metadata.get(pathId, 'illustration');
var partNumber = metadata.get(pathId, 'partNumber');
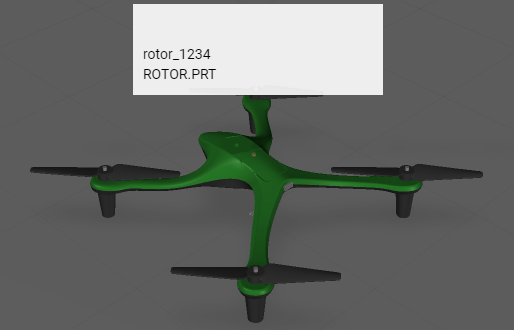
3. 變更快顯的 template 內容的定義。現在,屬性資料已匯入至 Vuforia Studio,按一下 Ionic 快顯視窗應該會顯示 partNumber 和 partName 變數值。註解也已編輯過,以包含更多資訊:
//
// adds an ionic popup when a part is clicked. Show the part number and name of the selected object. </br> adds a line break between the two variables
var popup = $ionicPopup.show({
template: '<div>' + partNumber + ' </br>' + partName + '</div>',
scope: $scope
}); //end of ionic popup
4. 按一下「儲存」並開啟「預覽」來核對新資訊是否已新增至快顯。如果圖像看起來像下面的圖所示,則此步驟已正確完成。


