创建并绑定“播放”和“重置”按钮
在
3D-Guided Service Instructions 101 中,您为模型创建了插图序列,并向与该序列关联的零件添加了插图属性。此属性用于告诉
Vuforia Studio 要在该模型上显示的分解序列。在本体验中,如果所选零件具有关联的插图序列,
Vuforia Studio 将收集此插图属性值,并且为您显示选项用于播放该插图序列。您还将为本体验添加
Reset 按钮以随时重置模型。这些按钮将添加到“体验”的 2D 工作区中。
|
|
如果您希望了解当前的进展,可以在 GitHub 上的 Appendix 6 中找到本部分的完整代码进行比较。 |
1. 导航到“主页”视图并打开 2D 工作区。
2. 翻转 2D 工作区的方向。
| 建议正在查看“体验”的用户将手机或移动设备横过来观看。 |
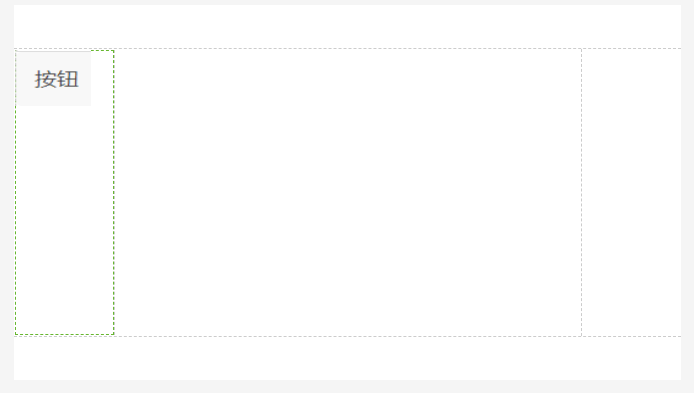
3. 在工作区的左侧面板上添加一个“按钮”小组件。
4. 在按钮的“属性”下,更新以下内容:
◦ “文本”- 删除该字段中的文本,将其留空。
◦ Studio ID - 将其改为 playButton。
◦ 单击“单击”事件旁边的 JS 并输入 playit()。这样会将此按钮与 Home.js 中的函数(将在后续步骤创建)进行绑定。
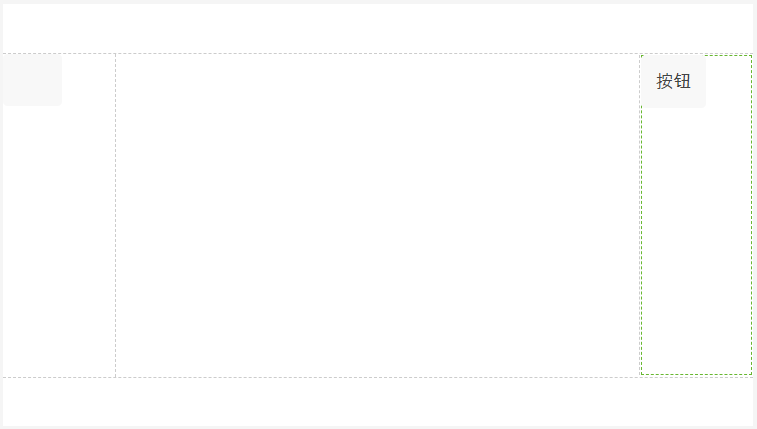
5. 在右侧面板上添加另一个“按钮”小组件。
6. 在按钮的“属性”下,更新以下内容:
◦ “文本”——将其改为“重置”。
◦ Studio ID——将其改为 resetButton。
◦ 单击“单击”事件旁边的 JS 并输入 resetit()。这样会将此按钮与 Home.js 中的函数(将在后续步骤创建)进行绑定。
7. 之前,您曾创建了 Ionic 弹出窗口来显示给定零件的名称和零件号。某些零件还将具有一个名为
illustration 的属性,该属性已在
3D-Guided Service Instructions 101 中添加。
illustration 属性包含之前在 Creo Illustrate 中创建的动画序列的名称。序列是执行特定过程所需的步骤组合。上载到
Vuforia Studio 的
.pvz 文件中包含序列。
“播放”和
“重置”按钮可让您开始或重置四轴飞行器模型相关序列的回放。
| 本节中的信息仅在为模型正确填充了 illustration 属性后才起作用。任何没有 illustration 属性的零件均无法播放序列。 |
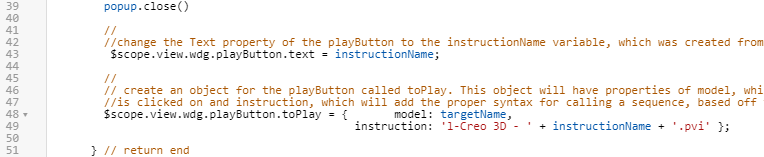
a. 在弹出窗口消失后,playButton 小组件将显示所选零件的序列名称(如适用)。在 closePopup 函数中,将以下代码添加到 popup.close() 运行后以更改 playButton 的“文本”特性并编辑名为 toPlay 的对象(用于存储模型的相关信息)。
toPlay 对象用于存储模型的名称(由 targetName 参数定义)以及模型的插图序列。插图序列会存储为 .pvi文件(包含在通过 Creo Illustrate 创建的 .pvz文件中),然后再随已完成的模型从 Illustrate 导入到 Vuforia Studio 中。这些文件的格式为 1-Creo 3D-(图名).pvi(除非您更改了发布选项,Creo 3D 可能不再是文件格式的字符串)。在本体验中,instructionName 变量中存储的选定零件的插图属性值源自 Creo Illustrate 中的图(用于保存动画序列)。instructionName 值随后会被调用到文本字符串中,用于创建 toPlay 对象的操作说明特性。
//
//change the Text property of the playButton to the instructionName variable, which was created from the JSON data of the model
$scope.view.wdg.playButton.text = instructionName;
//
// create an object for the playButton called toPlay. This object will have properties of model, which will be the name of the object that
//is clicked on and instruction, which will add the proper syntax for calling a sequence, based off the instructionName variable, into Studio
$scope.view.wdg.playButton.toPlay = { model: targetName,
instruction: 'l-Creo 3D - ' + instructionName + '.pvi' };
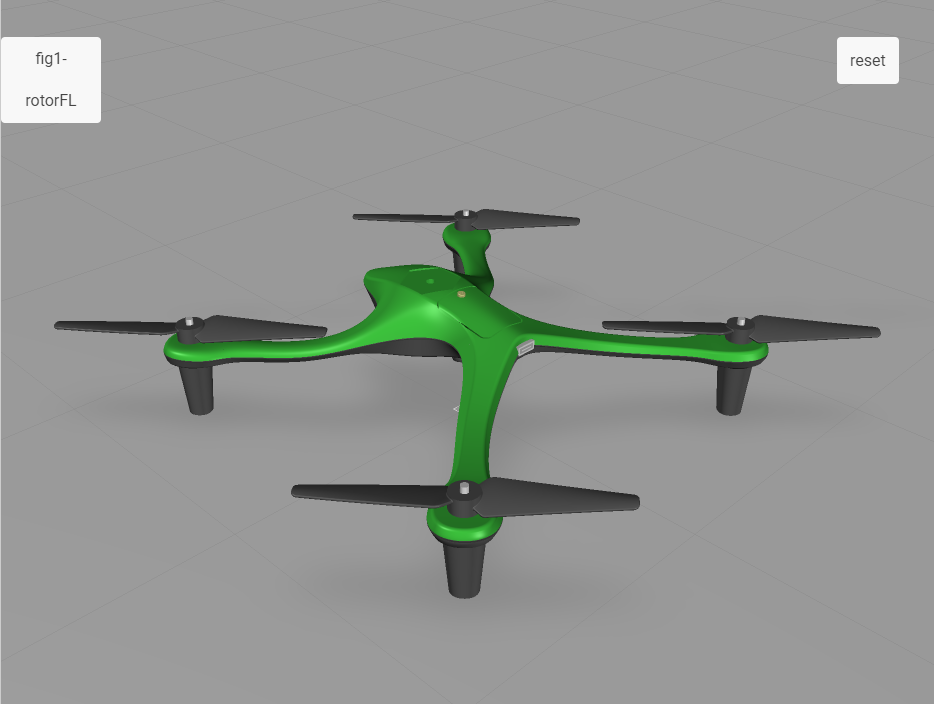
b. 单击“预览”。在预览选项卡打开后,单击四轴飞行器的左前转子(在其显示时)。弹出窗口消失后,您会注意到 playButton 的变化。在其他零件上尝试此操作,查看有关联序列和无关联序列之间的区别。
c. 现在按钮文本已更改,必须为此按钮绑定一个函数以播放序列。您是否还记得之前我们曾添加过一个名为 playit() 的函数,作为 playButton 小组件的“单击”JS 事件。playit() 函数用于将四轴飞行器模型的“序列”特性值设置为等于 playButton 的 toPlay 对象的 instruction 特性。在此例中,以下代码中的 quadcopter 引用了所添加的模型小组件的名称。
| 如果该小组件的 Studio ID 未在项目初期更改为 quadcopter,则此代码将不起作用,需要更改代码中的模型名称。 |
将以下内容放在代码的底部,因为它是独立于 userpick 的函数。
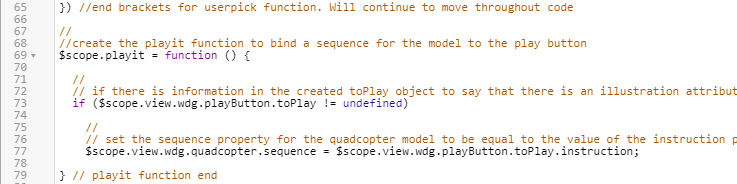
//
//create the playit function to bind a sequence for the model to the play button
$scope.playit = function () {
//
// if there is information in the created toPlay object to say that there is an illustration attribute for the part
if ($scope.view.wdg.playButton.toPlay != undefined)
//
// set the sequence property for the quadcopter model to be equal to the value of the instruction property of the toPlay object
$scope.view.wdg.quadcopter.sequence = $scope.view.wdg.playButton.toPlay.instruction;
} // playit function end
d. 在设置好模型的“序列”特性后,playButton 小组件需要通知序列开始播放。若要完成此操作,可以使用名为 sequenceloaded 的新事件侦听器,并通过小组件服务调用来开始回放序列。像上个步骤一样,模型小组件的 Studio ID 必须设置为 quadcopter,否则将需要对代码进行编辑。在您刚刚创建的 playit 函数放置以下代码。
//
//sequenceloaded event listener triggers when the sequence property is updated
$scope.$on('sequenceloaded', function(event) {
//
// call a widget service to trigger the quadcopter model to play all steps for the given sequence
twx.app.fn.triggerWidgetService('quadcopter', 'playAll');
}); //serviceloaded event function end
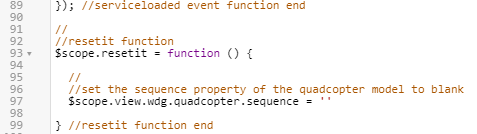
e. 与 playButton 小组件类似,resetButton 也附加了一个 JS 事件,称为 resetit()。该独立函数可将模型重置回原始状态,无论其是正在回放还是已完成序列回放。更新四轴飞行器模型的“序列”特性,将其保留空白即可实现此操作。将以下代码放置在 sequenceloaded 事件侦听器下方。
//
//resetit function
$scope.resetit = function () {
//
//set the sequence property of the quadcopter model to blank
$scope.view.wdg.quadcopter.sequence = ''
} //resetit function end
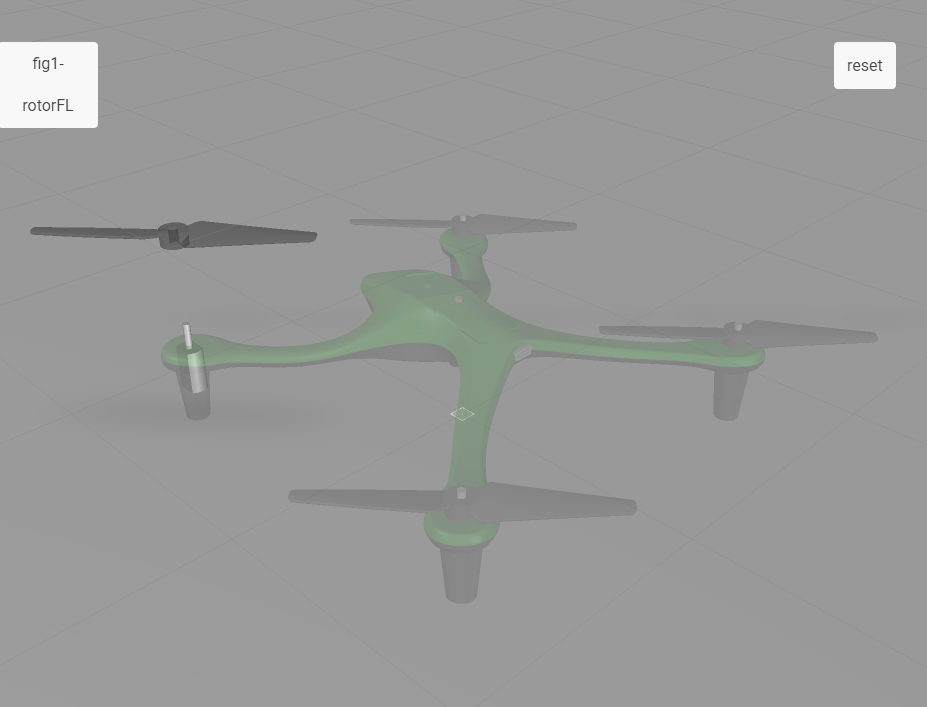
f. 在将所有代码添加到 Home.js 之后,单击“预览”。预览选项卡打开后,单击左前转子。如果成功完成了此部分内容,系统会弹出窗口,且播放按钮上会填充文本,单击按钮即会开启维修序列。