突出显示零件
此体验使用动态结构来选择模型上的零件。在 Vuforia Studio 上下文中,这意味着模型的零件可以单独选中,而无需用“模型项”来分离零件。使用 tml3DRenderer(基于 WebGL 的 Vuforia Studio 呈现器)和具体值数据可为用户提供一组服务来根据节点 ID 更改 3D 组件,从而允许基于用户选择的零件进行动态更改。
此功能使模型更具交互性,无需将小组件添加到体验中。选定的零件不应仅显示 Ionic 弹出窗口及其零件信息,还应突出显示。本节将介绍如何使用 JavaScript 代码和 TML 文本小组件创建着色器。
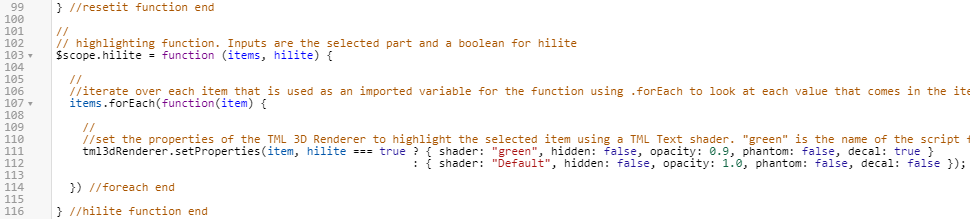
1. 在 Home.js 中,必须创建用于突出显示零件的新函数,名为 hilite。此函数的输入参数为 items(选定的零件)和 hilite(用于确定零件是否要突出显示的布尔值)。在函数的内部,tml3DRenderer 对象会被编辑,结果对应于将在下一步中添加的“TML 文本”小组件。
tml3DRenderer 对象会调用 .setProperties 服务来设置对象的特性。此服务引入应突出显示的项,然后检查已输入到函数的布尔值 hilite 是否为 True。? 条件运算符用于评估 hilite 为 true 还是 false,然后根据结果返回一组对象特性。如果 hilite 为 true,则将为对象设置以下特性:{ shader:"green", hidden:false, opacity:0.9, phantom:false, decal:true }。在此例中,green 是要添加到下一步的“TML 文本”小组件的指定名称,因此这一行代码将调用要激活的“TML 文本”小组件。如果 hilite 为 false,则 {shader:"", hidden:false, opacity:1.0, phantom:false, decal:false} 将设置为特性,通知零件沿用其默认视图。函数的这一部分使用 WebGL 编辑 Vuforia Studio 的图形界面。在添加“TML 文本”小组件之前,此代码不会突出显示选定的零件。
//
// highlighting function. Inputs are the selected part and a boolean for hilite
$scope.hilite = function (items, hilite) {
//
//iterate over each item that is used as an imported variable for the function using .forEach to look at each value that comes in the items input
items.forEach(function(item) {
//
//set the properties of the TML 3D Renderer to highlight the selected item using a TML Text shader. "green" is the name of the script for the TML Text.
tml3dRenderer.setProperties(item, hilite === true ? { shader: "green", hidden: false, opacity: 0.9, phantom: false, decal: true }
: { shader: "", hidden: false, opacity: 1.0, phantom: false, decal: false });
}) //foreach end
} //hilite function end
2. 在“项目”窗格中,回到“主页”以查看 3D 工作区。将“TML 文本”小组件拖放到工作区,然后将小组件的 Studio ID 更改为 shaders。
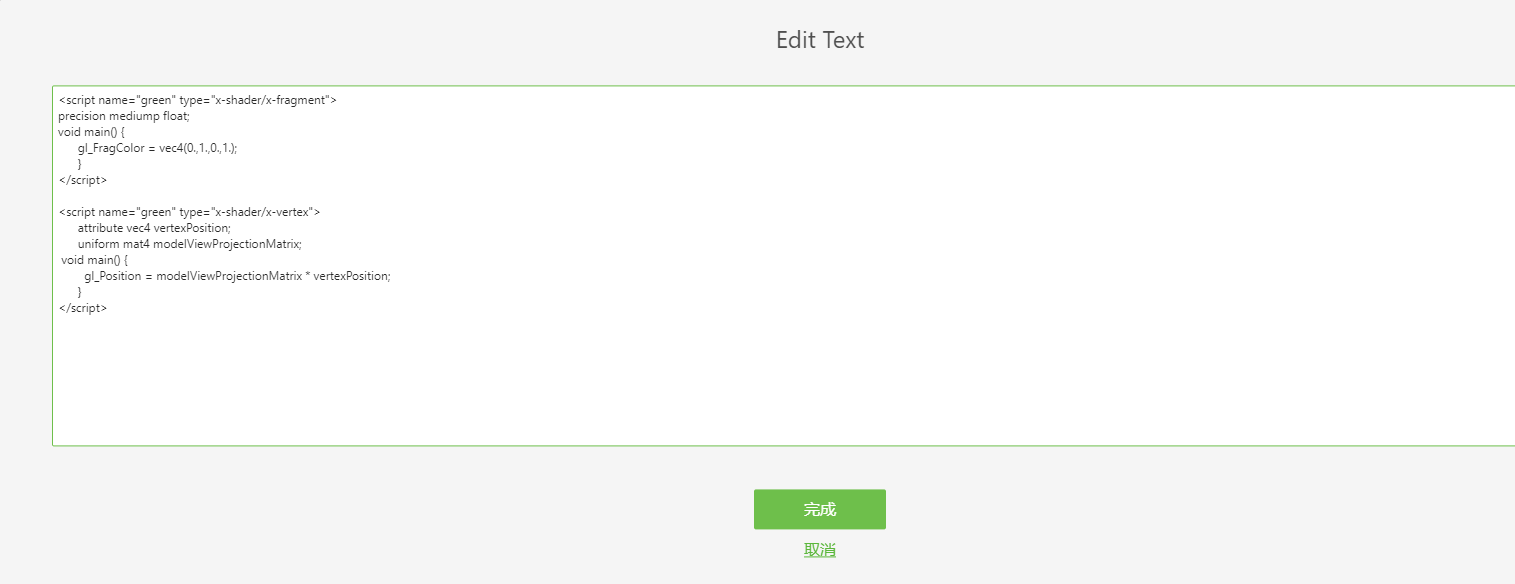
3. 单击“文本”特性旁边的绿色编辑图标以打开“编辑文本”框,仅输入下面的代码。不输入备注。完成后,单击“完成”。
此代码将允许在脚本中调用函数时应用着色器。
| 备注仅用于解释此上下文中的代码。如果备注包含在代码中,它们将显示在屏幕上。 |
//name of the shader is green, the type is setting the color.
//
<script name="green" type="x-shader/x-fragment">
//
// setting the precision of the shader. medium is fine for this application.
precision mediump float;
//
// function to set the color of the shader. Syntax is vec4(R, G, B, A) format and the values are on a 0.0-1.0 scale
void main() {
gl_FragColor = vec4(0.,1.,0.,1.);
}
</script>
// name of the shader is green, this time the type sets the position
<script name="green" type="x-shader/x-vertex">
attribute vec4 vertexPosition;
uniform mat4 modelViewProjectionMatrix;
//
// sets the position of the vertex
void main() {
gl_Position = modelViewProjectionMatrix * vertexPosition;
}
</script>
4. 函数设置完毕后,将其添加到单击零件时调用的代码中。在弹出窗口后的 userpick 函数中添加下面的代码。
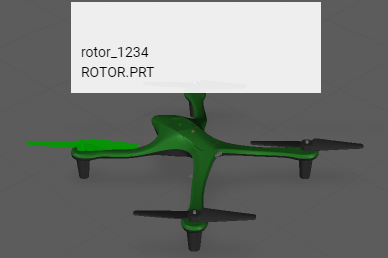
这段代码使用先前创建的 currentSelection 变量来确定哪个零件被点击,具体实现方法是输入选定的模型的名称以及模型中所选定的零件实例来确定突出显示的部分。例如,如果选定了左前转子,[$scope.currentSelection] 会变为 [quadcopter + “-“ + /0/18/0/0],或 quadcopter-/0/18/0/0(如果字符串被写出)。True 表示将布尔值设置为 true,以应用突出显示着色器。
//
//highlight the chosen item and set the shader to true
$scope.hilite([$scope.currentSelection], true);
5. 单击“预览”以确保着色器正常工作。如果在单击时零件变为绿色,则表明着色器已成功添加。
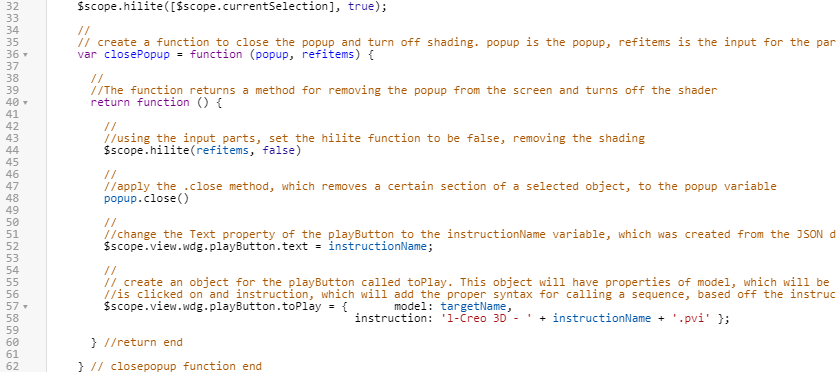
6. 请注意,弹出窗口消失后,着色器不会消失。要使着色器消失,refitems 必须作为输入参数添加到 closePopup 函数,用于确定要从中移除着色器的零件。随后,closePopup 函数中将使用 false 的布尔值输入以及 refitems 输入来调用 hilite 函数,以关闭选定零件的着色器。这段代码还将添加到 Home.js 的代码中,以使着色器在同一函数中消失。
| 请确保将 refitems 作为新输入添加到 closePopup 函数中。否则,体验将不会按预期运行。 |
将附加代码添加到现有 closePopup 函数:
//
// create a function to close the popup and turn off shading. popup is the popup, refitems is the input for the part(s) that is being highlighted
var closePopup = function (popup, refitems) {
//
//The function returns a method for removing the popup from the screen and turns off the shader
return function () {
//
//using the input parts, set the hilite function to be false, removing the shading
$scope.hilite(refitems, false)
//
//apply the .close method, which removes a certain section of a selected object, to the popup variable
popup.close()
//
//change the Text property of the playButton to the instructionName variable, which was created from the JSON data of the model
$scope.view.wdg.playButton.text = instructionName;
//
// create an object for the playButton called toPlay. This object will have properties of model, which will be the name of the object that
//is clicked on and instruction, which will add the proper syntax for calling a sequence, based off the instructionName variable, into Studio
$scope.view.wdg.playButton.toPlay = { model: targetName,
instruction: 'l-Creo 3D - ' + instructionName + '.pvi' };
} //return end
} // closepopup function end
7. 将 closePopup 函数的目标更新为选定的零件。
$timeout(closePopup(popup, [$scope.currentSelection]), 3000);
8. 单击“预览”再次查看体验。如果着色器在弹出窗口消失后消失,则表明此步骤成功完成。
9. 请确保项目已保存,使其可重复用于后续“3D-Guided Service Instructions 202”部分。