Execute InfoEngine Task
Use this action to execute an InfoEngine task configured on the Windchill instance. This action supports two types of InfoEngine tasks:
• In-built Task—Out of the box connector tasks available with Windchill installation
• Custom Task—Customized tasks which you can create
|
|
The InfoEngine task has to be "HTTP access enabled" in the task definition. This allows the task to be called from the ThingWorx Flow action.
|
InfoEngine provides data and integration capabilities to access Windchill data, remote Windchill systems and non-Windchill data and services through adapters. InfoEngine components can be used in different software and hardware configurations to meet your business requirements for accessing, managing, and presenting data from different information systems.
Using the Execute InfoEngine Task Action
To use this action in your workflow, you need to connect it to ThingWorx Flow. To connect to a flow, do the following:
1. Drag the Execute InfoEngine Task action under the Windchill connector to the canvas, place the pointer on the action, and then click  or double-click the action. The Execute InfoEngine Task action window opens.
or double-click the action. The Execute InfoEngine Task action window opens.
2. Edit the label name, if needed. By default, the label name is same as the action name.
3. To add a connection, refer to the section Adding a Connection in the Windchill connector topic. The default value is Basic.
If you previously added a connection for Windchill, select a connection from the list. |
4. Select an Info Engine Task Type from the list:
◦ In-built Task
◦ Custom Task
5. In the Info Engine Task Name field, select an Info Engine task name.
Selecting the In-built Task Type
1. In the Info Engine Task Name field, select an Info Engine task name, and then enter the following information:
◦ Multilevel_Components—Fetch the part list information
Enter the parameters information that appear on the form.
◦ Query—Fetch the metadata information
1. Enter the Parameters information that appear on the form.
2. Click Add to enter the value for the propertyNames.
2. Click Done.
Selecting the Custom Task Type
1. In the Info Engine Task Name field, enter the path for the custom task in Windchill.
2. Click + to view the additional fields. The Parameters field appear.
a. Click Add to enter the parameter name.
b. In the ValueSet field, click Add to enter the collection of values.
Click Add to enter multiple Value Sets.
Click Add to enter multiple parameters.
3. Click Done.
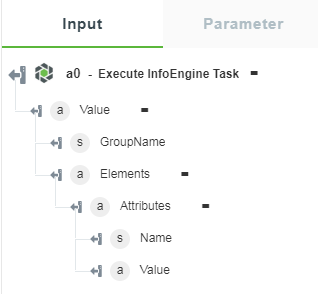
Output Schema
The Execute InfoEngine Task action returns a fixed output schema. See a sample output schema, when you select the Custom Task type in the figure that follows: